Turning with Temple: The Order of Cuts on a Fluted Antique Screw-Driver Handle
by Temple Blackwood
Castine, ME
Note: click on any picture to see a larger version.
The Order of Cuts
One of the first important lessons I learned while turning long, thin balusters, emerged from the frustration of breaking a number of spindle blanks, typically after I had put a fair amount of time into the turning and was nearing completion. The lesson rivals the famous "measure twice; cut once" advice, and expands the generalized guidance about the importance of planning a project fully before beginning it, guidance so hard to understand as a teenager but remarkably sensible to those of us who are senior citizens. My middle son is known to have told one of his friends that "When Dad gives me advice about how to do something, I generally ignore it and try to do the project my own way. When that does not work, I try to think of other ways to do it. When those do not work, I cave in and do it Dad's way – which, darn it, too often turns out to be the best way!" Now that this fine young man has reached middle-age, he is now giving out the advice he used to be so quick to discard.
This critical lesson itself involves carefully planning the "Order of Cuts" in a project as part of the planning project. When faced with a long, thin, detailed spindle or even with such a simple (looks can be deceptive) and familiar object like a baseball bat, there are several "best practices" rules to keep in mind:
-
Position the greatest mass of weight by the headstock (power);
-
Turn each of the larger diameter details first starting on the right (tailstock) and working left BEFORE you begin the next smaller size details;
-
Turn the smallest diameter detail LAST and consider that you might need to sand the other details before you complete and sand this detail.
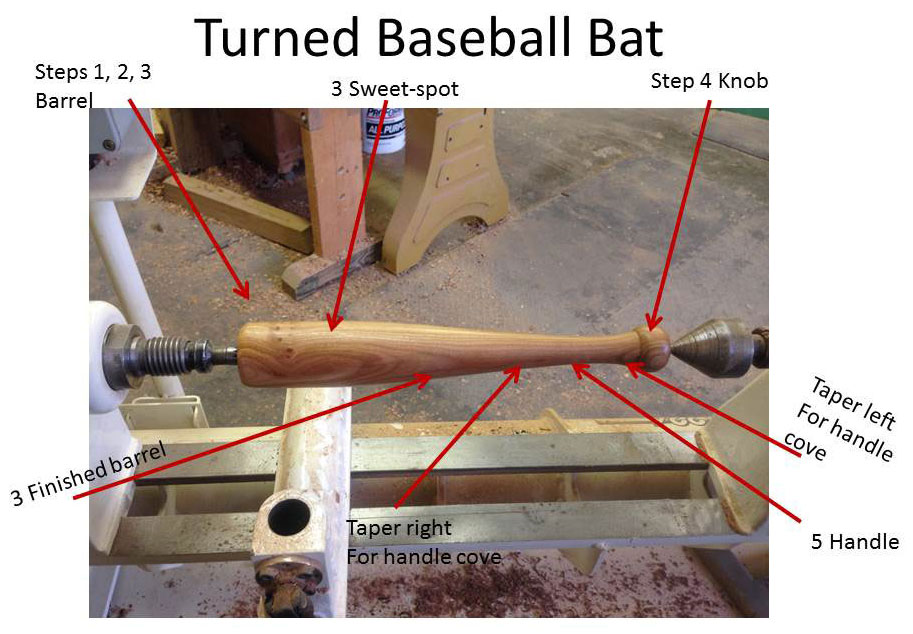
One simple example of this would be baseball bat turning for which the Order of Cuts should follow this sequence:

|
(Click picture to enlarge)
|
-
Turn the blank to a cylinder slightly larger than the final barrel diameter and establish waste blocks on each end. The barrel will be on the left (headstock) and the handle's knob will be on the right (tailstock);
-
From the half-way point of the cylinder, taper to the right of the blank down to slightly larger than the diameter of the knob on the far right by the tailstock;
-
Return to the left to finish and smooth the largest portion of the barrel using the skew chisel. Remember that the bat tapers from the sweet-spot (ideal spot to hit the ball) slightly to the left with a rolled half-bead on the top (far left) end. The sweet-spot to the right tapers gently to ultimately become the handle, but stop working when you get to the diameter size of the knob and leave the handle shaping for last;
-
Move to the right to shape and finish turn the knob including the small shoulder cut. Next reposition to cut the handle itself;
-
Essentially the handle is a long, shallow cove with a short side from the knob and its shoulder and the longer side blending the barrel into the handle and a flat, smallest (and last turned) cylinder big enough for both hands.
Notes: The proper dimensions and weights (legal) for different kinds of bats may be found in many places, but the critical points of this description involve turning in this order. This is an excellent exercise in both use of the skew chisel and tapers and design. Much of the weight and shape can be adjusted by increasing or reducing the taper connecting the barrel and handle. A longer barrel with a steeper taper will produce a heavier bat.
Another example of the importance of planning the
Order of Cuts
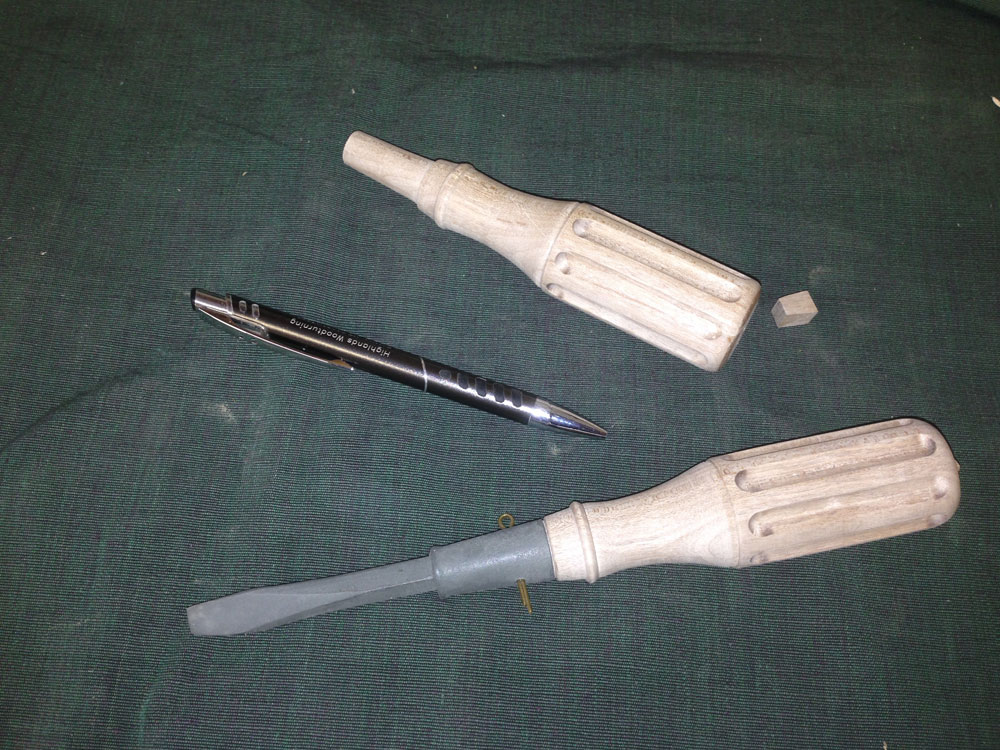
as part of the pre-turning planning came from a recent commission I received via the Internet to replicate an obsolete fluted antique screw-driver handle. This project offers itself as a model exercise in carrying out a successful application, and unless you already have an existing antique screw driver blade with a square shank, you might need to find one or make one before you begin.
This project originated when I received an email request from Jerry A (used with permission):
12/8/2013 -- I have a relatively rare wood handle screw driver which needs a new fluted wood handle turned. I have the screwdriver with a non fluted handle and the original drawing of the original handle. Is it possible for you to make a new handle? Thanks jerry a Tilghman, Maryland
I responded that I would be interested in trying to help him and received the following:
Temple, I've attached an image of the blueprint which was taken off the web. I have no time line for reproducing the handle(s). If it's relatively easily in the setup to do two handles, I would like to have a second one. The square metal part of the screwdriver comes through the end of the wood so I assume we would need to cut out the square inner recess and temporally bond the two halves together while it is turned.?? Let me know what you think and an estimated cost. Thanks jerry a
As promised, this message included an attachment of the image which as you will see shows it to be part of an original Ford Motor Company Tool Kit Screw Driver that I later learned was part of Jerry's restoration project:
I made a best guess at what this might cost Jerry for the pair of handles, and he sent along one of the actual steel screw driver blades and ferrule asking me to proceed.
The
Order of Cuts
for this project is actually the sequence of activities from start to finish.
Screwdriver is finished with a second handle. Maple turned out to be the best given the various construction issues. I believe you will find it worthy of either varnish or paint- your preference.
The unfinished bill is in the box, incomplete because I was not sure of shipping charges which are now included in the attached bill. The box will leave Castine USPS at noon today.
Thanks for your patience and for the opportunity to put that lovely old blade and ferrule to right.
The "rest of the story" … or … things do not always work out the way you plan in spite of careful planning…Jerry A responded almost immediately via email and by sending me a check for the completed work. Then we both waited and waited and waited. While it is true that Castine, Maine is off the beaten path and it occasionally takes a week for first class USPS mail to find its way between my shop and my son who also lives on the Eastern Shore of Maryland, after two full weeks of waiting, Jerry and I emailed our mutual concerns, and we both went to our respective local USPS offices with the tracking number that I had and had supplied him with. We learned that he could do nothing, and that I would have to wait a full 15 business days before we could put out an official tracking inquiry. I did this on the fifteenth day with the help of my very responsive local Postmistress (they take pride in their work), and we soon learned that the package had arrived and been scanned into a New Hampshire facility but there was no record of it going out. It also did not appear to be there. According to the USPS procedures, on the 30th day they can refund the postage. Given the small size of the package, I had not tried to insure it beyond the typical minimum all postal items receive. My local Postmistress was nearly as upset as I.
On the 29th day, knowing that Jerry had given up hope and almost resigned to asking Jerry to send me his other screw driver blade so I could replicate the handles for his project, I receive the following message from him:
04/10 -- Temple, Can't believe it - the package just arrived!!! The handle turning is beautiful. Really appreciate it. Thanks jerry
You can email Temple at
temple@highlandswoodturning.com
Take a look at Temple's Website at
http://www.highlandswoodturning.com/.