by Steven D. Johnson
Racine, Wisconsin
(Page 2 of 4)
Previous Page
1
2
3
4
Next Page
Measuring & Marking Out Desk Joints
In the theoretical world, engineers, architects, and designers can conceptualize and design
200-story skyscrapers and intricate furniture joinery and never dirty their hands, boots, or tools.
In the real world we build, refine, and build again. We start down a path, change direction,
sometimes scrap our ideas and plans completely and start over. We sketch, we build models, and we
build mockups. We test, tinker, and fret over details. Sometimes we win and sometimes we lose.
But, we toil on simply because, as I oft repeat, it's the journey, not the destination.
After finishing the
preparation for the leg stock
(also see last month's videos, Part 1 and Part 2) , the challenge facing me was to cut aprons and stretchers and matching mortise and tenons, with no
real design to follow. Instead of building a mockup, I decided on a "life size" drawing. Two
birds, one stone, you know… I figured a full size drawing might eventually serve as template stock,
too.
A trip to the local big box netted me a 1/2" piece of MDF that I had them rip to about 30 -1/4" by 97"
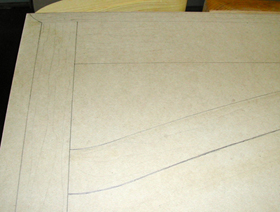
(yes, a sheet of MDF is actually 97" long). On this sheet, I started to draw a rear view of my new
desk in full size. Why a rear view? Because what I call the front, or "user side," of the desk
will not have an arched stretcher, and that was the component that was causing my mental duress.
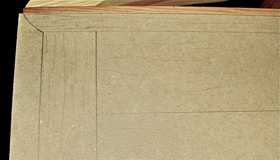
Drawing in the top, the apron, and the square legs was easy. I referenced off the factory edge
of the MDF, since the rip cut was not straight (it seems they never are). There were a few
dimensions of which I was sure. The leg stock was a "known" and previously I had determined the
desired finished height (30"), length (76"), and depth (29") of the desk. The width of the
stretchers and aprons, however, was another story. I resorted to using a little math and the Golden
Ratio, and decided to make the aprons 4 3/16" wide. This should leave me with almost 25" of legroom
(height) when seated at the desk. With an intended 1" overhang on the top, the frame outside
dimensions would need to be 27" X 74". These dimensions and the fabricated leg stock established
the lengths for the aprons and stretchers. With this all drawn in, the next debate became how wide
to make the arched stretchers.
I played with math for an hour, calculating every conceivable permutation of the Golden Ratio,
then started getting really weird, thinking about the "effective" or "apparent" width of the apron...
'Let's see, there is a one inch overhang so when standing at six feet, the viewing angle will be
approximately 45 degrees, therefore about 1/2" of the apron will not be visible, reducing the
"apparent" width to 3-11/16"' --- my head was spinning. In the end, I decided to draw in the arched
stretcher the same width as the top stretcher. Drawing an arch that size presented a new set of
challenges, and after I was finally done, I looked at the finished drawing and decided that the
stretcher was too wide. I redrew it the same width as the legs, and it looked much better. All
this took longer than preparing the leg stock!
Drawing a huge curve required some improvisation. I have trammel points, but they were purchased
at a discount tool store, and they are lousy – soft metal, bad clamping action, dull points, crummy
pencil holder. Take my advice, spend a few extra dollars and get some
good trammel points at Highland. How many times have I wasted good money by trying to save money?
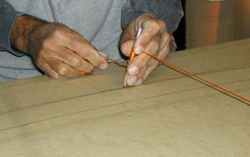
No compass I have could draw a part of a circle as big as I needed, so I decided to resort to the
old tried and true nail-string-pencil trick. First, I needed a starting point for the correct size
radius.
Calculating the radius is actually pretty simple. Here's the formula:

I wanted the arc to start about 1" from each end of the visible portion of the stretcher, so I
measured the distance between the legs, subtracted 2" and rounded a bit, and determined that my arc
should be 67" long. The height of the arc, from where it joins the leg to where it will "kiss" the
bottom of the apron is 6 3/16". So here is the math:
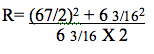

A construction calculator makes it easy to do the math, since you can enter in fractional
dimensions or decimal equivalents interchangeably. The radius of the arc will need to be (1122.25 +
38.285156) ÷ 12.375, or 93.78 --- just call it 93 3/4" --- close enough for jazz, as they say. So,
93 3/4" from pivot point to pencil point was the needed radius.
I could have rigged up some sort of frame or a long piece of wood at a right angle to the MDF,
but in the end, my portable thickness planer provided the answer as to how to draw a circle that
big. The unit is on a cabinet with locking wheels, and one of the corner posts would be the perfect
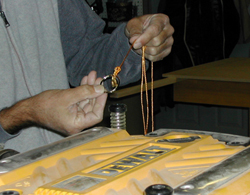
pivot point for my string and pencil. I tied a string to an oversize key ring, dropped the key ring
over the post, positioned the planer's corner 93 3/4" from the apex of the arc, locked the wheels,
and drew a semi-perfect semi-circle. Necessity really is the mother of invention!
My next step will be to prepare the wood and pick out which boards to use in which locations.
After that, I can transfer the drawing of the curved stretcher and cut it out on the band saw. Then
I can use the same full size drawing and draw in the end stretcher using one end of the original
drawing. Here's a
video showing the process in action.
(Page 2 of 4)
Previous Page
1
2
3
4
Next Page
Return to
Wood News
front page