Build an Improved Marking/Cutting Gauge
by Chris Black
Click on any picture to see a larger version.
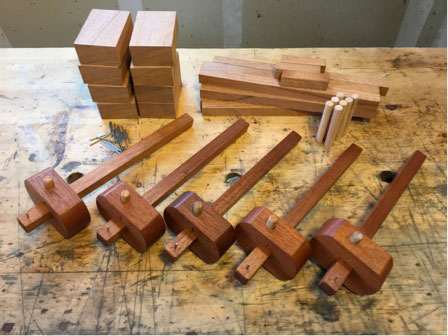
Most of us would agree that an adjustable fence gauge is an essential layout tool for fine woodworking. Of course you could do most tasks with other tools, but it's hard to beat the convenience of a gauge for marking dovetail depths, tenon shoulders and molding reveals. Typically gauges are divided into two categories: cutting and marking. Cutting gauges generally have a knife-like cutter that works brilliantly across the grain but tends to wander off course when going parallel. A marking gauge usually sports a pencil-like point that marks well along the grain but badly scratches wood across the grain. Most folks wind up with one of each type or purchase a metal, wheeled gauge. The type machinists use. They do a decent job at both tasks.
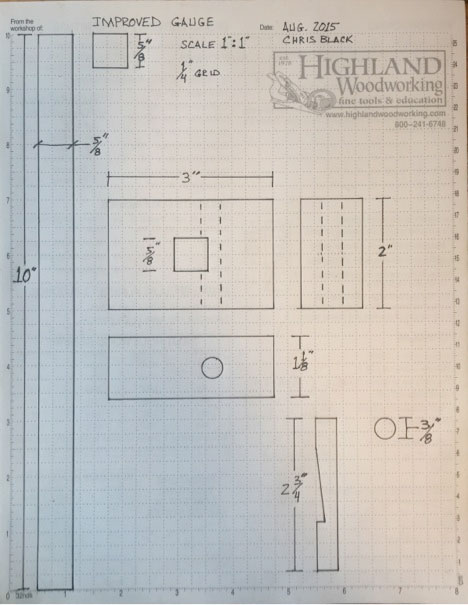
This gauge employs a unique cutter that works similarly to a wheeled cutter, but in a traditional wooden frame. Good looking to boot. The best part may be the captured cam- lock that secures the beam with just one hand. You can see how handy this is if you've ever tried to hold a work piece with one hand, a gauge in the other and tighten the lock-screw on most gauges. I can see you now with a board tucked under your arm, the other hand steadying the gauge and grabbing the screw with your teeth. Awkward at best. So, here's a fairly straightforward, finish in a weekend type of project that you can make from scrap. While the overall design is quite common, I've refined some of the features based on feedback from woodworkers who have purchased them from me over the years. Plus, I've included some rudimentary shop drawings on some
Highland Woodworking Drafting Paper
. Feel free to come up with your own dimensions. I don't mind a bit.

|
You can pick just about any hardwood for the job as long as it's dry and straight. I suggest using something easy to work for your first attempt. Consider using cherry, walnut or mahogany which are all hand tool friendly, but hard enough to endure years of use. You'll need a block 3" long x 2" wide x 1-1/8" thick for the fence. The thickness is important. You'll want enough girth to house the cam-lock and to prevent it from cracking the fence once it's engaged. Also, you don't want the beam wiggling around when it should be fixed in place.
The beam is just a length of 3/4" material ripped and planed to 5/8" square. Obviously, you'll need a piece as long as you want the beam to be plus an extra 2" or so. More on that later. For the cam-lock, I like 3/8" oak dowels. Avoid the softer, more common dowels made of string-cheese mystery wood. They tend to deform over time losing their ability to grip the beam securely.
THE FENCE AND BEAM
Start by roughing out the 5/8" square beam and the 3 x 2 x 1-1/8" fence. While you're at it, cut a few lengths of 3/8" diameter dowel 2-3/4" long. The extra ones are to insure you don't mess up the first one when you start carving on it. As you clean up the fence with a plane or by sanding, check to make sure it's square and parallel on all adjacent sides with a good quality square that you trust. This is important because you're going to layout a through mortise from both faces right in the middle of the fence, and they need to line up. I like to use some graph paper (see shop drawings) to draw two full-size patterns of the fence. I cut them out and paste one on each side of the fence. Then, I mark through paper with a knife onto the wood. Cut on the inside of the mortise lines to make sure the beam fits snuggly. You can always reduce the beam later if necessary.
There are a variety of ways to remove waste for the through mortise. You could always drill a hole through the center and clean up the corners with a chisel. Whether drilling or chiseling, remove waste equally from both sides to ensure there's no blowout from either end. Doing this will guarantee that the beam passes through the fence at a right angle. While this is more of an aesthetic issue, you know that that one woodworking friend will point out the flaw if you don't.
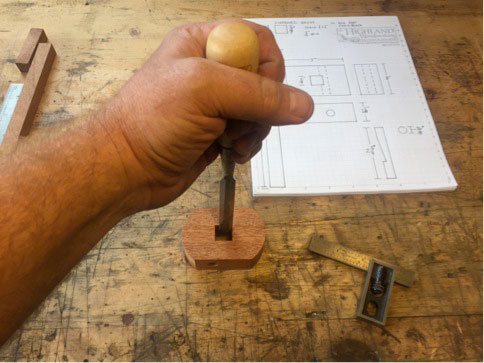
THE CAM-LOCK
The hole for the hardwood dowel cam-lock needs to be drilled perpendicularly to the beam mortise, and it has to pass into the mortise by approximately 1/8". In other words, the dowel must intersect the mortise by 1/8" when it's pushed in. If you're using my drawings, layout the dowel hole as shown. Important! Before you drill the cam-lock hole, insert a short, sacrificial section of the 5/8" square beam material in the beam mortise. This will prevent blowout from occurring inside the mortise. Again, consider drilling from both sides. You may have to sand the dowel to get it to fit. You could also enlarge the hole if necessary with a rat-tail file.
|
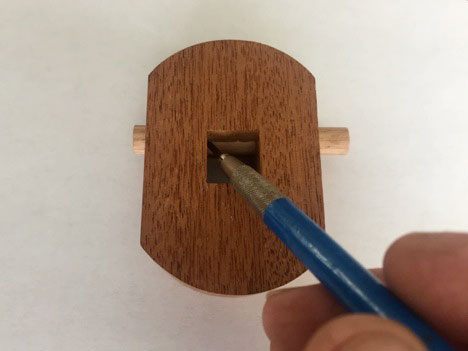
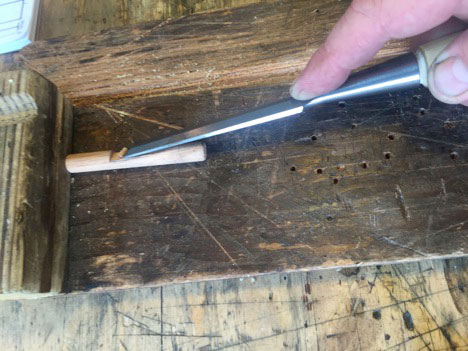
Here's the bit that requires some patience and a bit of trial and error. Don't be discouraged if you mess up a few dowels before you get it right. Remember the extra ones you cut earlier? First, take a look at the drawings to get an idea of what the finished cam should look like. Yours should look similar, but the drawing's scale measurements are approximate because there's no way to account for all the variables that could creep in. Push the dowel into the hole you just drilled. It should poke through the bottom of the fence by about 3/16" and through the top by 9/16". Now, with a very sharp pencil, mark the exposed portion of the dowel on both sides through each side of the beam mortise. Mark along the grain on both sides of the dowel, but only across the grain at the bottom. Leave the cross grain portion of the dowel at the top unmarked.

|
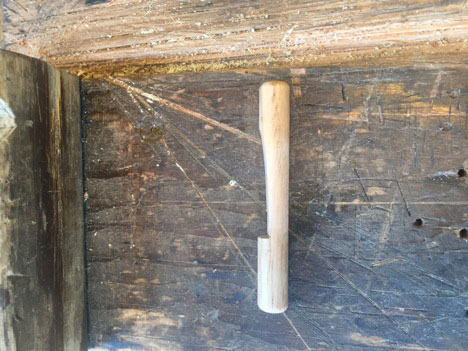
With the dowel removed, take a fine-toothed saw and cut along the cross grain pencil line to the depth of the long grain pencil marks that are on each side. Measure up from the cut you just made 1-3/8" and put a pencil mark roughly parallel to the cut. You will carve away a somewhat parabolic curve (yeah, I had to look that up) from just below the mark to the saw cut. Use a bench hook or similar device to hold the dowel while carving the slope to prevent injury if the chisel should slip.
Once you start getting close to your pencil marks, check your progress by inserting the beam into the mortise to see if it slides by the dowel. Keep removing small amounts of wood from the dowel until the beam just clears it. Once the beam clears the dowel, press down on the top of the dowel to see if it locks.
If you're having trouble carving the dowel, try filing the slope or use a card scraper to shape the curve. It may take some doing before it works for you. Take a break, get some coffee and come back to it. There's no such thing as a woodworking emergency. You can quote me.
THE MARKING/CUTTING PIN
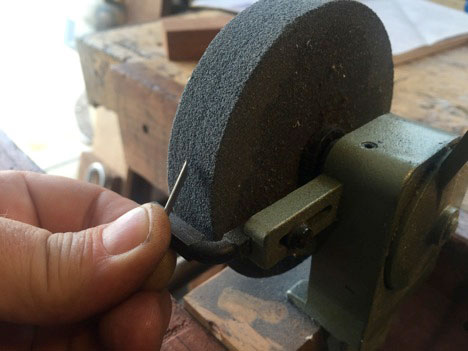
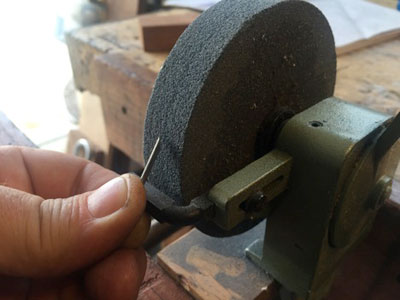
You can make the pin out of anything. I have a friend who uses a finish nail sharpened with a file. I prefer 5/64" round, O-1 tool stock available from mail order supply houses like McMaster-Carr and MSC. The steel arrives annealed or at its softest state. I don't bother to heat treat it because it holds up just fine, and it's easier to shape. Cut it to about 1-1/8" long.
The pin on this gauge works well with and across the grain because of its distinctive shape. By grinding, filing or sanding a flat slope on one side only, you'll create a round, chisel-like edge that slices beautifully in any direction. The finished bevel on the pin should be about 1/8" long. Since the steel is relatively soft, you can refine the edge with a medium diamond stone, a flat file or some 400-600x sandpaper. No further honing is necessary.
|
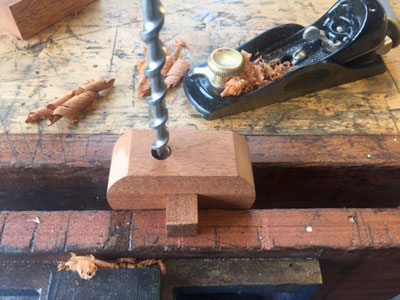
As for attaching the pin to the beam, just drill an undersized hole 3/8" back from the business end of the beam and hammer the pin through. If you're using 5/64" round stock, then a 1/16" bit will work fine. To prevent blowout when hammering the pin through, slightly chamfer or countersink the exit hole. It's also helpful to backup the exit hole with a piece of softwood. Go ahead and hammer the pin through the beam and into the softwood until you're happy with the amount of cutter exposed. Most likely the beveled edge will not be parallel with the fence at this point. Just grip the top end of the pin with a pair of locking pliers and turn the pin until the beveled edge is visually parallel with the fence. The pin is held in place by friction.
CLOSING THOUGHTS
I chose to radius the fence ends on my gauge. Decide on a shape that pleases you. Whatever finish you pick, keep it thin so that the beam slides freely. If you find the beam catches, try coating it with a little wax. Also, I carved a small recess into the face of the fence to protect the pin when not in use. Practice a light touch when using the gauge, and try tilting the fence forward or back when scribing with the grain. It will track better. Please feel free to email me if you have any questions or want further information at
redscabinet@gmail.com
.
Chris Black, a former longtime Highland employee, now spends most days caved up in his wood shop sharpening hand saws, teaching fine woodworking classes, selling antique tools and manufacturing a line of woodworking hand tools. He lives near Raleigh, NC.
Chris would be happy to answer any questions by email at
redscabinet@gmail.com
.
Return to
Wood News
front page