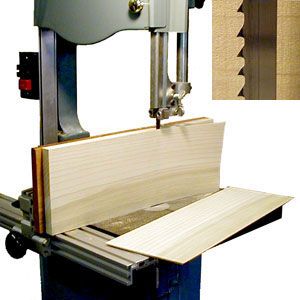
1. Choose the RIGHT BLADE for resawing.
As you saw through very thick stock, each saw tooth shaves out an enormous amount of waste. In order
to maintain a reasonably productive feed rate, there has to be room out of the way for the waste to
occupy until the tooth emerges from the cut. (Otherwise the gullets between the teeth fill up and
stall further advance until they've cleared the stock.) Blades with about 3 teeth per inch (tpi)
have large gullets which can accommodate as much waste as you'll generate by sawing through thick
stock, and they'll handle anything less substantial with no trouble at all. The best choice of all
is our
Wood Slicer
, whose thin-kerf, variable pitch 3-4 tpi design makes it the smoothest and
quietest resaw blade on the market.
Now, how wide should the blade be? In principle, the wider the blade, the higher its beam strength
and the better it can maintain straightness. Wider, however, isn't necessarily better. Almost all
U.S. woodcutting bandsaw blades over 1/2" wide are made of coil stock .035" thick (which by itself
is thicker than the Wood Slicer's TOTAL kerf width – including the width added by the set of the
teeth). Most 3/4" blades are set far more coarsely as well. They more than double the load on your saw,
and they cut so roughly that on medium-sized bandsaws (14" and smaller), they're clearly a step in
the wrong direction. (Consider a 3/4" wide blade only if your bandsaw is an 18" model or larger.)
2. TENSION the blade for optimal performance.
Adequate blade tension helps keep stock centered even if your control isn't flawless, and it reduces
the blade's tendency to flutter under thrust. It's easy to set a satisfactory amount of tension.
Install a Wood Slicer blade on your saw with lateral guides and thrust bearings OPENED UP AND BACKED
OFF both above and below the table so they do not contact the blade. With the saw unplugged, crank
on some tension and then carefully give the blade a sharp sideways poke with your index finger about
halfway between the upper and lower wheels. The blade will deflect a short distance and then seem to
hit a wall; if you push a lot harder it will bend farther, but there's a fairly distinct point where
it quits deflecting easily.
Now add tension until this sideways movement is just 1/4" to 5/16" on saws
with 6" depth of cut, or about 3/8" to 1/2" on saws with 12" depth. By the way, don't look at the
saw's built-in tension gauge until you're finished; there's no need to confuse yourself with
arbitrary numbers. After you've gotten the hang of tensioning by feel, check the gauge and use its
reading as a setup guide when tensioning the blade in the future.
Now track your blade on the upper wheel so the deepest part of the gullet of the
blade is at the centerline of the tire. This usually gives the best results
for the blade to continue tracking well while cutting.
3. Adjust your BLADE GUIDES.
Once the blade is tensioned and tracking properly, there's still some tuning you can do that can
make a real difference in performance. So before you bring the lateral guides and
thrust bearings
up
close to the blade, close the wheel covers, plug in the saw and turn it on. First make sure the
blade tracks well at full speed, adjusting the tracking setting as necessary.
Now observe the blade. If vibration blurs the blade, try increasing or decreasing the tension very
slightly until the blade runs smoothly in a straight, quiet line from wheel to wheel. Cuts will be
smoother when you eliminate this source of fluttering in the kerf, and the saw will run quieter and
more efficiently as well.
Now you're ready to bring your lateral blade guides and rear thrust bearings close to the blade. By
the way, does your saw use traditional steel blade guides, or the more modern roller guides? If it
uses traditional steel guides, do yourself a favor and replace them with
Cool Blocks
, which are
blade guides made of graphite-impregnated phenolic resin. Unlike metal blade guides, they can be
snugged right up against the blade and give you a far more stable and accurately guided cut. Cool
Blocks eliminate friction and heat caused by metal to metal contact so the blade runs smoother,
cooler and far quieter than with metal guides. Best of all, Cool Blocks will pay for themselves
quickly by extending the life of your bandsaw blades.
4. Steering your workpiece: Use a POINT BLOCK to guide your cut.
 Cutting straight lines is easy: you just need to find out how the saw wants to do it, and do it that
way. Every bandsaw blade, unless there's something seriously wrong, can cut straight lines, but each
will do so in its own way. A particular blade has its own "lead angle," which may be different from
"straight ahead." For this reason, if you're resawing just one or two pieces, it may be easiest to
use a point block fence, a curved fence tall enough to hold your stock upright while leaving feed
direction manually up to you. Mark the cut line full length on the stock (leaving a generous margin
for error), set the point block to your target width and freehand the cut, adjusting feed direction
as you go. It's an imperfect technique; you'll waste more wood and spend more time at the thickness
planer than ideal, but overall you'll get the job done quickly.
Cutting straight lines is easy: you just need to find out how the saw wants to do it, and do it that
way. Every bandsaw blade, unless there's something seriously wrong, can cut straight lines, but each
will do so in its own way. A particular blade has its own "lead angle," which may be different from
"straight ahead." For this reason, if you're resawing just one or two pieces, it may be easiest to
use a point block fence, a curved fence tall enough to hold your stock upright while leaving feed
direction manually up to you. Mark the cut line full length on the stock (leaving a generous margin
for error), set the point block to your target width and freehand the cut, adjusting feed direction
as you go. It's an imperfect technique; you'll waste more wood and spend more time at the thickness
planer than ideal, but overall you'll get the job done quickly.
5. Better yet, adjust your fence to the LEAD ANGLE of the blade.
 When you need to resaw more than a couple of pieces, however, it will probably be more productive to
set up a straight fence and make the cuts with predictable, repeatable accuracy, minimizing waste
and finishing time. However it doesn't necessarily help to set your rip fence parallel to your miter
slot or perpendicular to the front edge of your table. You want to be able to adjust your fence to
skew right or left at least 1/2" out of parallel to the miter slot. If because of its design, your
fence cannot be adjusted to skew right or left, you can make your own, or upgrade instead to
our
Kreg Precision Bandsaw Fence
which is fully adjustable. Outfit your fence with an auxiliary face high
enough to hold your resaw stock securely vertical – 5" or 6" should do.
When you need to resaw more than a couple of pieces, however, it will probably be more productive to
set up a straight fence and make the cuts with predictable, repeatable accuracy, minimizing waste
and finishing time. However it doesn't necessarily help to set your rip fence parallel to your miter
slot or perpendicular to the front edge of your table. You want to be able to adjust your fence to
skew right or left at least 1/2" out of parallel to the miter slot. If because of its design, your
fence cannot be adjusted to skew right or left, you can make your own, or upgrade instead to
our
Kreg Precision Bandsaw Fence
which is fully adjustable. Outfit your fence with an auxiliary face high
enough to hold your resaw stock securely vertical – 5" or 6" should do.
Now take a piece of 8/4 scrap wood two or three feet long, joint an edge straight, and mark a line
parallel to that edge. Rip (not resaw) freehand along the line, adjusting your feed direction until
you're cutting consistently straight down the line. When you've split the line for 4 or 5 inches,
stop. Hold the stock still on the table and shut off the saw. Mark a pencil line (which can be
erased later) on the saw table along the straight edge of the test piece, then SET YOUR RIP FENCE
PARALLEL TO THE PENCIL LINE. This is a first approximation to get you ready for fine tuning.
Now make a SHORT RESAW CUT, either in the work at hand or scrap of similar hardness and roughly similar
width. With the cut completed, stand a straightedge against the resawn face of the board. You may
see that the blade bowed left or right within the stock. The way the blade bowed tells you how to
fine tune your fence for very precise resawing. You know that the solid body of a blade can't simply
move sideways through solid wood. To create a bowed cut, the teeth must lead to one side or the
other within the wood (where they're free of the lateral guides' constraint), twisting the blade and
making it saw its way out of vertical.
To keep the cut vertical, adjust your fence to match the way
the blade twisted. If the blade bowed to the left, adjust the far end of your fence slightly to the
right; if the blade bowed right, adjust the far end of your fence slightly to the left. Make another
test cut and check the face of the wood again. It may take three or four tests to get the fence set
for flawless sawing, but once that's done you can resaw piece after identical piece, with cuts so
straight that one pass through the planer is all its takes to produce clean, flat wood at your
target thickness.
6. Feed at the RIGHT RATE.
Once you've done all of the above successfully, you can't go wrong – unless you feed too fast or too
slow, or let the blade get good and dirty. Feeding too slowly will cut the wood okay, but it will
wear out the blade a lot faster than need be. You're feeding too fast when the completed cut shows
pronounced bands of wide diagonal tooth marks. Practice feeding at a moderate, consistent pace, just
slow enough to leave a smooth surface.
7. Keep your blade CLEAN.
Several species of timber can cause rapid buildup of debris on the blade, and any wood eventually
will bake on quite a load. Material crusted around the teeth will invariably make it as hard for
them to cut as if they were dead dull, and it can affect the blade's lead angle, too. The longer you
wait to clean a blade the harder it will be, so clean it often. If a quick scrub with a
Scotch-Brite pad
laced with mineral spirits doesn't do the trick, take the blade off the saw and hose it down
with our
Blade & Bit Cleaner
, wait a few minutes and then wipe clean. If you saw resinous wood
regularly,
with our
BladeCote blade treatment
will help retard accumulation of resins and junk.
8. Do it SAFELY.
There's one last detail to cover. Keep your fingers attached. The bandsaw may be the least hazardous
resawing tool in the shop, but always remember that anything that turns hard wood into sawdust can
do much worse to you. As you resaw, you'll often find yourself pushing the stock with one hand while
holding it against the high face of your rip fence with the other. It's tempting to let your
pressure hand slide along toward the neighborhood of the blade. Bad idea! Imagine the blade bowing
within the wood and unexpectedly sawing its way out through the face your hand is pressed against.
Likewise, it can also be tempting to push the wood right up to the last half inch and then pull it
through the final bit of the cut. Once again, imagine the worst case where an unseen crack allows
the last two or three inches of the plank to split apart suddenly, just as you're pushing firmly
toward the blade. Always use a push block instead. (You can easily make one out of a scrap of wood.)
There's plenty more to know about resawing, but this should help get you started successfully.
And don't worry. Perfection will come with practice.