|
 Hand tools appeal to me with their (relative) quietness and intimacy. The vibration, dust and motor noise of power tools are quelled. Plus they take up less space and start at a much lower price point. Full disclosure, I also read
Christopher Schwarz's The Anarchist's Tool Chest. My high school self was drawn to the anarchy bit, and the explanations of what makes certain tools useful and necessary appealed to my adult sense of order.
Hand tools appeal to me with their (relative) quietness and intimacy. The vibration, dust and motor noise of power tools are quelled. Plus they take up less space and start at a much lower price point. Full disclosure, I also read
Christopher Schwarz's The Anarchist's Tool Chest. My high school self was drawn to the anarchy bit, and the explanations of what makes certain tools useful and necessary appealed to my adult sense of order.
The sunroom in our rental house features a hideous solid-wood built-in that I use to stash my tiny collection of tools (I plan to someday dismantle the beast and recycle the wood). It's also the room containing our year-round Christmas tree forest. (A woodworking shop in an indoor, climate-controlled forest? What better use for it.) Future plans include setting up home and shop in an actual forest.
I found an old Stanley 5-1/2 jack plane at a thrift store in Mccayesville, GA for $40, and I didn't buy it because I hadn't learned enough yet to be able to tell if it was any good. I still wonder if I let a good find slip through my fingers. I stood in the aisle holding it for twenty minutes, trying to recall what Schwarz had said about the most important things to look out for when buying vintage tools (missing parts, a warped sole, cracked or pitted metal) and found that I drew a blank, but holding it gave me such a feeling of satisfaction and excitement. I was going to learn to make things. I love making things. In graduate school for creative writing I took a bookmaking class, and latterly wrote a couple chapbooks. Placing the books I made on a bookshelf I made was perhaps the most thrilling thing I've done with my education--an accretion of craft.
I find myself in the enviable position of working in a place where I get to learn--and am encouraged to learn--absolutely everything. It's often overwhelming. The volume of tools, experts and advice moving through the store on a daily basis is humbling.
So I begin at the beginning.
LESSON 1: HAND CUT DOVETAILS
 Every woodworker has a favorite way of cutting a dovetail--marking, tools, order of operations. Before setting out, I watched two master woodworkers: fine furniture maker David Barron and cabinet maker Frank Klausz. Barron is trending for his innovative
dovetail magnetic guides, a bestselling tool that keeps the saw at a consistent angle, holding both the saw and the top of the board.
Klausz, another master of the trade, freehands the hell out of stacks of dovetails and they fit flawlessly every time. My takeaway from both: cut a million dovetails and you might start producing an acceptable joint.
Every woodworker has a favorite way of cutting a dovetail--marking, tools, order of operations. Before setting out, I watched two master woodworkers: fine furniture maker David Barron and cabinet maker Frank Klausz. Barron is trending for his innovative
dovetail magnetic guides, a bestselling tool that keeps the saw at a consistent angle, holding both the saw and the top of the board.
Klausz, another master of the trade, freehands the hell out of stacks of dovetails and they fit flawlessly every time. My takeaway from both: cut a million dovetails and you might start producing an acceptable joint.
In the video showing David Barron's process for cutting dovetails, he begins with rough marking. "And what about one here?" he says, and from the lift of the corner of his mouth you may see that he is very much aware of how we are being thrown to the wolves. But there is simply no other way to do it than to do it. Snaps on guide, cuts tails first with Japanese saw (
Gyokucho's Rip Dozuki Saw aka Razorsaw), flips the board (with the guide still sitting on top) to keep saw on the right side of the guide, removes the waste with a
Knew Concepts aluminum fretsaw, then uses a chisel to clean up (defines corners of each cut before tapping out waste). He uses a dovetail alignment board built expressly to line up tails onto the uncut pin board. He marks with a knife, cuts the pins. Dry fits the joint. Planes the joints with the
Lie-Nielson No. 102 bronze low-angle block plane.
Frank Klausz cuts the pins first, once again eyeballing where he wants them to go. Years and years of experience, cutting thousands of dovetails, allow him to cut a perfect joint every time. A fretsaw to cut the pins. Then with a bench chisel and mallet to chop out the waste. He stacks his boards staggered and clamps them down to expedite the process. Everything about his setup is geared toward efficiency. There is no wasted movement. A small amount of wood is taken from the back of the board to eliminate spelching in the chiseling-out process. Chisel is held bevel-down to quickly waste excess, cutting into the endgrain.
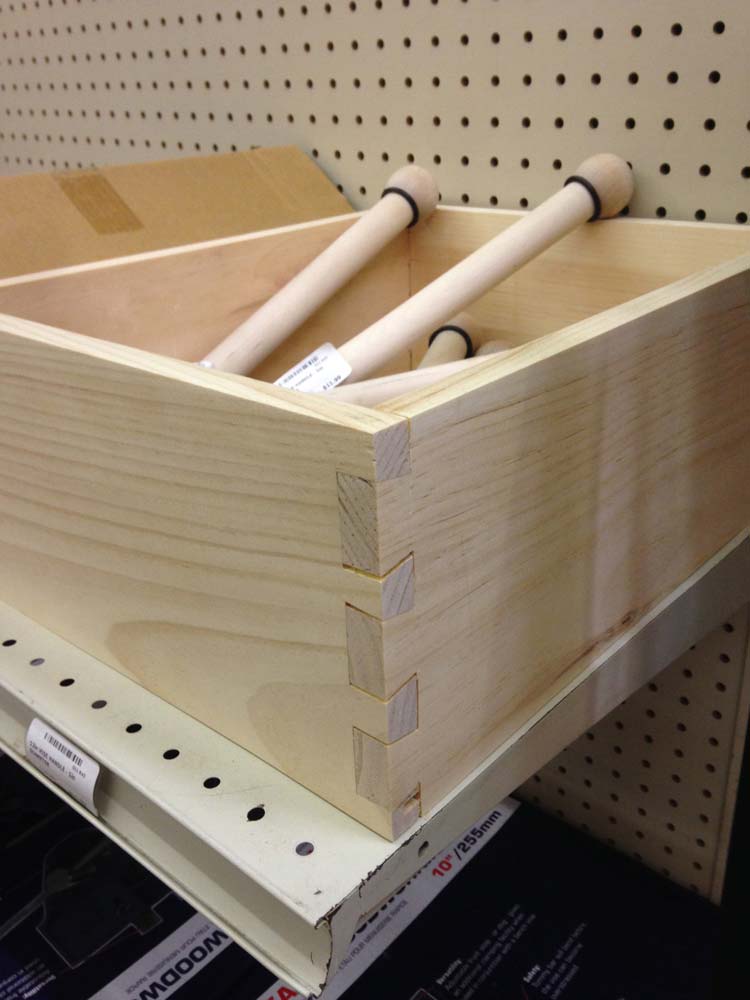
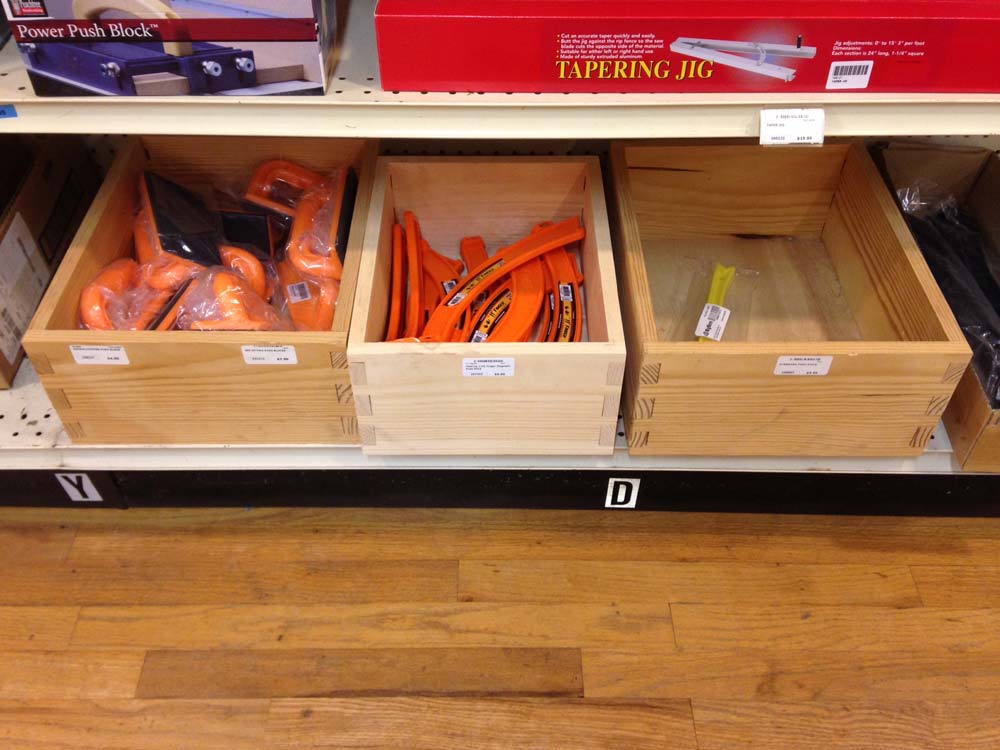
My own project involved matching some existing boxes at Highland to store loose inventory. The original boxes are 12"x15" yellow pine. Out of three lengths of scrap from the shop, I cut backs and sides for three boxes on the
Festool Kapex saw
(utilizing the
LH track extender). I divided the boxes into A, B and C pieces (A being the fairest, C the wood with the most character) and drew a carpenter's triangle to denote inside, outside, front and back. Then I took a scrap of wood and made a story stick for my dovetails, eyeballing the spacing based on the original set of boxes (eyeballed by a different pair of eyes).
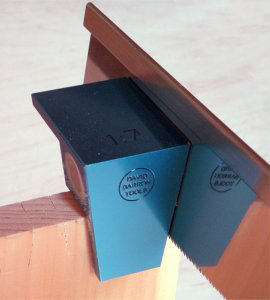
I started with C boards and used the
1:6 Barron guide
(our most popular) and a
Knew Concepts fretsaw. A coworker helped cut some of the joints, but failed to consult me on my marking system, so some of the joints had to be recut. I managed to incorrectly position the idiot-proof guide, resulting in some metal-on-metal screeching, a scratched guide, and the resolve to not mess with gadgets above my pay grade (as you will see, this didn't stand for long).
Box B I started the Klausz way, pins first, and this time with a guide/story stick I laid out with a ruler. There is something to be said for consistency. I used a
Japanese dovetail saw. My helpful coworker was banned from touching the project, though everyone continued to offer helpful pointers (Watch the saw when you're cutting, Clamp down the piece with sacrificial boards, Cut with the grain rather than chopping into it, Oh dear Lord watch what you're doing). This time, I drove a chisel into a tail that I mistakenly left hanging over the edge of a sacrificial board and the piece promptly split its length. I finished cutting the pins and tails utilizing extra clamps and mended the piece during glue-up.
Confident that I knew what I was doing at last, I began the A box full of gusto freehand--and promptly cut my joints backward. An inverted dovetail is useless, and although there are reports of one still standing in a timber frame house in Vermont somewhere, I do not recommend chancing it. I chopped off the ends with the Kapex and recut the joints to make a smaller box. This one held together without glue, possibly because I was now overcompensating and leaving too much waste in the joints. Three serviceable, if unattractive boxes resulted from my efforts thus far.
I dry fit the boxes before glue-up. I skipped the part where I check if the boxes were square on boxes B and A, much to my chagrin when I checked them afterward. Box C is the truest. I used
Titebond glue
and our
12" Quick Action bar clamps. Then I planed the corners with the
Lie-Nielson 102 low angle bronze block plane
to smooth the joints. I sanded the glued up boxes with the
Festool ETS EC 125/3 EQ Random Orbit Sander
to 120 grit. The mistake here was putting in the bottoms of the boxes before sanding, as the bottoms amplified the sound of the random orbit sander to an alarming degree. Thanks to the miracles of glueing, planing and sanding, I ended up with a product I could sell on Etsy as objet de shabby chic.
Instead I put them on the shelf to hold wooden vise handles.
Since the only remedies I know of for substandard dovetails are practice and patience, I'll simply have to dovetail everything. Dovetailed silkscreening frames? Check. Dovetailed bookends? Why not. Dovetailed scrap wood? Well, what else is it lying around for. I plan to incorporate them into as many of the projects I currently have lined up as possible. My partner has requested that I build a platform for the pup to comfortably watch squirrels from the window. I'm sure she'll appreciate my brave attempts at craftsmanship.

|

|
Amy received her MFA in Creative Writing from San Francisco State University. She is the staff writer at Highland Woodworking. In 2015 she and her dad co-founded Coywolf Woodworks, their hobby shop in North Florida.
Return to the
Wood News Online
front page
|