
|
| ||||||||
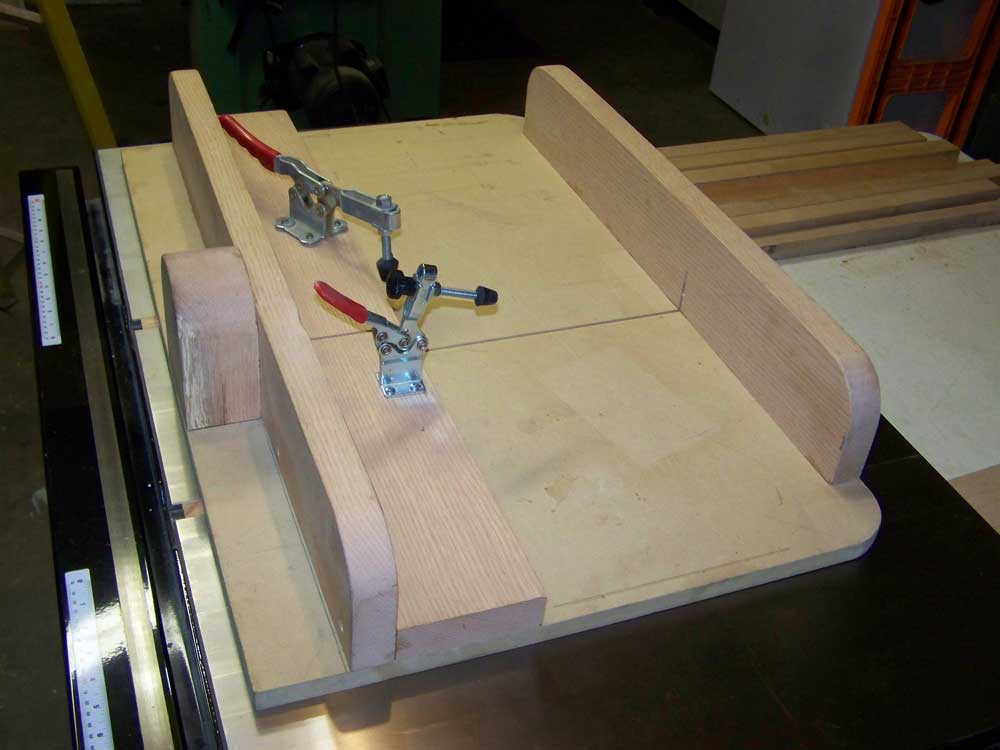
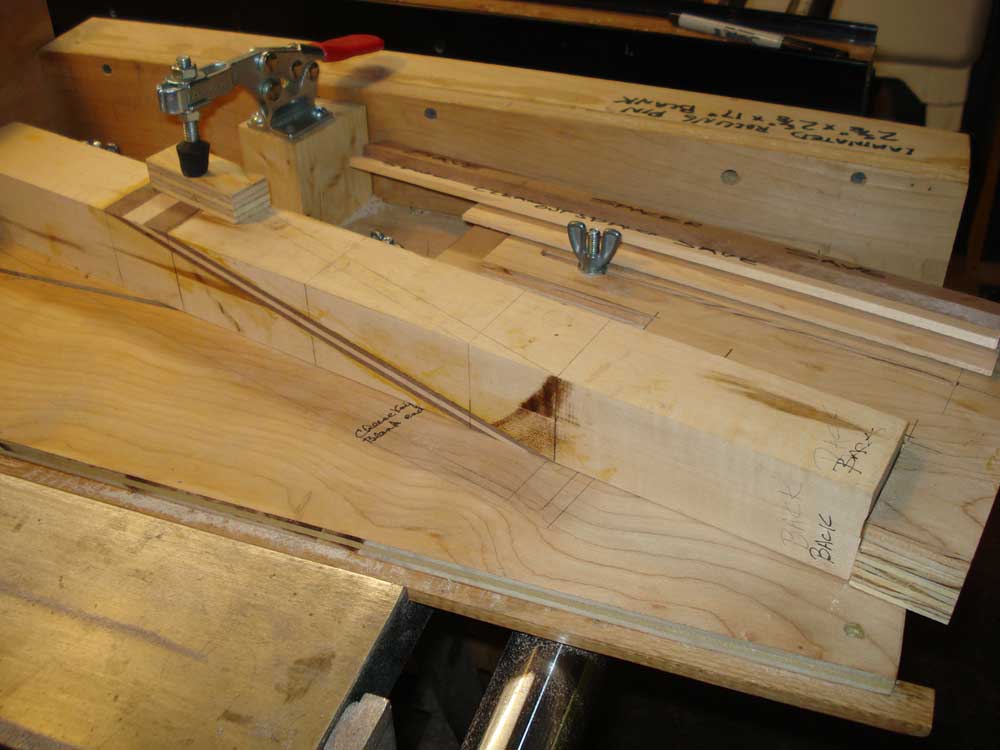
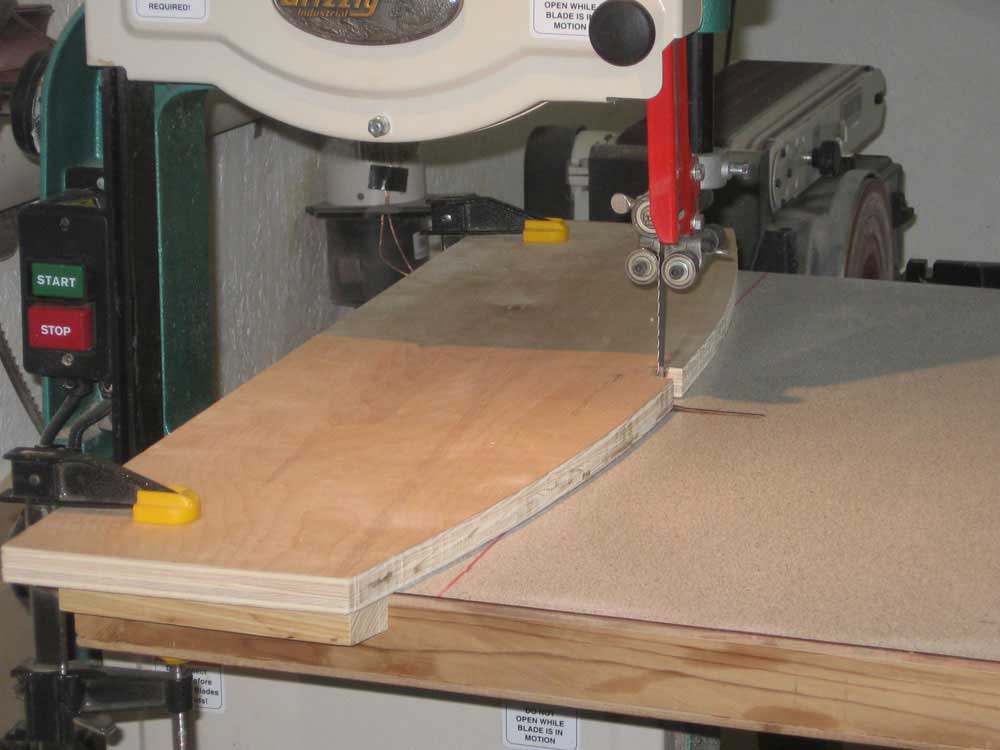
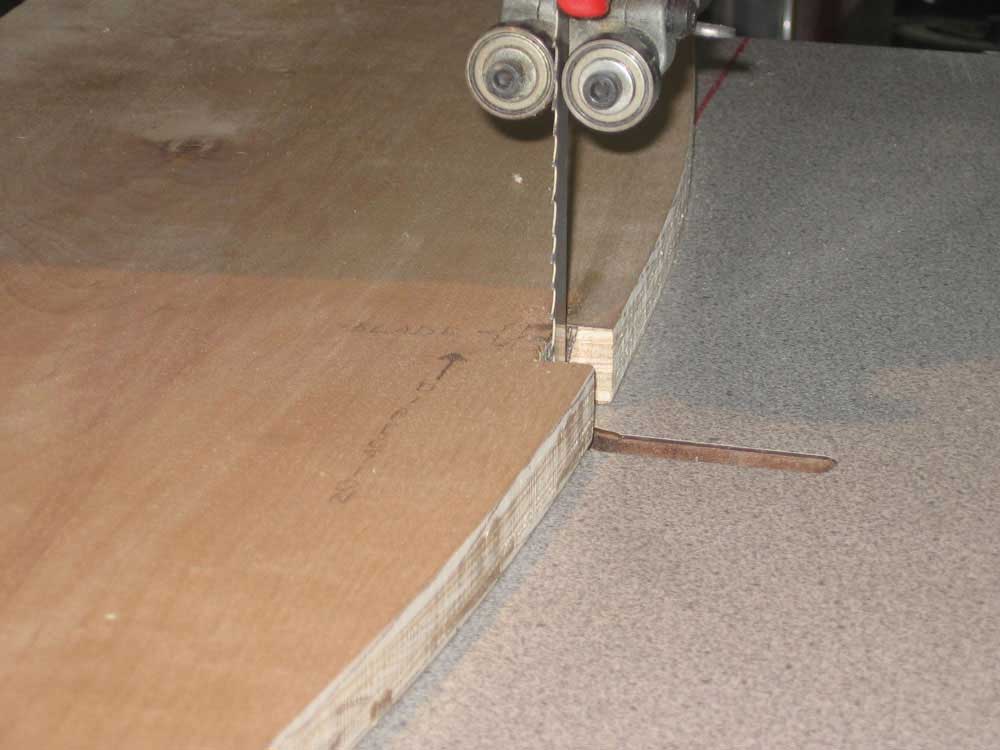
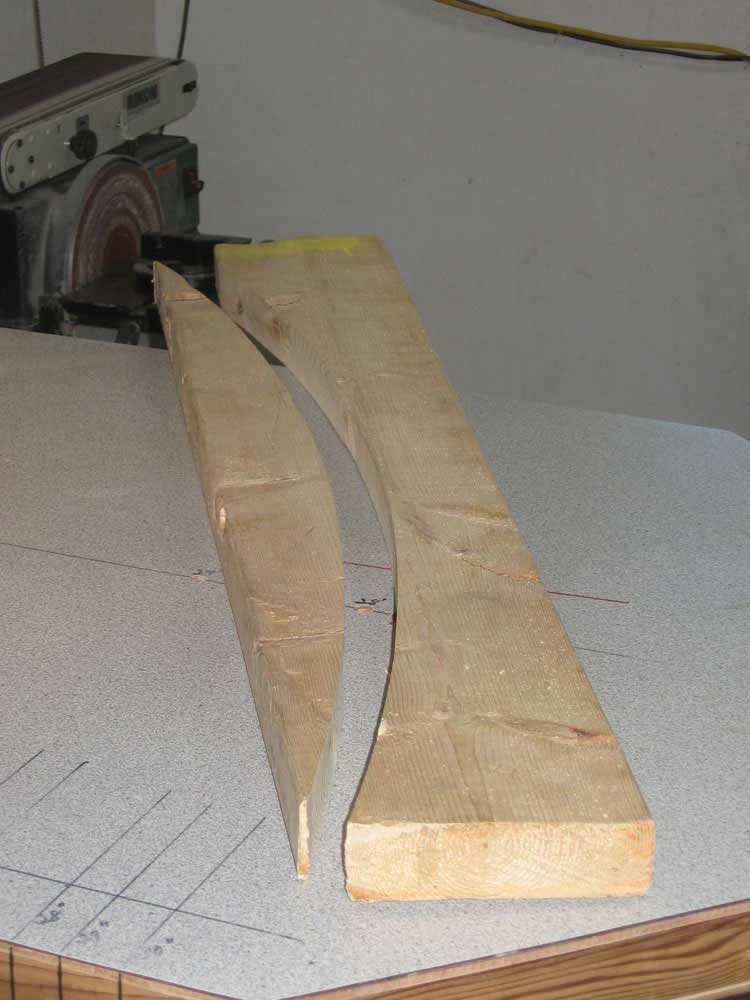
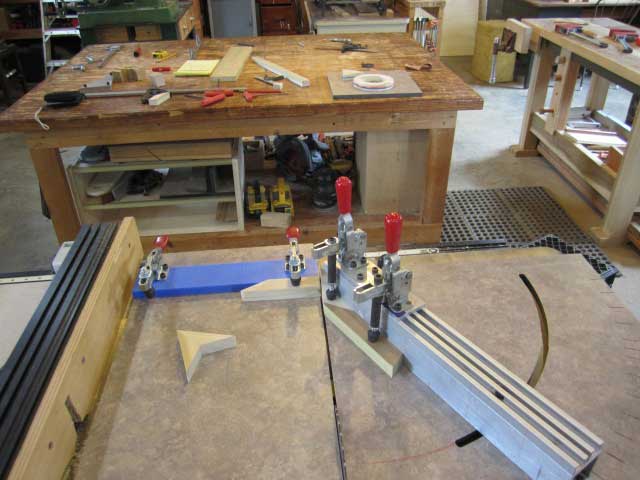
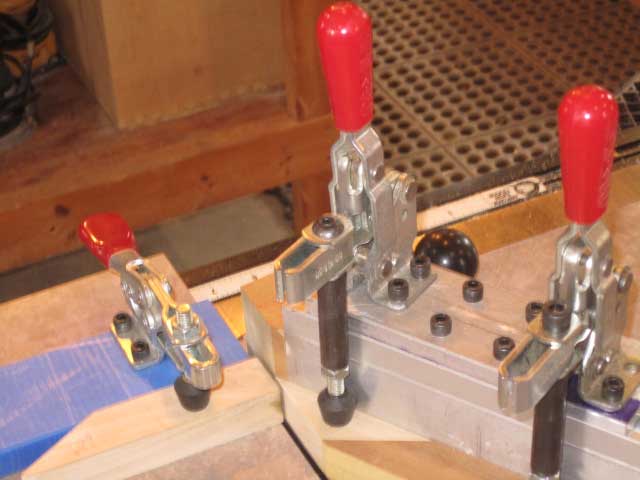
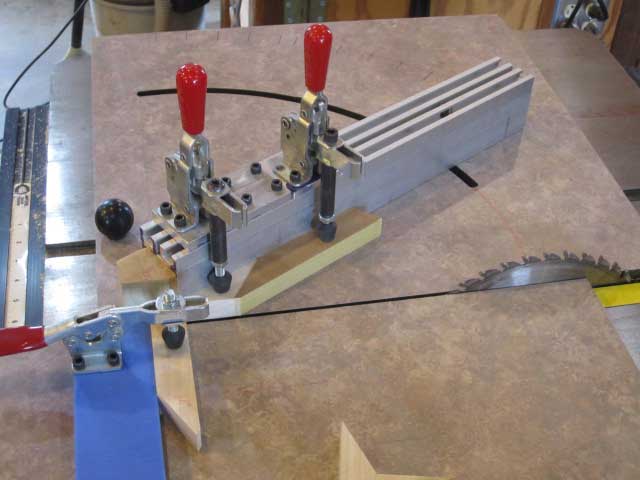
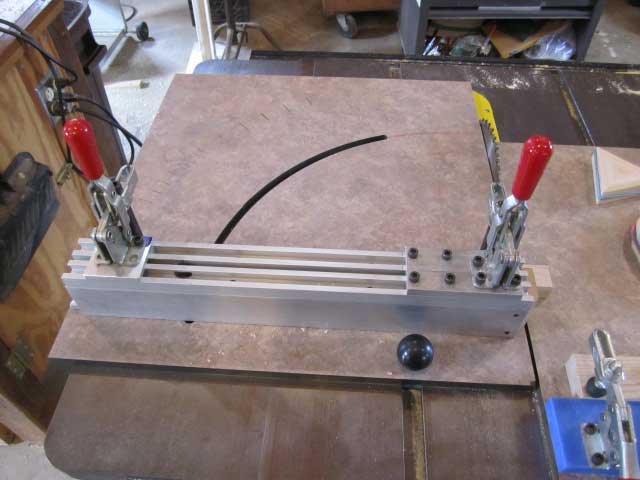
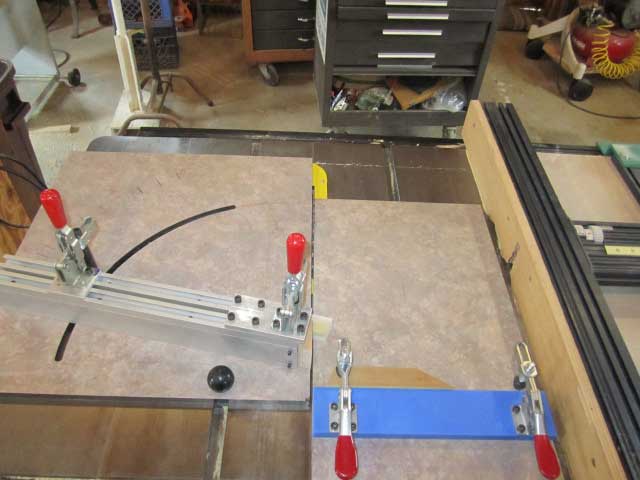
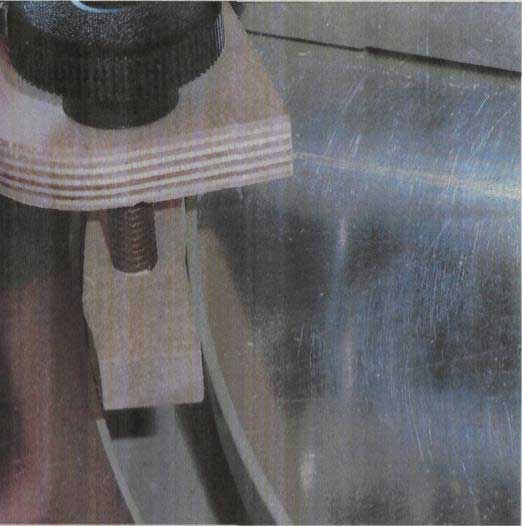
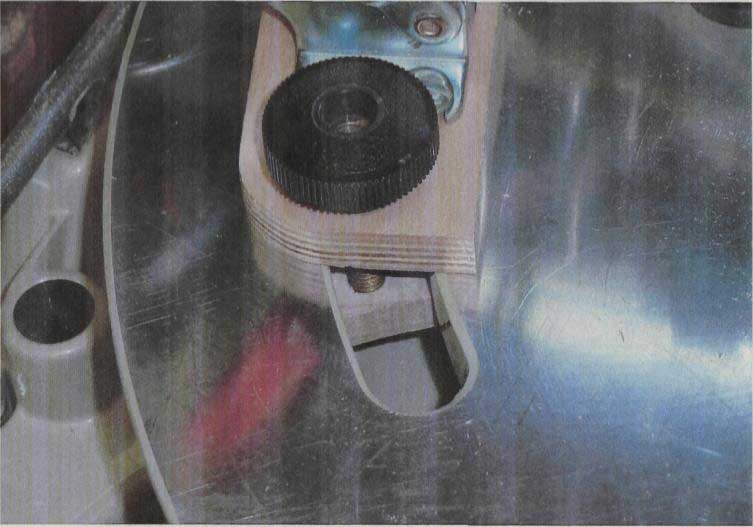
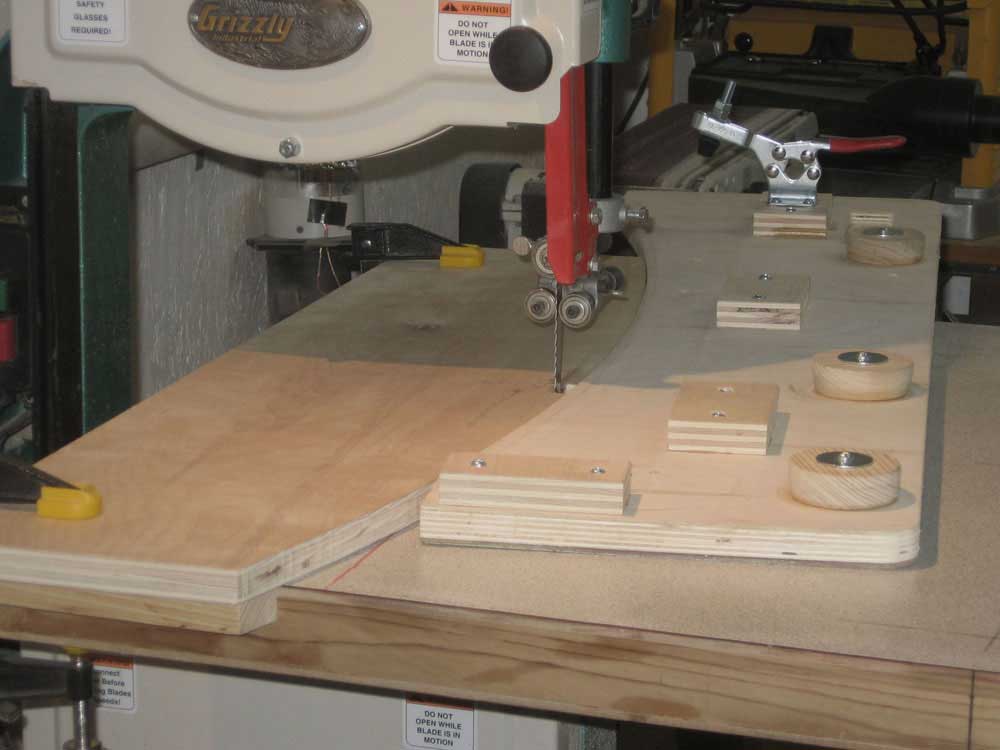 Nate Hood's Bandsaw Jig for Perfect Arcs
This is a simple two part jig: 1. A curved notched Fence that is clamped onto your bandsaw table. 2. A curved Sled that rides against the Fence. Your wood blank gets clamped to the Sled, and since the Sled is slightly thicker than the Fence, your wood blank rides right over the curved Fence. Perfect identical arc cuts every time with no pattern tracing or free hand cutting!
|
||||||||
|
| ||||||||
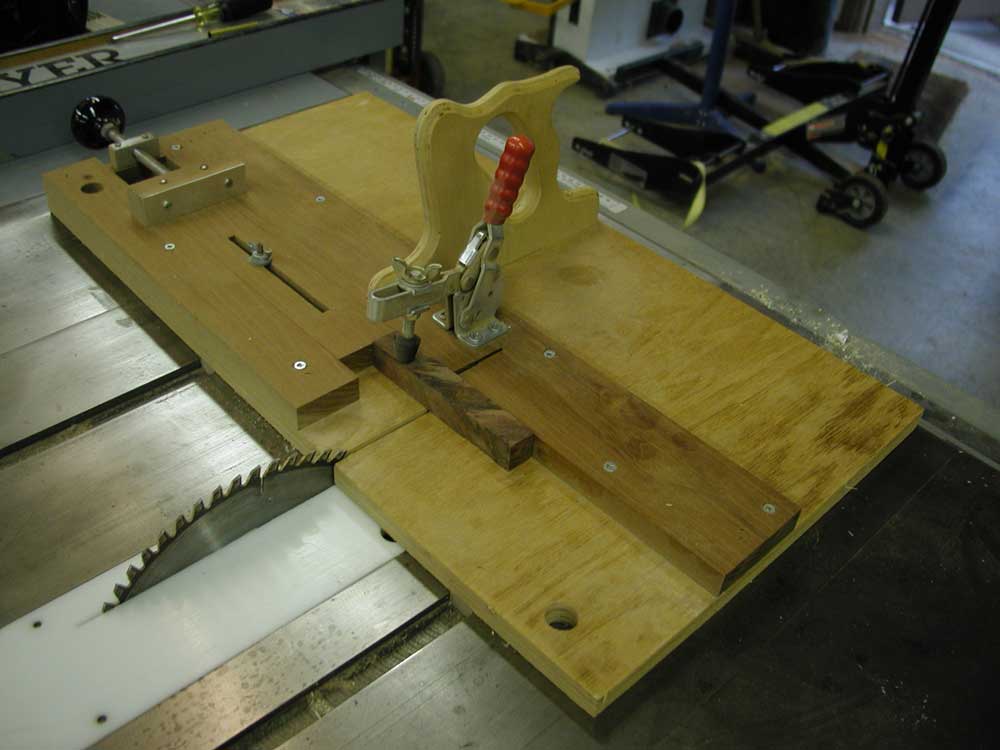
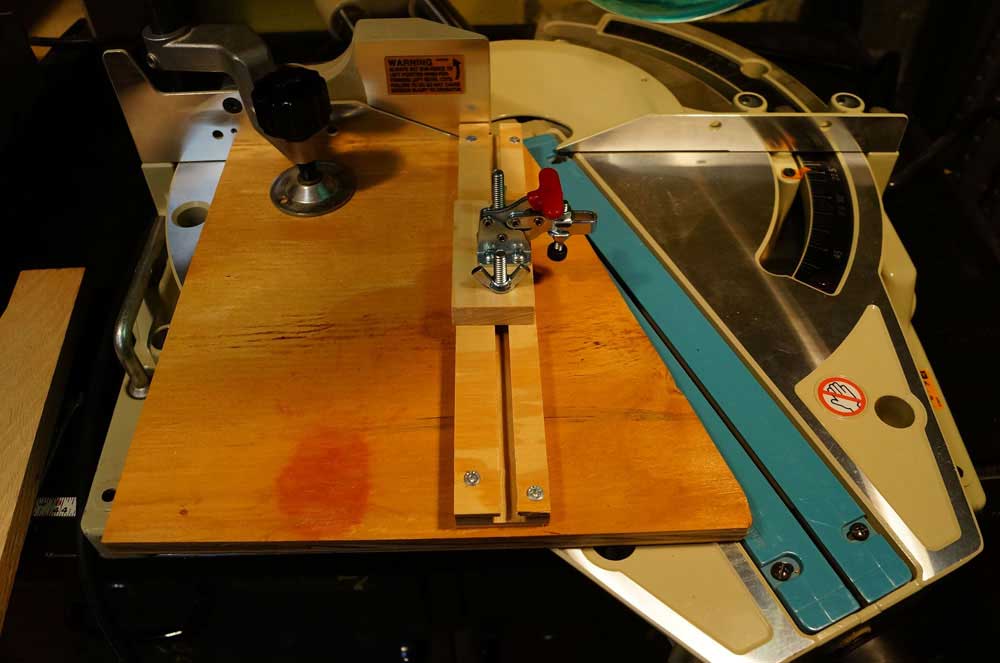
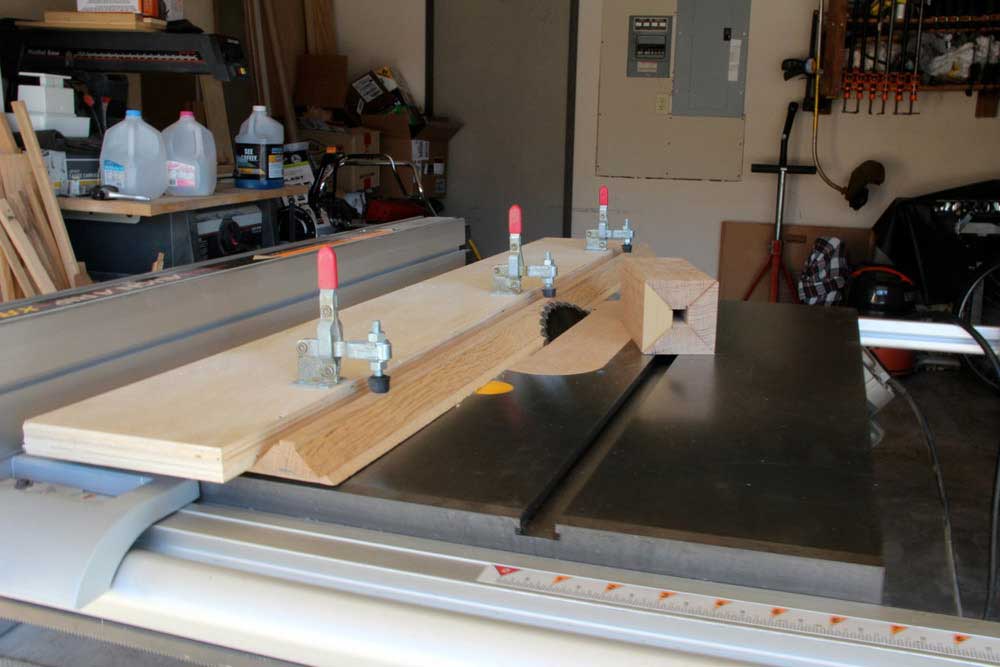
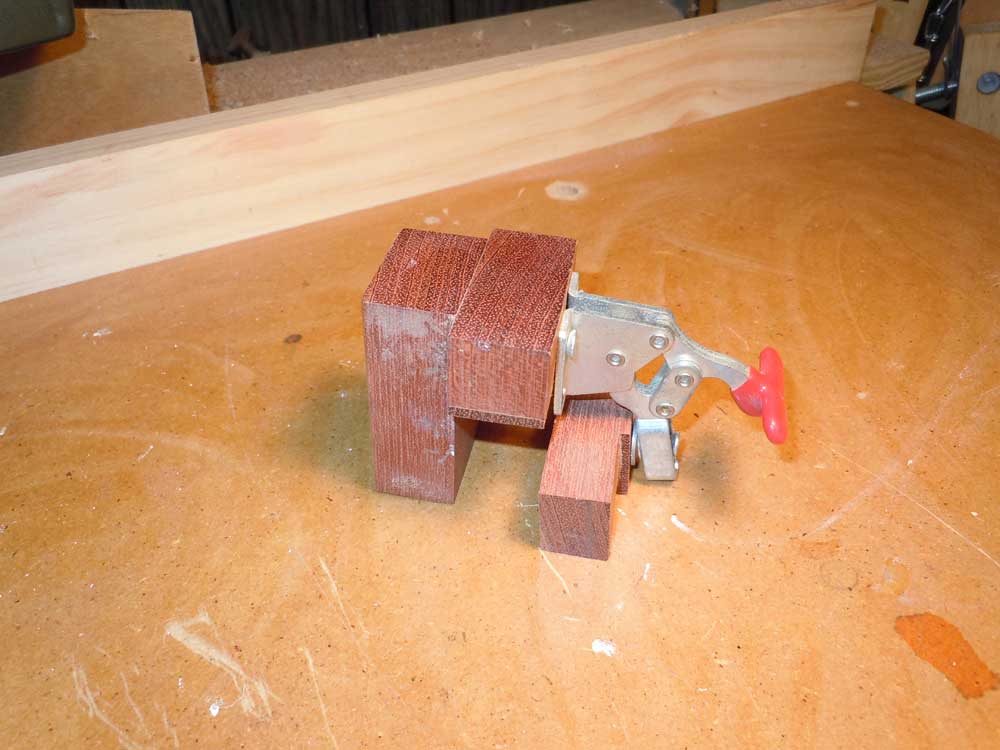
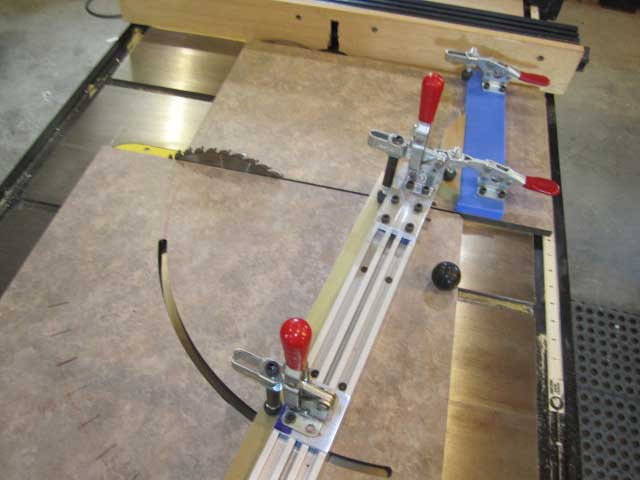
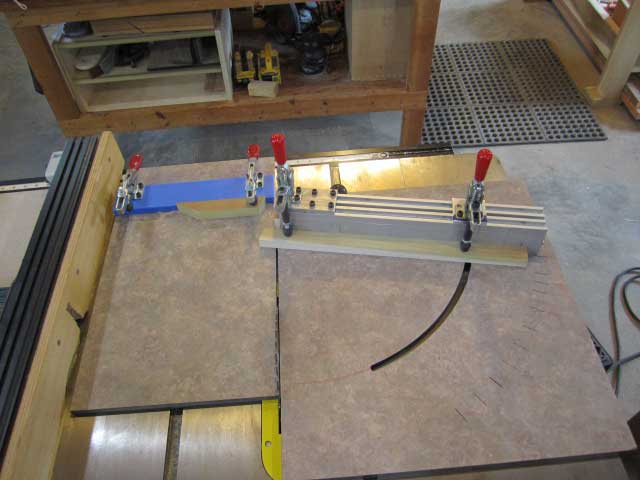
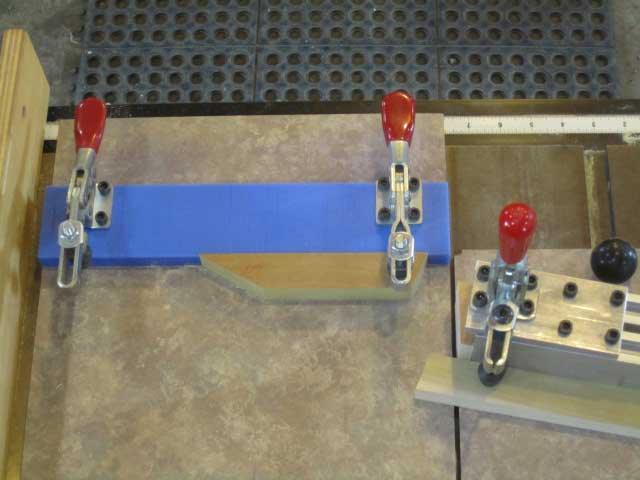
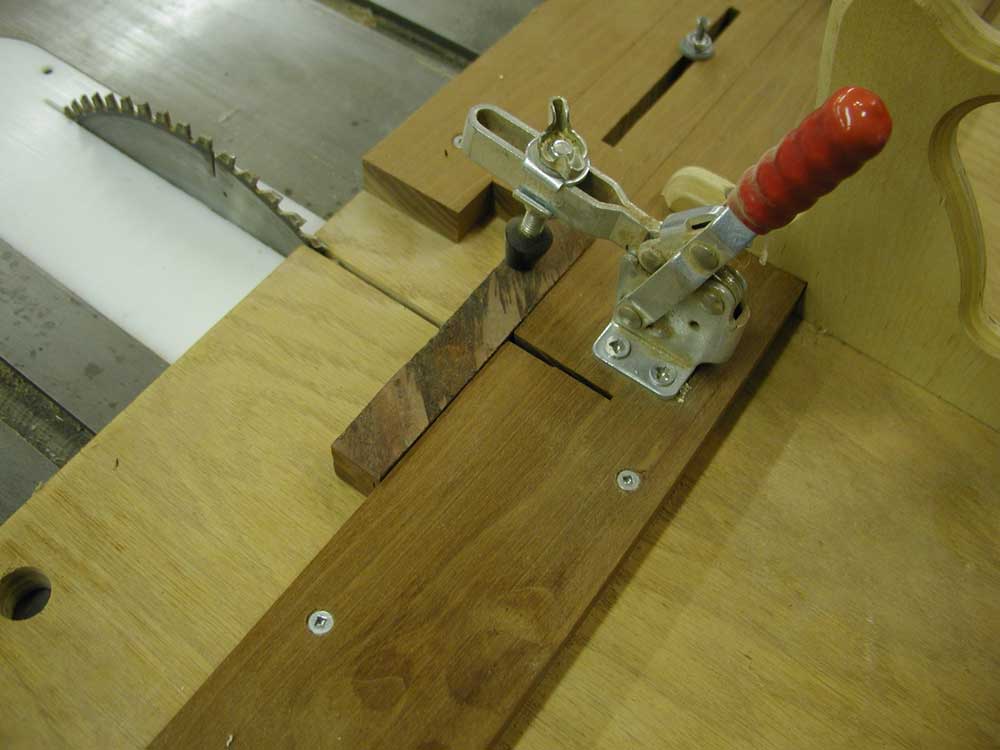
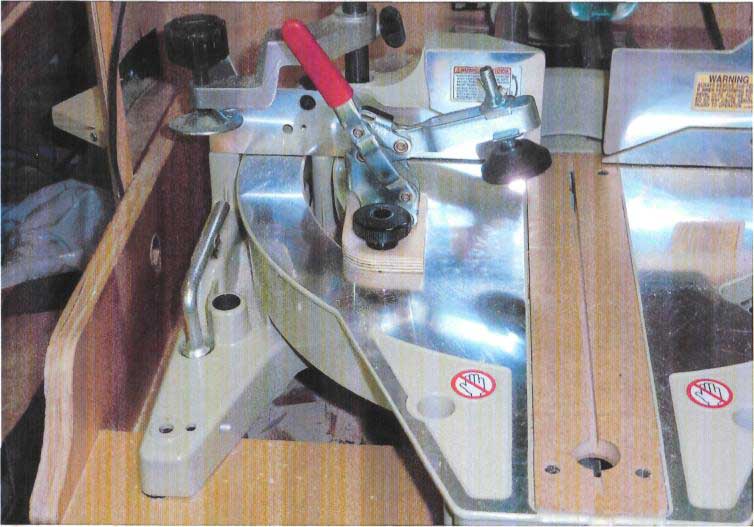
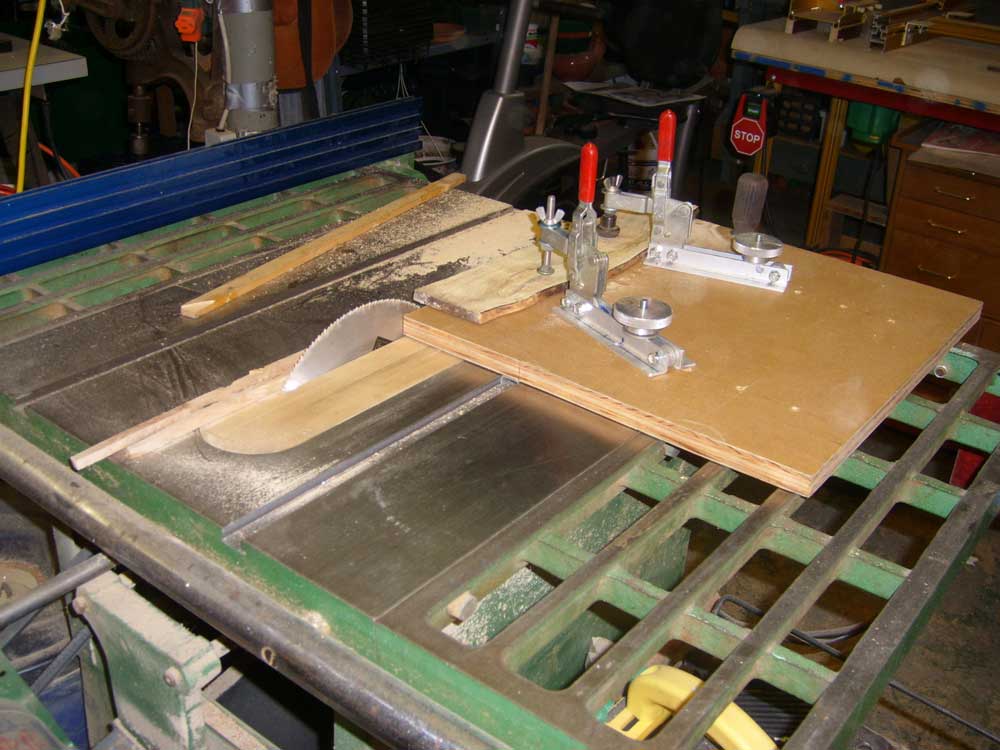
 Frank Hamilton's Miter Sled
This is a miter sled I use on my tablesaw to cut the segments I glue together for making segmented bowls and plates. I use the toggle clamps to hold the small pieces safely to be cut on the tablesaw. I also use toggle clamps to hold my stop on this same jig.
|
||||||||
|
| ||||||||
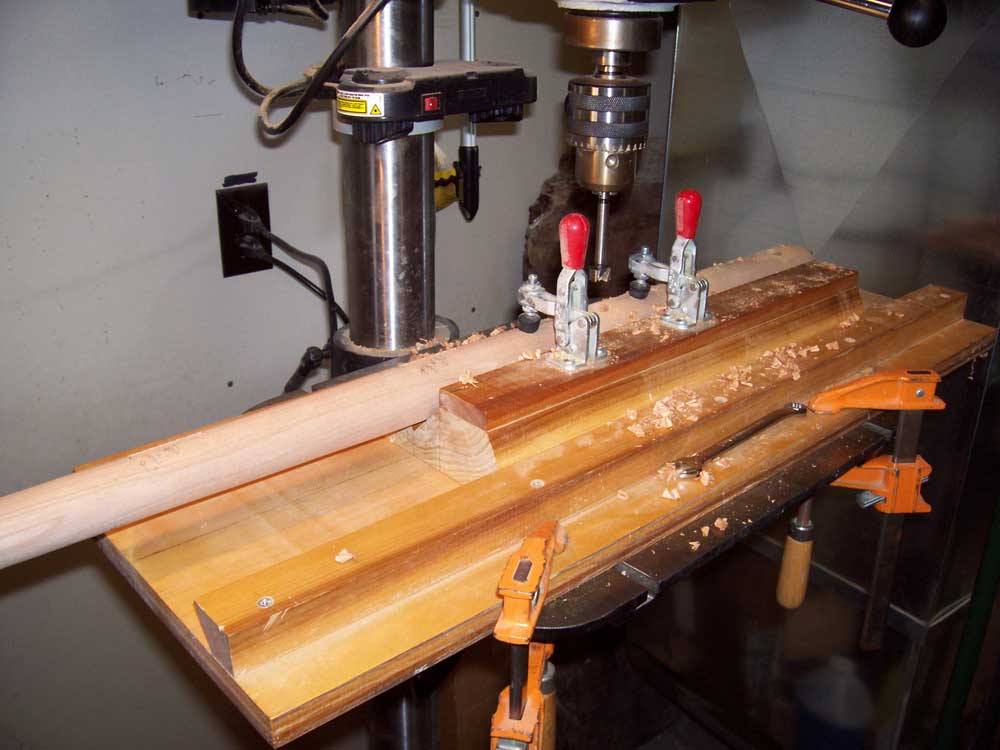
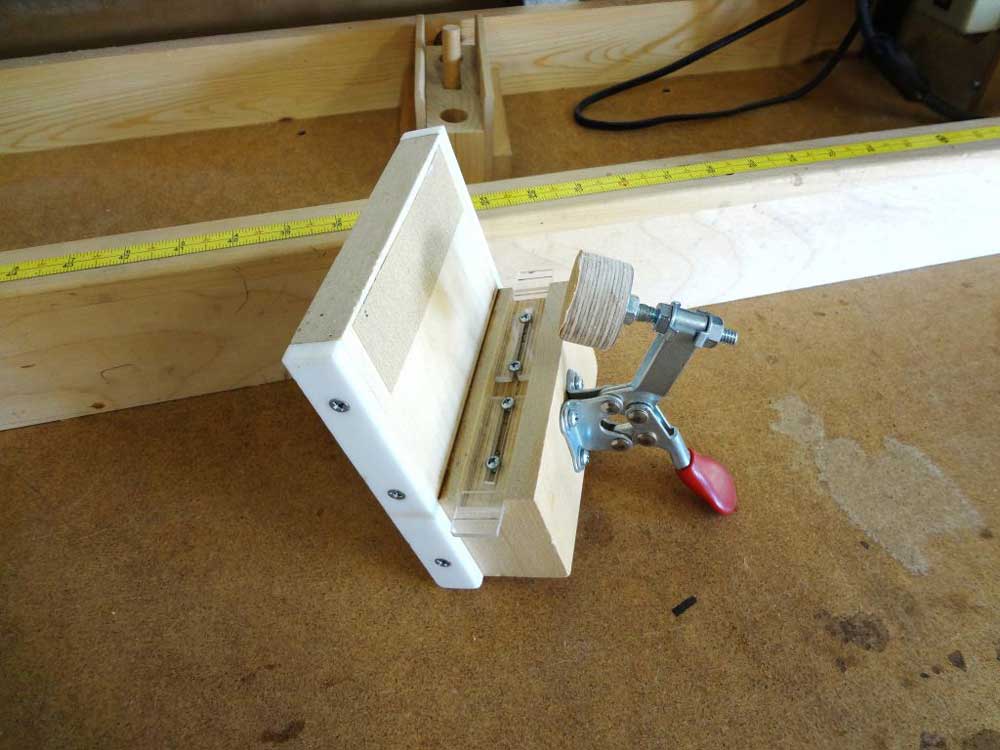
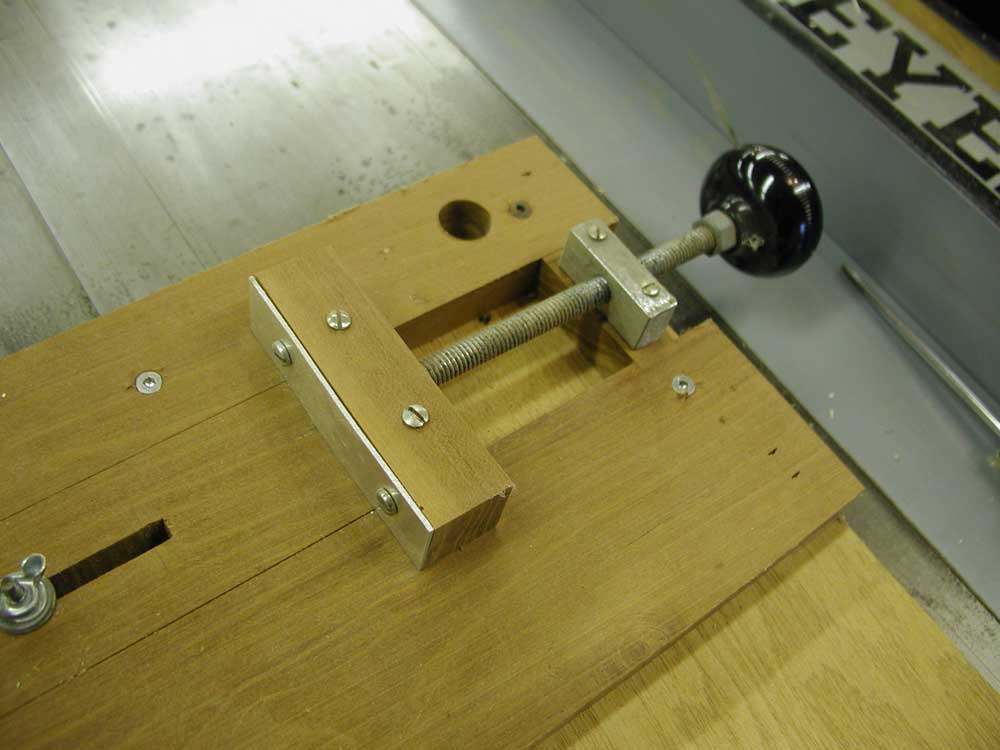
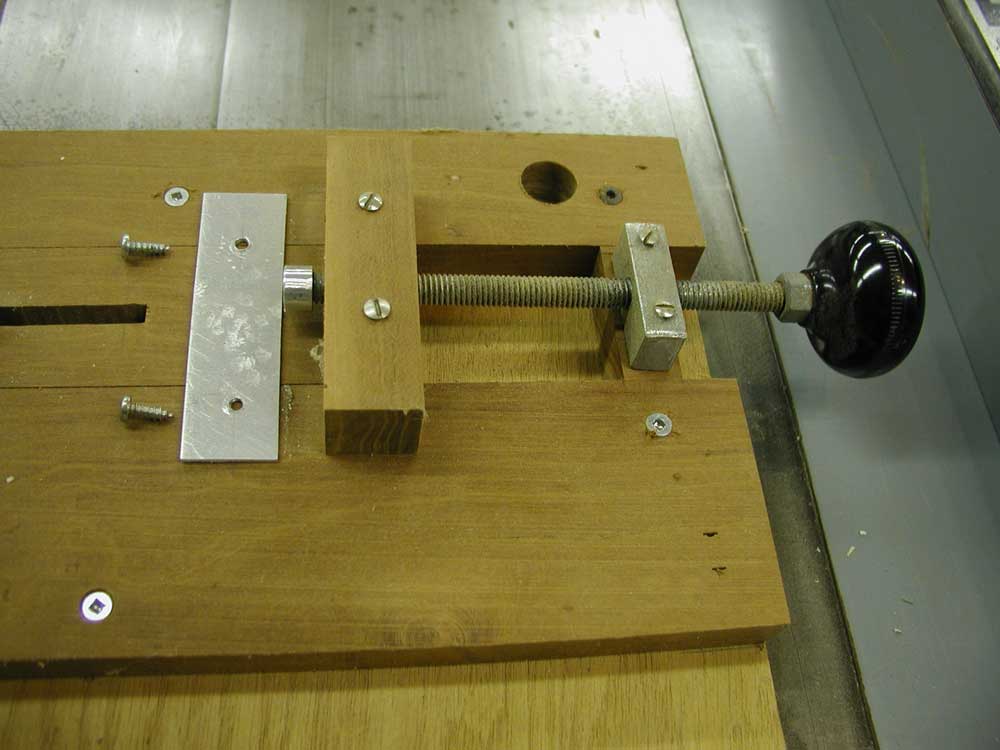
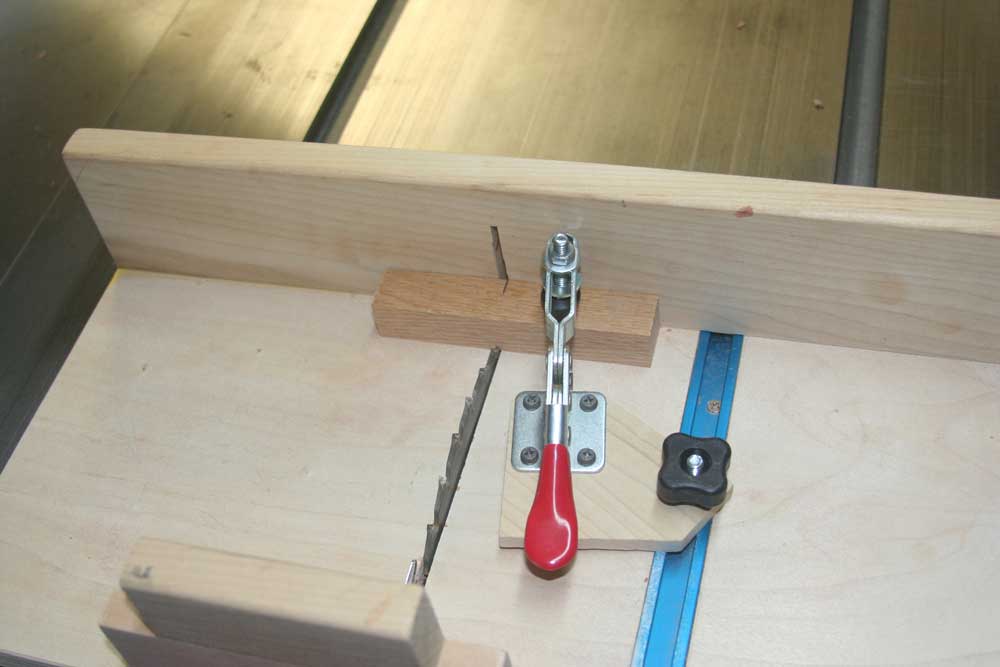
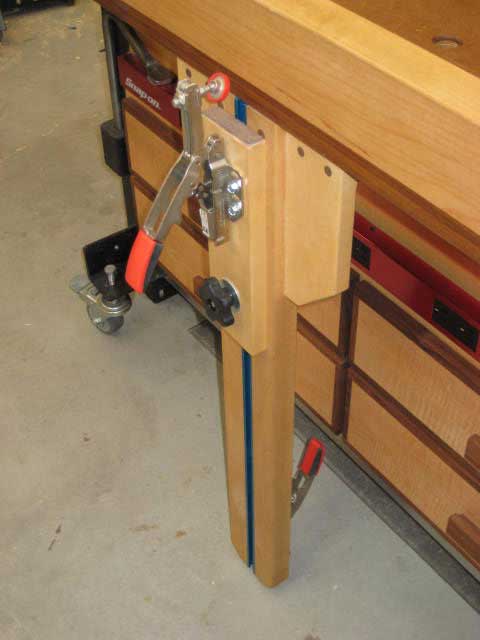
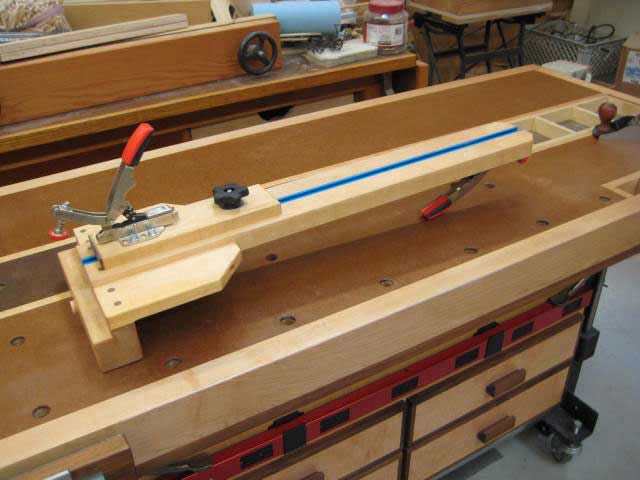
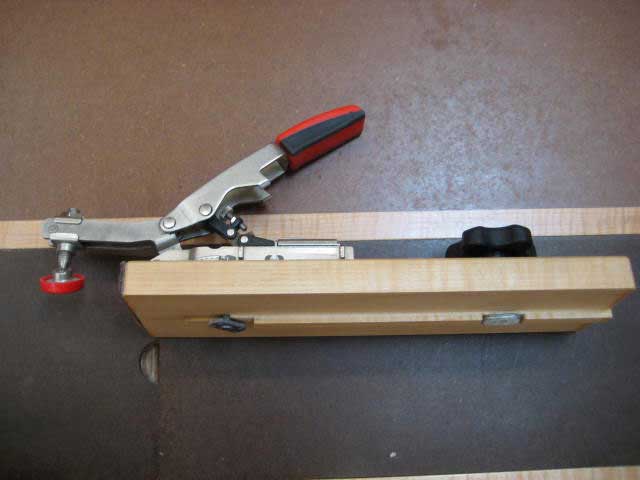
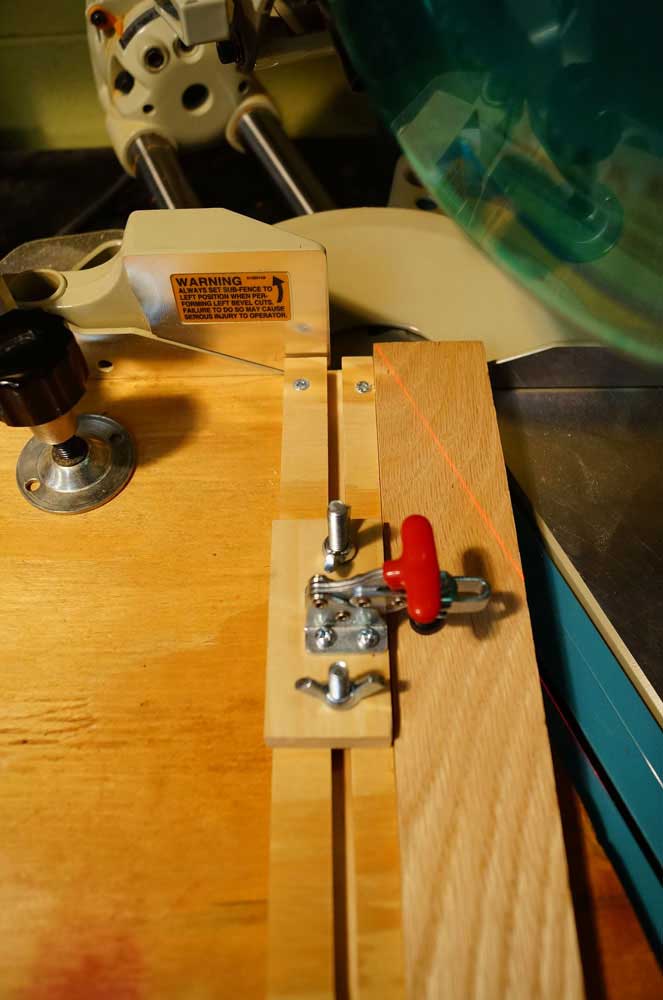
 D. Scot Williams' Scarf Joint Jig
This jig is used to cut long scarf joints, either 6 or 12" in length. It is adjustable to accept 3/4", 13/16" or 1" wide stock. It is invaluable in canoe building, when 16'+ stock is in short supply or unavailable. It runs parallel to the saw blade by means of a hardwood strip that fits in the miter gauge slot. Handplane handles keep the hands safely away from the blade. |
||||||||
|
| ||||||||
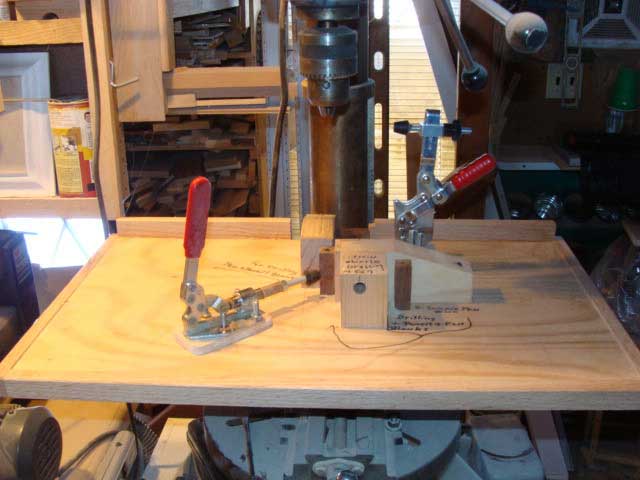
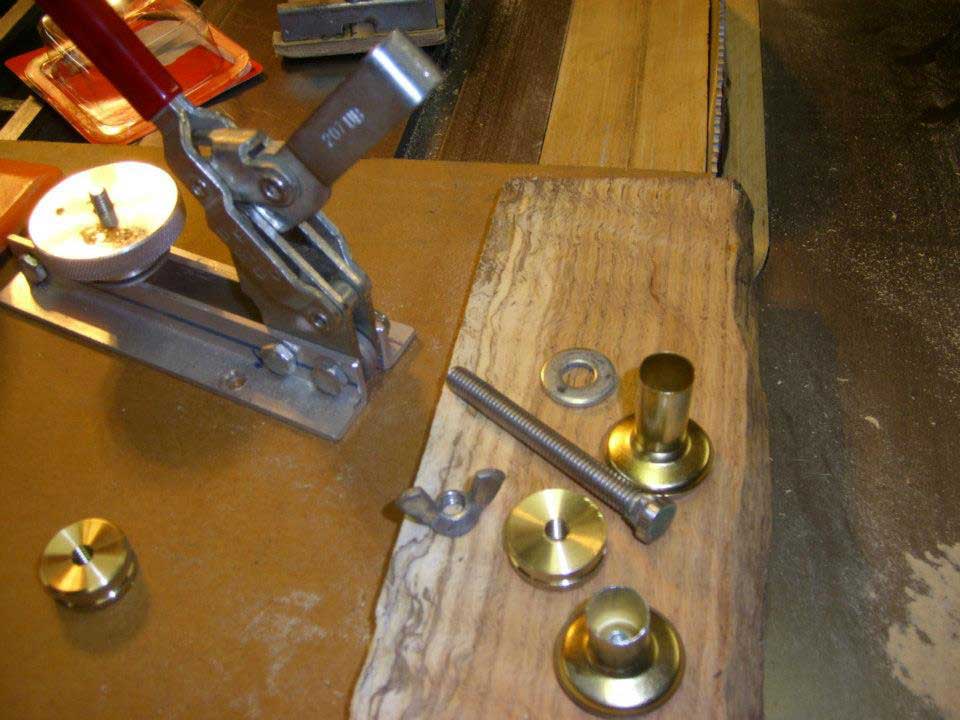
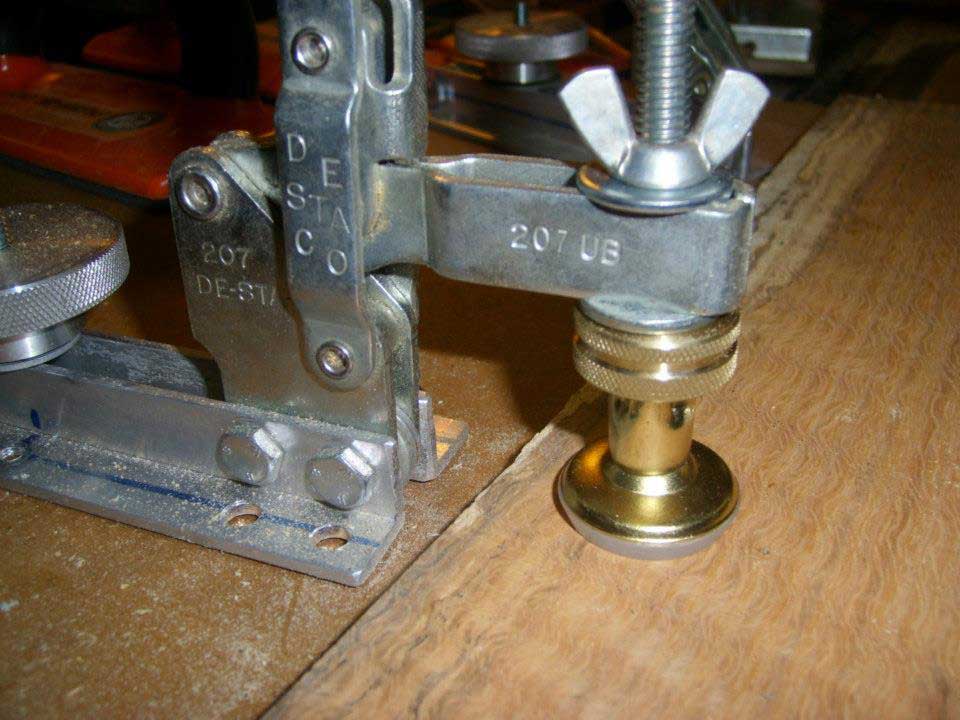
 Harold Holmstrom's Combination Jig
This is a combination jig I designed and built to drill rung mortises for a Shaker style chair that I built. The Destaco clamps hold the leg in position during the tenon drilling operation. The 2nd part of the jig is designed to allow the use of a router with a guide bushing to mortise the slots for the back slats. Again the Destaco clamps hold the leg in position to accurately hold the leg in position.
|
||||||||
|
| ||||||||
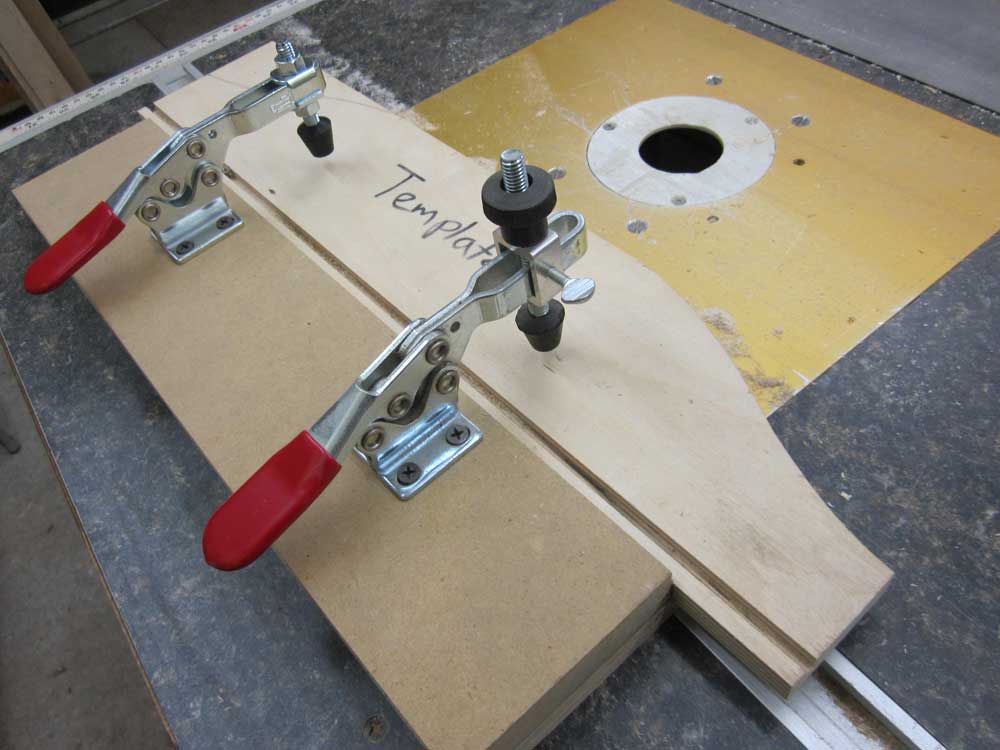 Matthew Anderson's Template Jig
This is a really simple jig but its adaptability has made it a lifesaver. It is made with a 1/2" plywood base and 2 cam clamps. Size the spacer block under the clamps to fit the project. I have a picture of the jig routing a replacement guitar bridge. After roughing it out with a bandsaw I fastened the broken bridge to the new piece with double stick tape. Rout one side and then turn it around! I also use it for making kitchen pullouts. This time with a bottom bearing bit.
|
||||||||
|
| ||||||||
 Fred Kachelhofer's Sled for Cutting Small Pieces
When trying to cut small pieces such as pen blanks in preparation for drilling, I was always uneasy trying to hold the piece in place safely. It was also difficult to get a very accurate cut. The sled shown below was my answer to both of these problems. The sled is runs on two strips in the slots on the table saw allowing for a smooth accurate cut. The handle was traced from one of my handsaws and cut out of 1/2" plywood and all edges rounded over with the router. The wing nut on the slot for the adjustment screw is secured with a hanger bolt. The piece being cut is held in place with a toggle clamp. The sled is very easy to use. Once it is in place on the saw top, either take a measurement from the stop or place a pen barrel on the sled. Loosen the wing nut on the slot and turn the handle on the adjustment screw to exactly where you want it. If you like to have the pen blank a little long to allow from barrel trimming it is easy to see just how much excess you will have. Tighten the wing nut and you are ready to cut. Note that you do not have to take a measurement. Place the pen blank in the jig and tighten the toggle clamp. Notice that I have replaced the hex nut on top of the clamp with a wing nut to make it easier to make adjustments for correct clamping pressure. Now turn on the saw and slide the sled forward to make the cut. Repeat as necessary. The third picture below shows a close up of the adjustment screw. The piece at the right is a metal block drilled and tapped for the proper size all thread rod being used. The knob is something I had and the nut by the knob is used as a jab nut to keep the knob from turning on the rod. This piece is fastened to the main sled body. The block with the aluminum plate on the front allows for a "Push/Pull" arrangement. Without this you would only be able to "pull" the block back. To give the ability to "push" I ground a nut round and drilled a hole to recess it in the block. When the aluminum plate is in place then the nut can "push" against the plate and move the adjustment to the left. The depth of the drill for the nut is critical. If the hole is drilled too deep, there is "play" in the adjustment. Of course the sled can be use to make any small cuts. Notice that I made the adjustment mechanism so it has several inches of travel. After over 50 years of woodworking I still have all ten digits and I want to keep it that way.
|
||||||||
|
| ||||||||
 Tony Profera's 45 Degree Adjustable Miter Jig
I was tired of picture frames and boxes having gaps at the 45's. It was time to build a miter jig that has adjustable wings on both sides. I can now dial in 45's with extreme accuracy by adjusting the angle on each wing. The blade gets buried in the center rail for safety. The toggle clamps are adjustable in and out to accommodate varied stock width and height. The entire carriage assembly unscrews for maintenance/upgrade (none needed so far). |
||||||||
|
| ||||||||
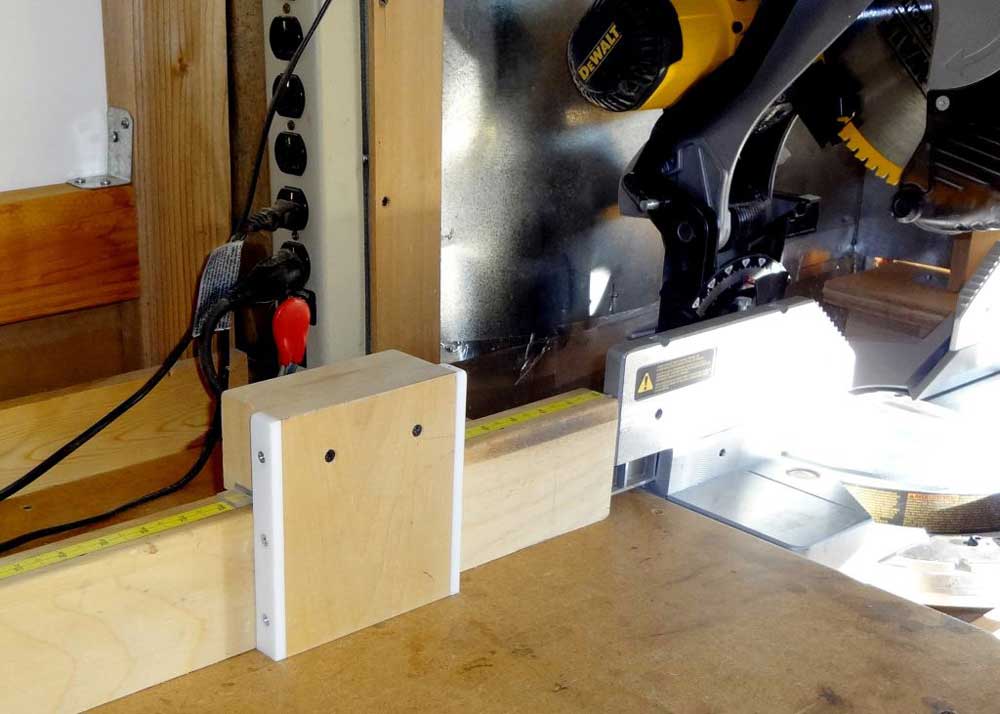
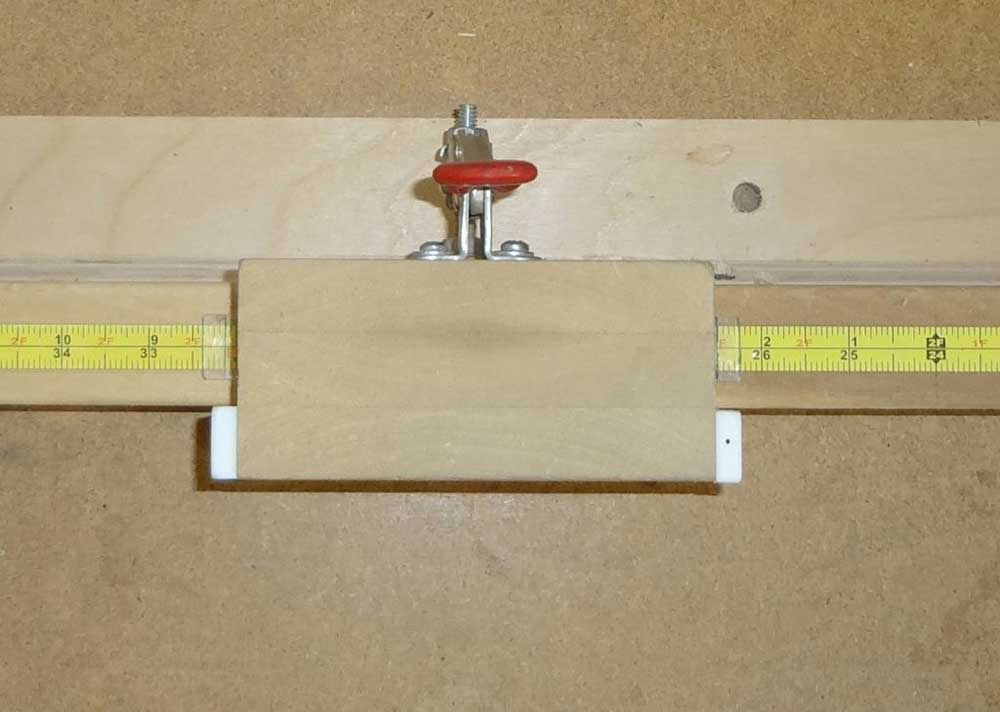
 Andrew Volk's Chopsaw Stop
This is the chop saw stop I have been using for over a year now. My fence is a 3/4" Baltic birch plywood "L" bracket topped with nominal 1 x 2 hardwood for stiffness and strength. The fence stretches both left and right of the saw. The top has a measuring tape attached for setting the cut length. The stop is also made from 3/4" Baltic birch plywood. The edges have UHMW to make durable and accurate stop references. The stop has two adjustable acrylic plastic strips with hairline indicators on them, one on each side, so the stop can be used on either left or right of the saw, and be independently calibrated. The acrylic strips are in a dado so they are close to the measuring tape on top of the fence, but do no rub or wear against it. Finally, a toggle clamp is used to hold the stop in place on the fence. The inside face of the fence has pressure-sensitive adhesive sandpaper on it to help hold the stop from sliding. The clamp foot has been replaced with a larger plywood pad to increase reach and allow a non-slip surface to be attached to it to provide further resistance to sliding.
|
||||||||
|
| ||||||||
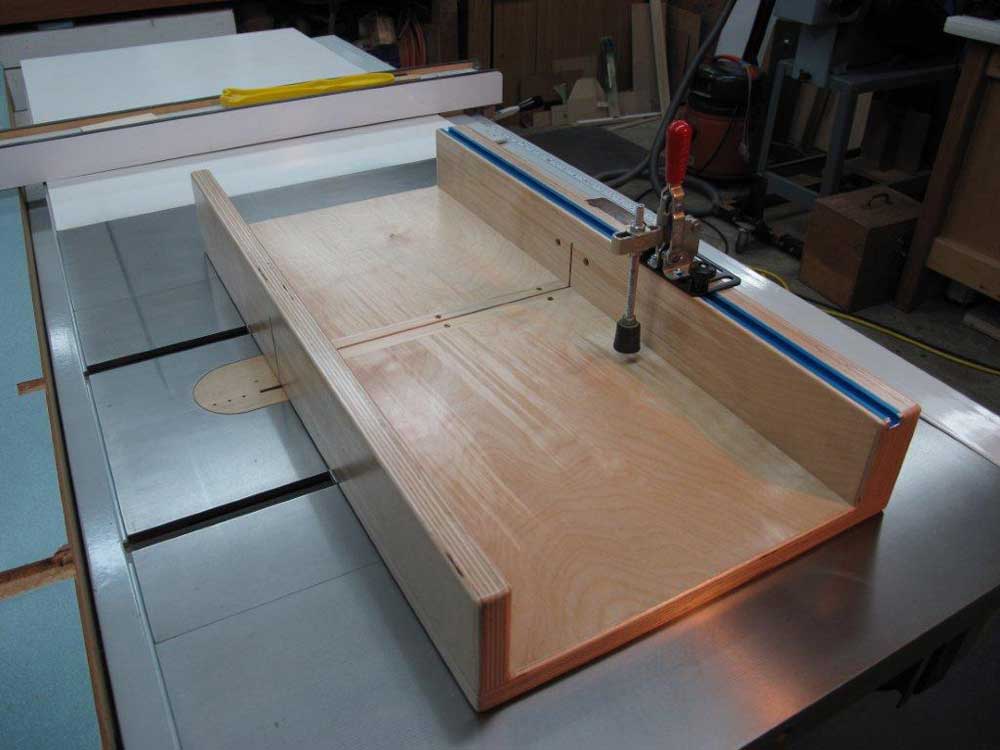
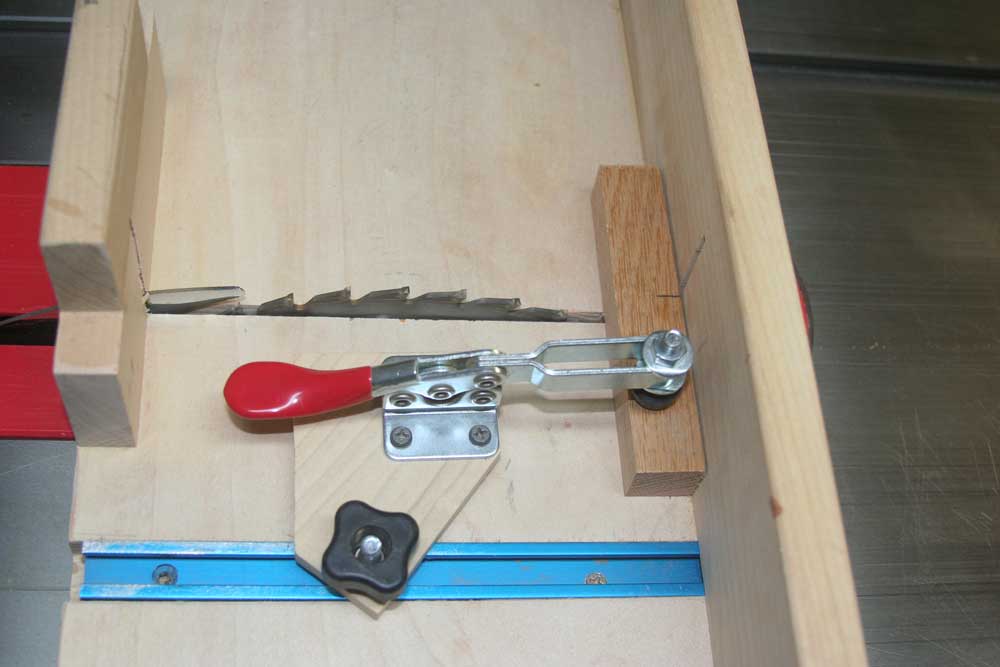
 Jim Brown's Tablesaw Crosscut Sled
I use toggle clamps on my Table saw Crosscut sled. The toggle clamps allow me to cut small pieces of stock and keep my fingers away from the blade. If I am making multiple small pieces the same size I use one of the toggle clamps to hold a stop block and the other to hold my work. |
||||||||
|
| ||||||||
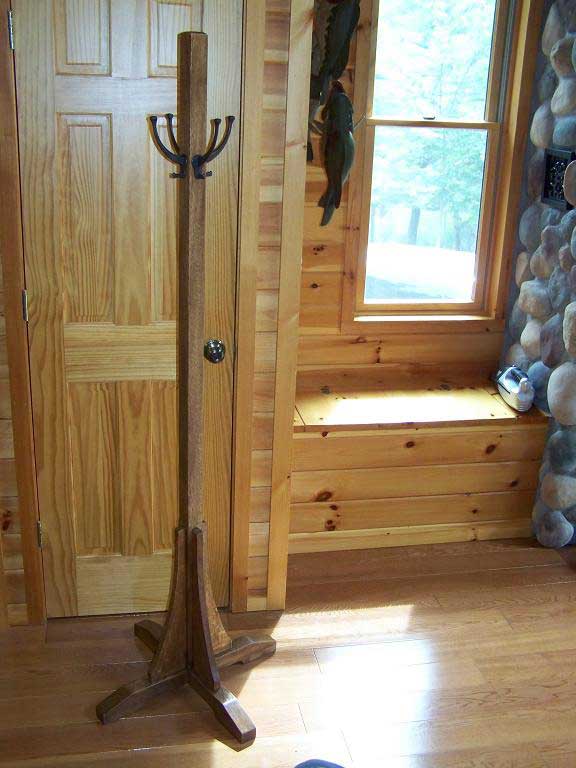
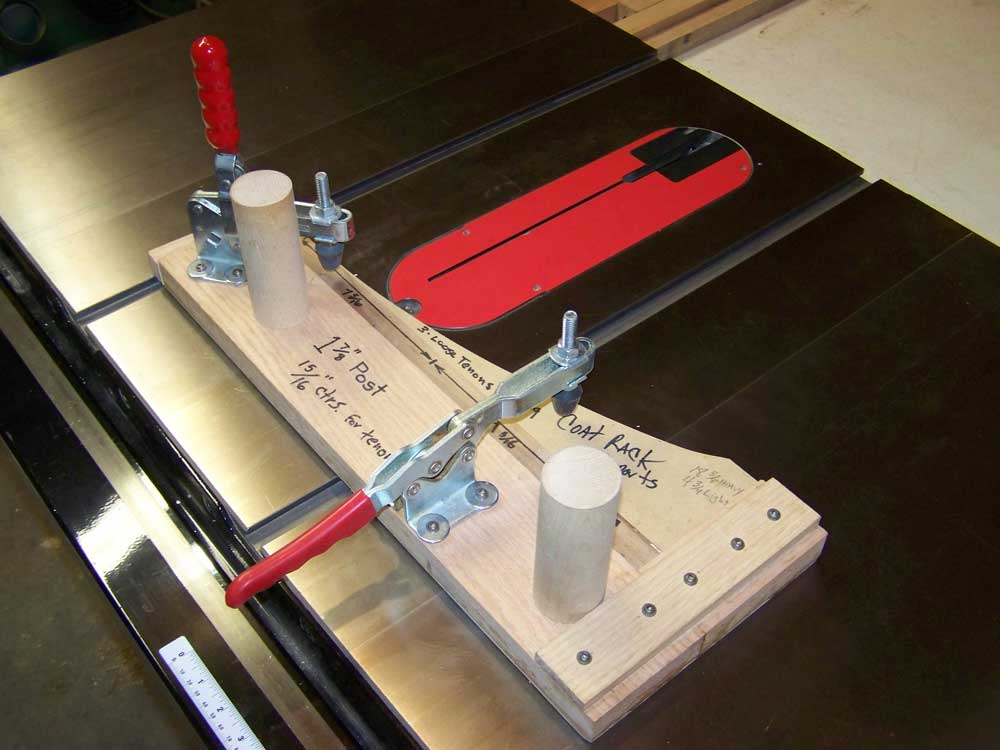 Jim Brown's Router Jig
Toggle Clamps allow my woodworking to be more accurate and safe. One of my favorite projects is a Mission Style Coat Tree. When making the vertical base portions I utilize toggle clamps to hold the wood in my jig, making the work safer and more accurate on the router table.
|
||||||||
|
| ||||||||
 Kent Parker's Cut-Off Sled
This is my version of a cut-off sled. It's made from 1" multilam Birch plywood measuring about 29" x 15". Fences are 3 1/4" in height. The rear fence is 2" thick and is through bolted to the base. Base runners are solid aluminum and fitted with nylon side set screws that can be screwed in or out to adjust the fit in the table saw miter grooves and for alignment. I added four lengths of 3/4" thin Teflon "tape" to the underside of the base to minimize the friction and so the plywood base does not have direct contact with the table saw top. The saw blade passes through a removable piece that can be changed when the slot gets damaged. The track on top of the rear fence can easily accommodate one or more toggle clamps depending on the size of the piece to be cut. I prefer to use a toggle clamp on the cut off piece, if it is large enough, to prevent it from moving towards the saw after the cut. This is a heavy unit, but super stable and slides like butter due to the Teflon tape on the underside. It is really a pleasure to use.
|
||||||||
|
| ||||||||
|
|
||||||||
|
| ||||||||
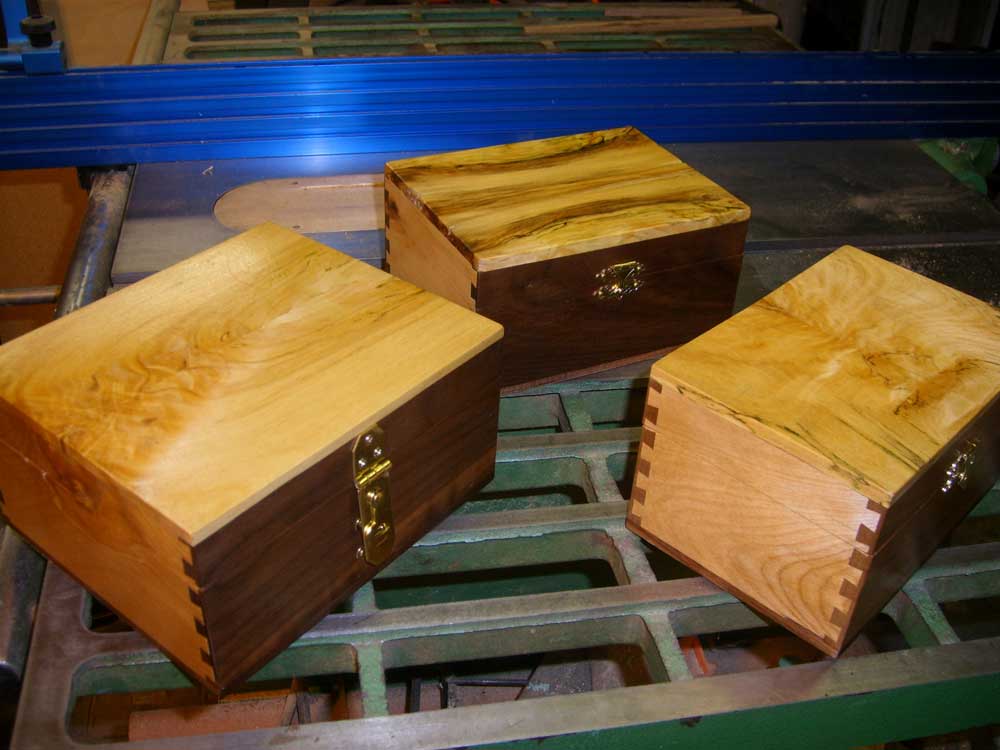
 Mike Petrenko's Box Joint Jig
Here's a photo of a jig I made for box joints in the router table. (I find the table saw too dangerous for box joints, I don't like my hands close to the blade.) This jig keeps your hands away from the router bit. It slows things down but it makes it a lot safer.
|
||||||||
|
| ||||||||
 Mike Petrenko's Cross Cut Sled Jig
Here is a jig a use on a cross-cut sled for cutting small pieces. Just align your mark with the inside kerf in the sled, clamp down on the jig and your all set. Great way to keep your hands away from the blade. Simple, safe and easy to use.
|
||||||||
|
| ||||||||
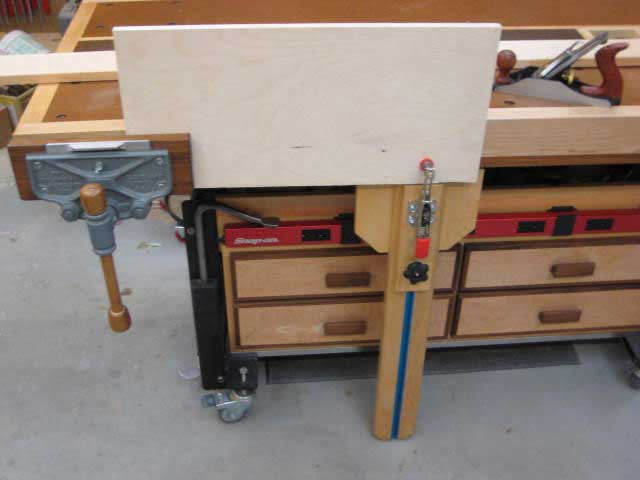
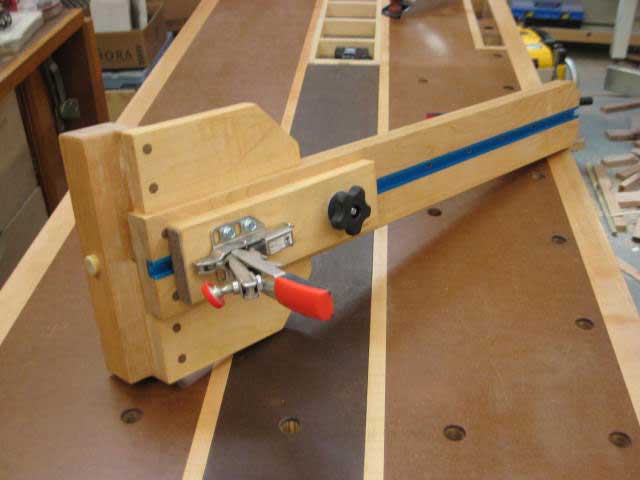
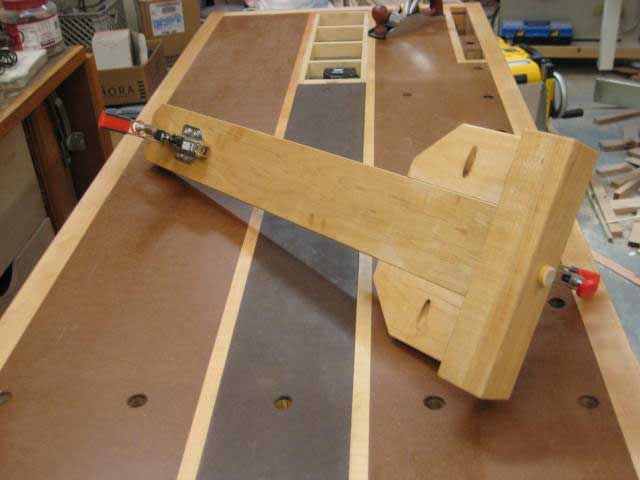
 Danny Hellyar's Sliding Board Jack
This jig is a sliding board jack to assist in holding stock to the front of my work bench for working an edge with a saw, hand plane, etc. I designed this using two Bessey adjustable toggle clamps, one to hold the stock against the workbench plus an in-line toggle clamp on the opposite side near the floor to secure the board jack snugly to the floor. All measurements are included in the drawings. The top of the board jack was designed to fit in any of the dog holes along the front and underneath my workbench, which has a 1 inch by 1-1/2 inch lip. (This portion would have to be designed to fit your individual workbench.) The side wings I added may not even be necessary, but I added them for support in case I accidentally kicked the jig from the side. I added a piece of leather to the top of the clamp carriage for extra protection for the bottom edge of material being worked on. The top T-bolt on the clamp carriage can be fitted through the middle of the front portion of the Bessey clamp. It is infinitely adjustable to hold any length or width of stock up to nearly the size of the front of my workbench. This jig works very well. Once material is clamped in the toggle clamp, it doesn't move.
|
||||||||
|
| ||||||||
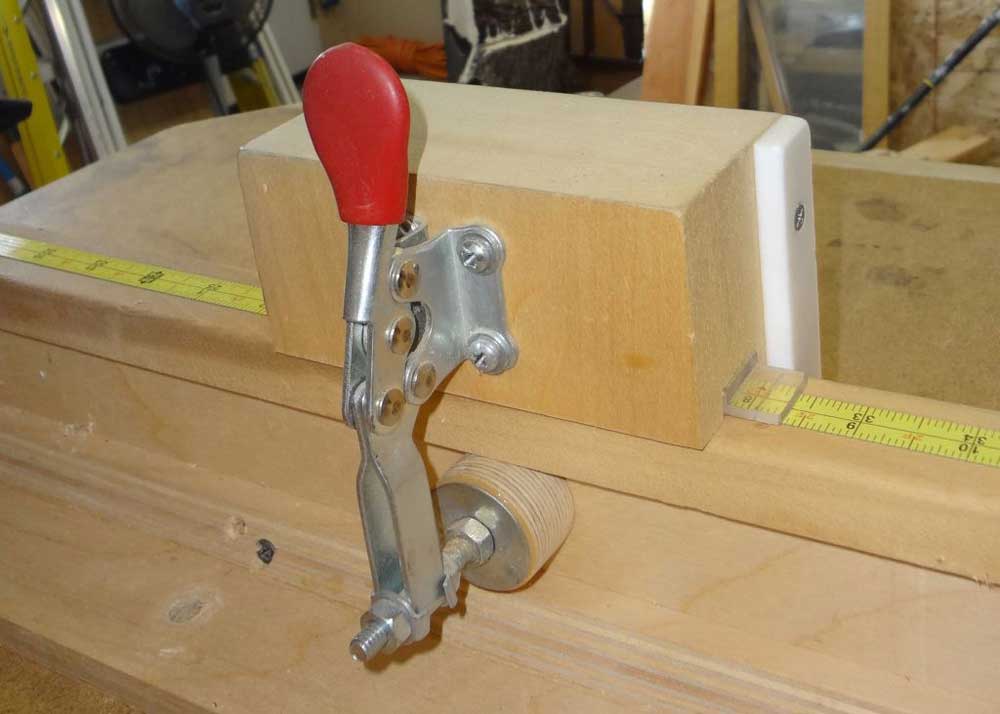
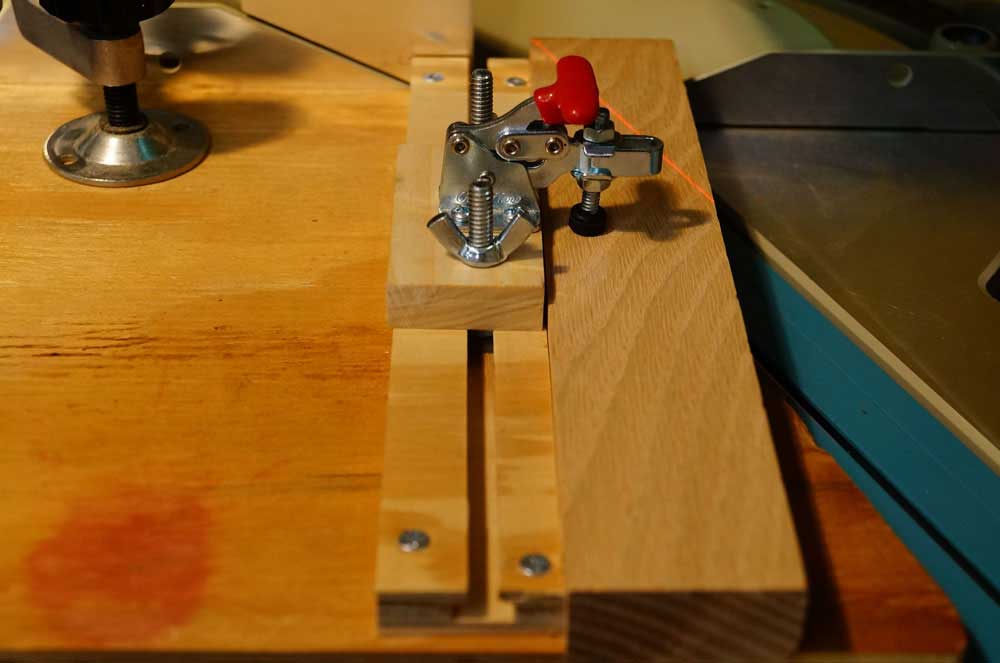
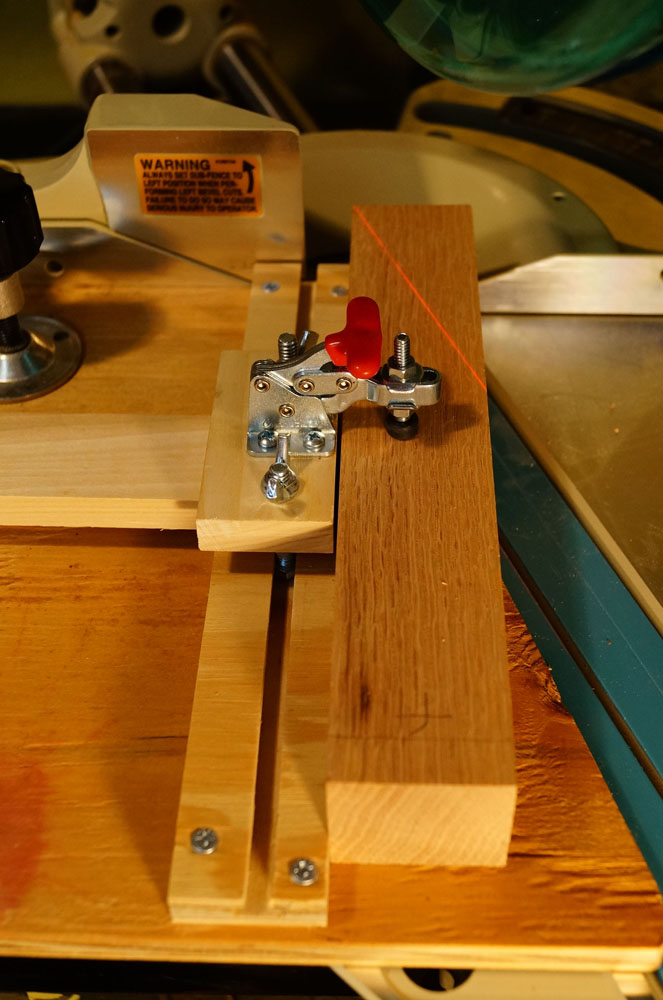
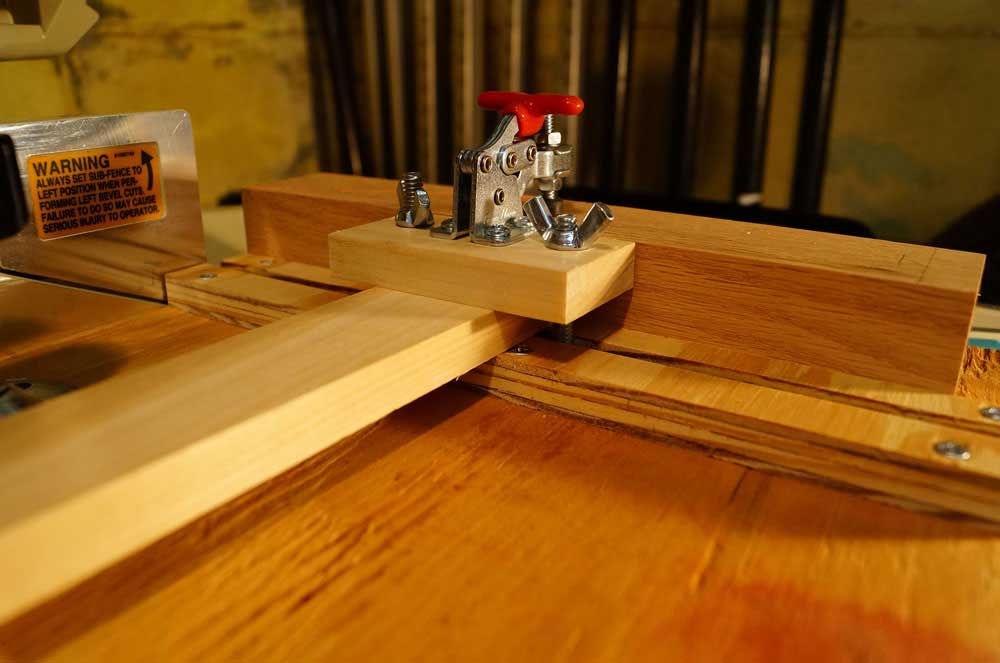
 Chris Wolf's Low-Angle Miter Saw Fixture
A miter saw or miter gauge will cut angles of 90 to 45 degrees, and a typical tapering jig is good for angles up to about 15 degrees, but how do you make cuts in that in-between range, 15 to 45 degrees? This fixture mounts on a miter saw to hold a workpiece for those cuts. It consists of a 1/2-inch plywood base about 11 inches square with a narrow piece of 1/2-inch plywood mounted on top as a fence. The fence is slotted so it doubles as a T-track. The fixture mounts on the saw with its fence (and the workpiece) at 90 degrees to the mitersaw fence. The workpiece is held by a toggle clamp mounted to a small piece of wood which slides forward and backward along the fence in the T-track. Mounting the clamp on T-track serves two purposes: 1) allows you to position the clamp in the best location for each workpiece, and 2) allows the use of spacers to raise the clamp for thicker workpieces. Photo 1 shows the fixture in place on the saw with the saw adjusted for a 22.5 degree cut. Photos 2 and 3 show a piece of 3/4-inch oak ready to be cut, with the laser showing the cut line. Photo 4 shows the fixture with a spacer inserted to raise the clamp for a thicker workpiece. Photos 5 and 6 show a piece of 1-1/2-inch oak ready to be cut.
|
||||||||
|
| ||||||||
 David Springer's Clamp for a Sliding Miter Saw
I really like my Makita sliding miter saw, but the hold-down clamp has very limited range and capability. I wanted more options for clamping. So, I decided to make my own clamp with greater range and options for holding wood. My solution was to cut a piece of hard wood approximately 2-½ inches long that duplicates the curve of the space on the table of the sliding miter saw. I drilled a hole through that piece of wood. I inserted a hold-down bolt through the hole, long enough to span the distance from the frame below the miter saw and through a small platform that rides on the saw table. I screwed a knob onto the bolt. I made the platform wide enough to attach a toggle clamp. In the first photo (above) I show how the under-the-table portion of the clamp is inserted through the slot and under the frame of the saw. In the second photo (below) the under-the-table piece is turned perpendicular to the slot. I am then able to use the clamp. The last two pictures below show two of several clamping positions that are available. With this clamp I can clamp anywhere within the range of the toggle clamp. All that is necessary is to be sure that the under-the-table piece is perpendicular to the slot. The clamp holds solidly. The clamp must be as close as possible to the piece of wood it is holding. It is best if the clamp pad is over the center of the piece it is holding. If it is not close to the piece it is holding, it tends to draw the piece of wood away from the fence. This can be overcome by getting the clamp close to the wood it is holding. You will note that I have a wing nut that tightens the clamp pad bolt. I find this very helpful so that I can adjust the position of the pad.
|
||||||||
|
| ||||||||
 George LaMotte's Cutting Board Jig
I use this for holding my assembled piece and getting ready to "slice" identical pieces for reassembly. One clamp holds the large piece against the stop block and the other clamp holds the "cutoff" piece to keep it from flying away, (or into my face). I realize it is very simple but most jigs are. |
||||||||
|
| ||||||||
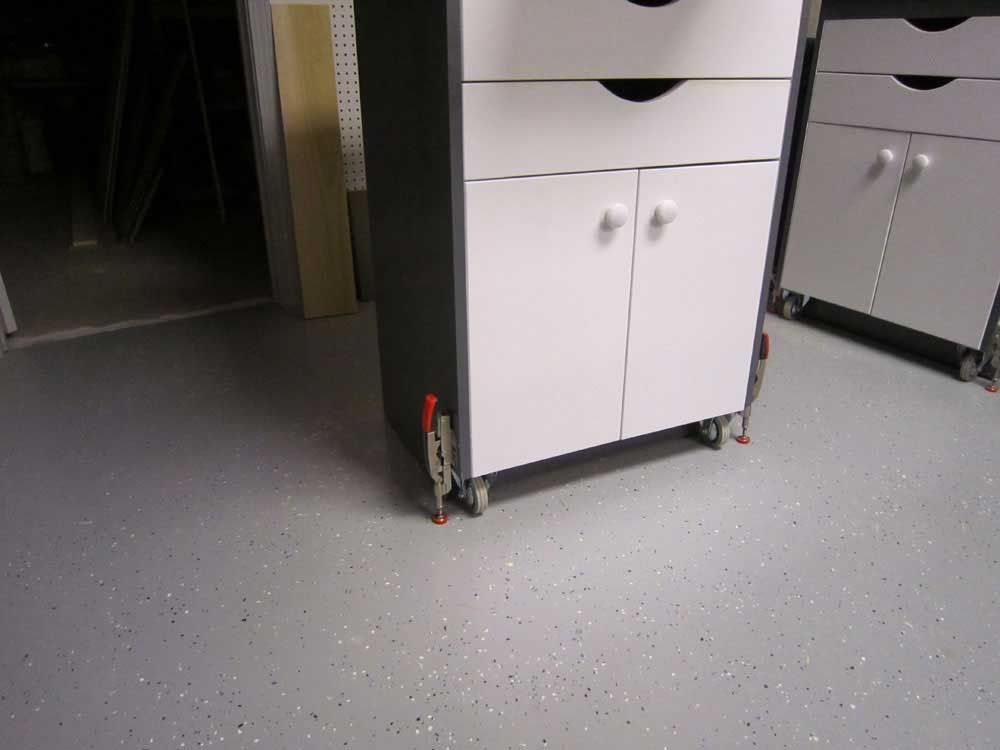 Paul Hoffman's Mobile Tool Cart Stabilizers
Other than clamping on jigs I also use them to lock and stabilize mobile tool carts.
|
||||||||
|
| ||||||||
 David Lynch's Bandsaw Jig for making Guitar Pick Cases
I have been making these guitar pick cases for a while now and needed a way to band saw the back of the case off so the grain pattern in the wood matches. With such a small item I needed a way to do this safely. The 1-7/8" vertical Toggle Clamp makes this operation safe and efficient. The plunger pushes on the slope of the ram block and holds the work piece against the fence, while the stop block pushes the piece through the blade and the thin kerf in the stop block makes for a tear free cut at the end. Once the piece has been completely cut off I can safely remove the cutoff piece before retracting the jig back through the blade. The best part about being able to use the 1-7/8" Vertical Toggle Clamp for this jig is, my fingers and hands stay safely away from the band saw blade. The vertical Toggle Clamp is the perfect choice for this jig since the stopper locks in place and will not push the work piece further forward when the piece is cut off. The adjustable toggle slide and the long arm of the ram block make adjustment easy. The thin strip against the fence which is made when the blade first cuts into the jig's bed, is flexible enough to accommodate wider cuts. The push block is easily removed and other stop blocks can be used for thinner or deeper cuts. Just remember not to cut off the long piece against the fence (under the cut off piece) since this piece prevents the cutoff piece from falling into the table insert hole. This jig was made for a specific purpose, other variations can be used ( moving the position of Vertical Toggle Clamp) for your specific needs.
|
||||||||
|
| ||||||||
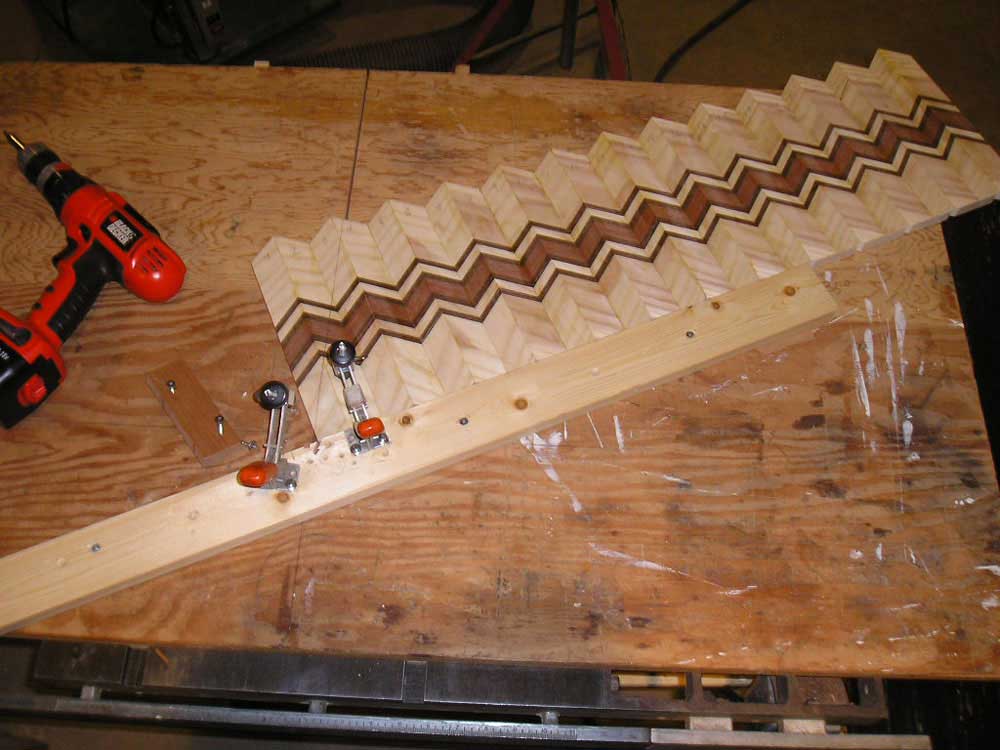
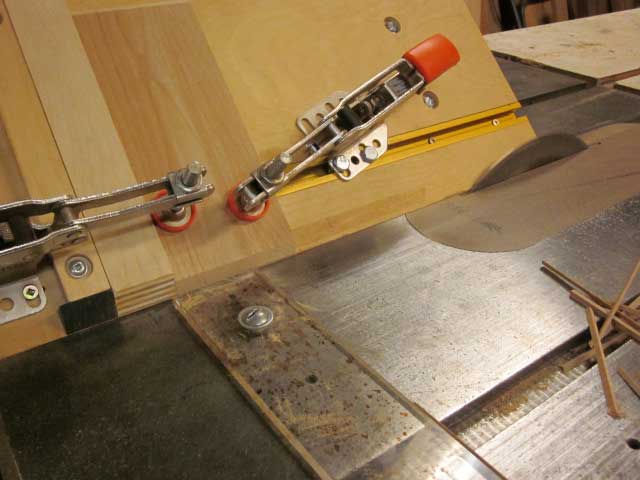
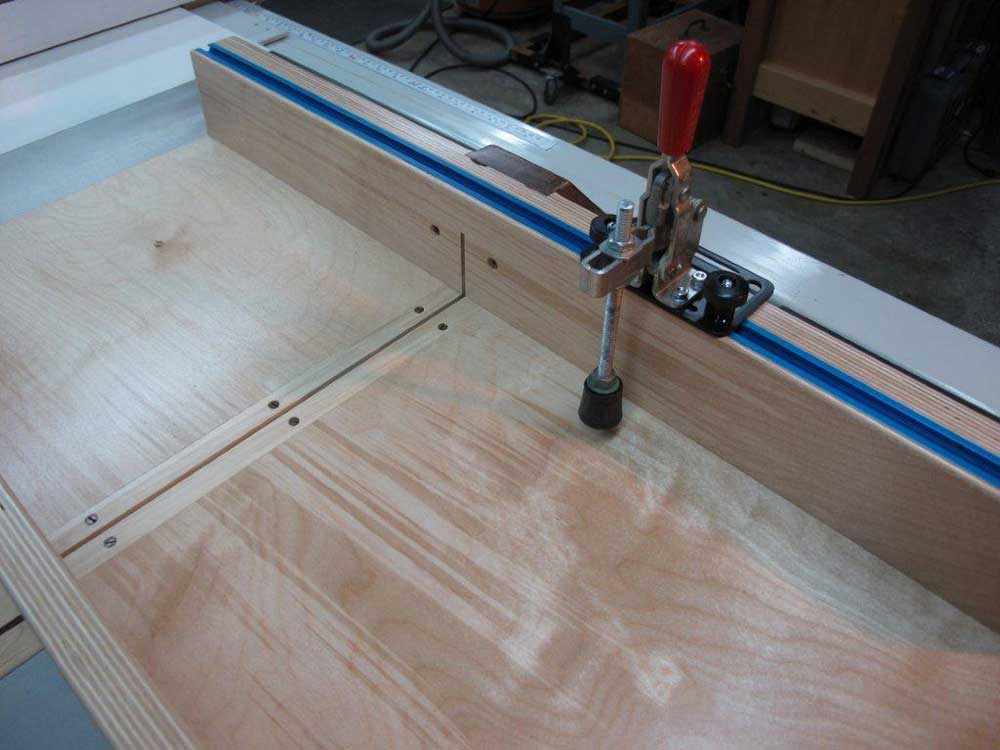
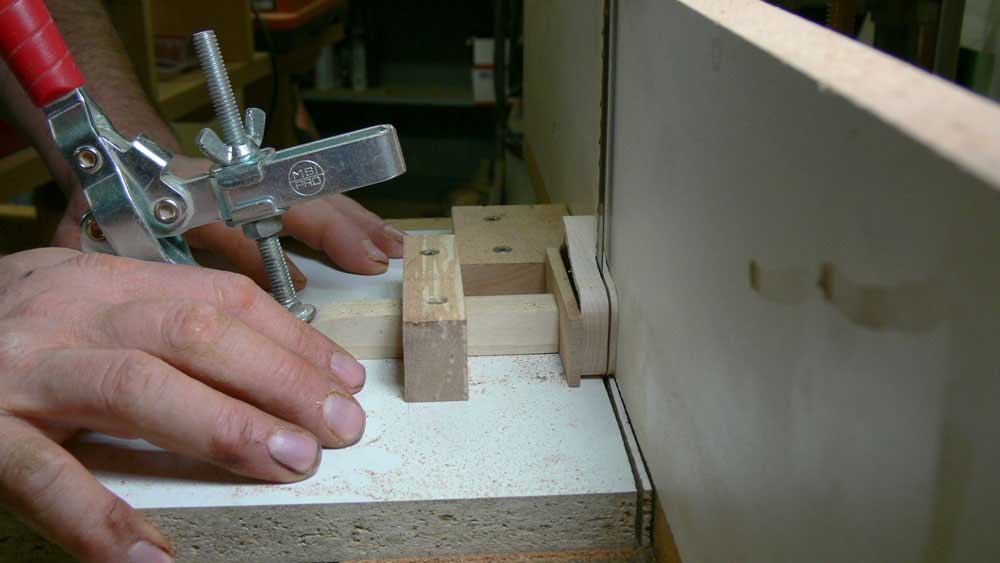
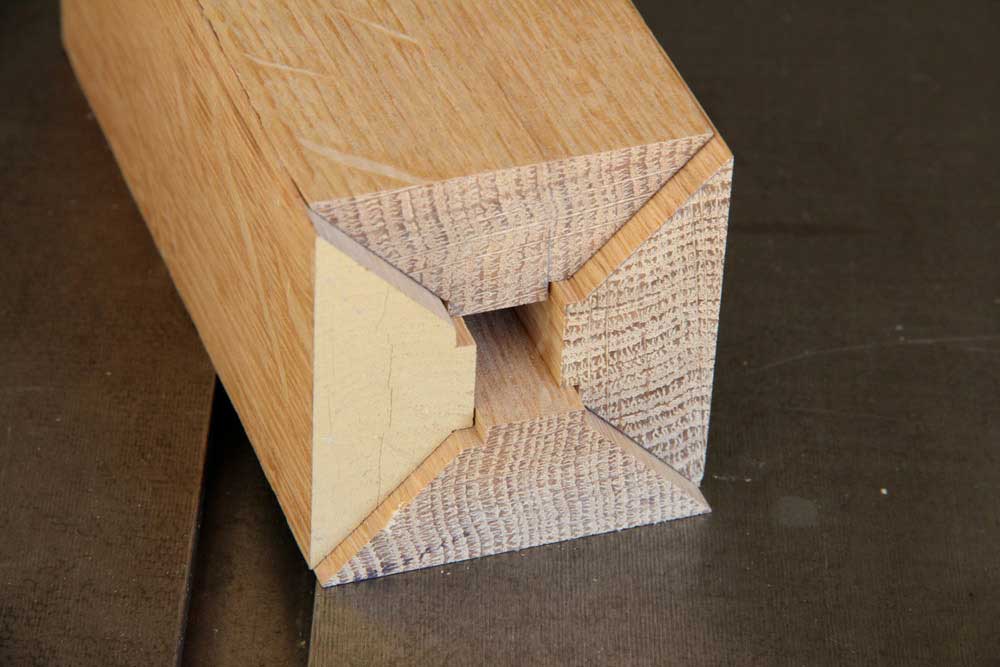
 Ed Everett's Arts & Crafts Quadralinear Mitered Rabbet Joint Jig
I am a fan of the Arts & Crafts quadralinear leg. The best way to make it seems to be the mitered rabbet joint. I made this jig using toggle clamps to hold the pieces as I made the various cuts on the table saw. It was invaluable when making the 1-3/4" square legs for my A&C stereo cabinet, as the pieces were too narrow to safely hold by hand. The jig rides between the fence and the blade on my table saw. I relocate the toggle clamps and the jig (right or left of the fence) depending on what cut I am making. This to the left shows the jig with one of the 1-3/4" wide pieces for my stereo cabinet legs. The picture below shows a test run after all of the pieces have been cut. These are 2-1/2" square for my L&JG Stickley prairie chair.
|
||||||||
|
| ||||||||
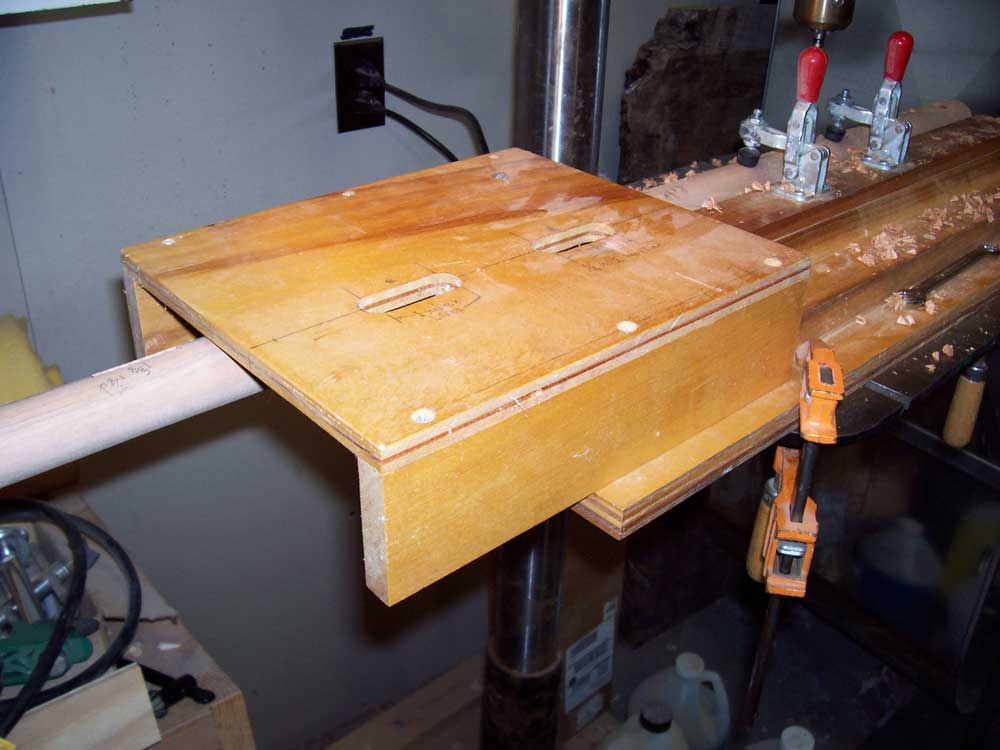
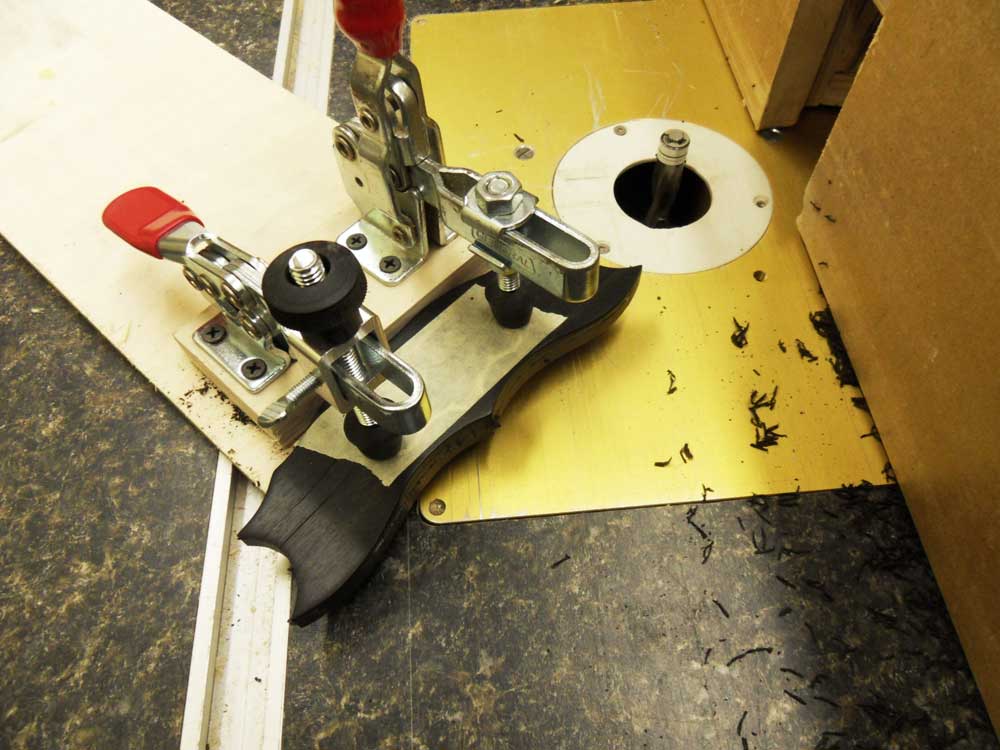
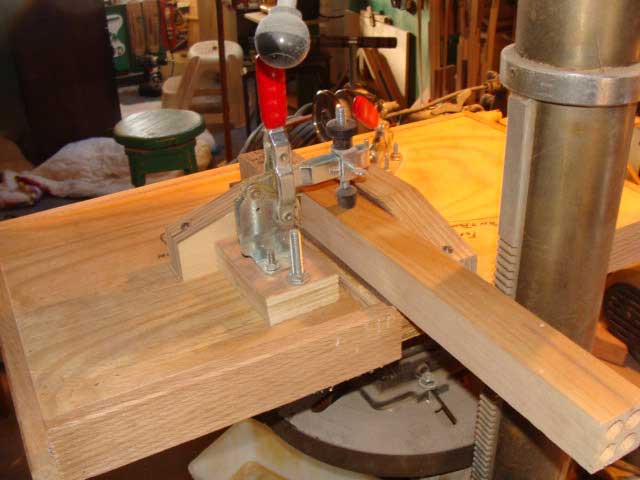
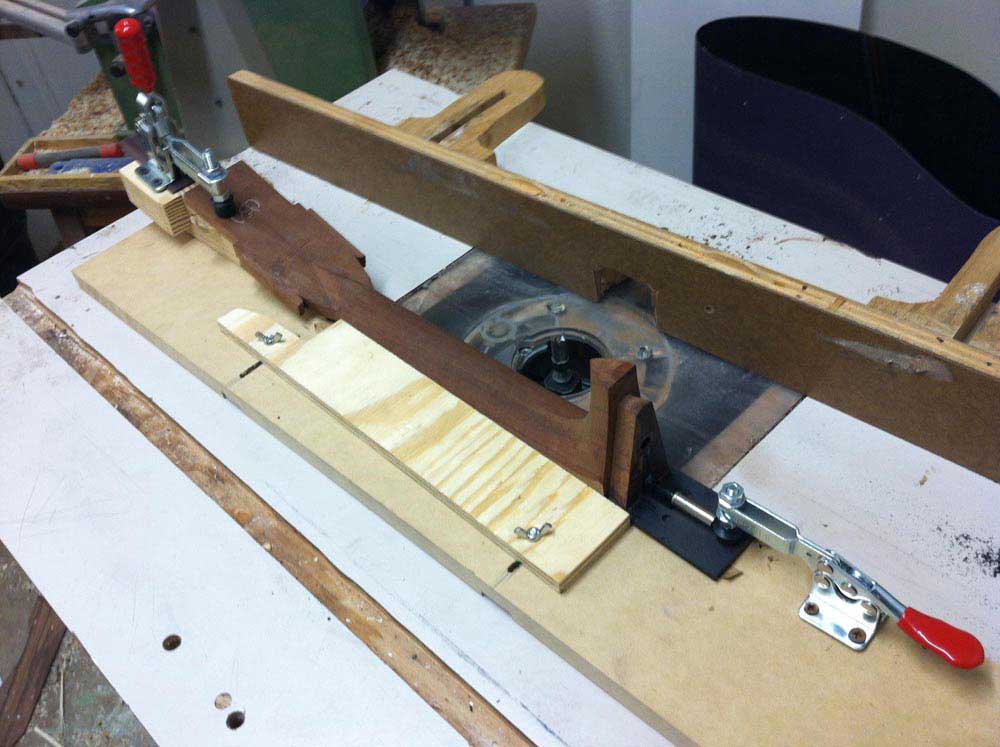
 Dan Pleska's Chair Leg-Making Jig
I used the jig in the photo to make the back legs for eight side chairs. It was used on a router table with a pattern cutting bit. I rough cut the legs about 1/8" oversize. The front side of the legs had a 6" flat where the side rails attached. The flat wasn't cut, but was the joined edge of the blank. I trimmed the back side of all 16 blanks stopping just short of the knob at the top. It was done with an oscillating edge sander and a rasp. I then trimmed the front side of each blank. The jig allowed the bit to come off of the blank to preserve the 6" flat. Without the jig it would have taken much longer to make the 16 legs. |
||||||||
|
| ||||||||
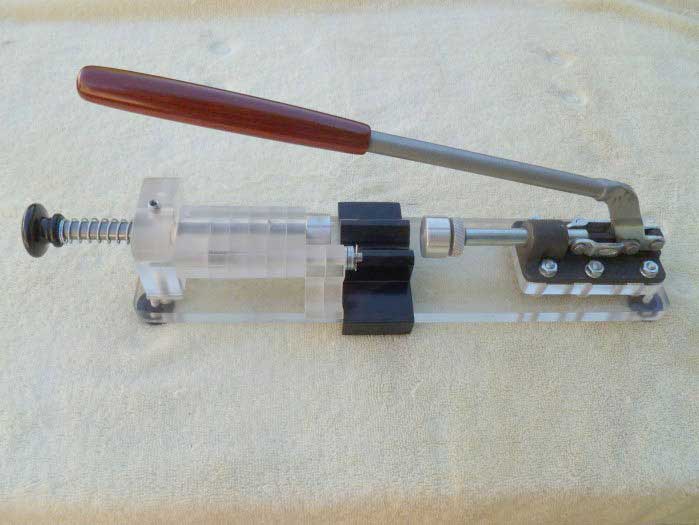
 Bruce Lewellyn's Pen Press Jig
Here's my submission, it’s a pen press that won't bend and bind up with lots of use. I've made several and these 2 are the latest versions. After seeing several of my friends and fellow Club members buy store bought pen presses and have them bend, bind up, and not work very well, I went to work and these do work very well. Our Club (Orange County Woodworkers) has been making 4 to 5,000 pens a year for the Freedom pen project for several years. My presses seem to be bullet proof. The store bought ones seem to use too light duty of a toggle clamp and framework. The toggle clamp bracket that the shaft slides through in my aluminum base model is heavier gauge metal and the support is longitudinal. It isn't going to bend up during normal use. The acrylic base press has a cast iron toggle clamp and it is even more heavy duty. Only problem with that one is the expense of the toggle clamp.
|
||||||||
|
| ||||||||
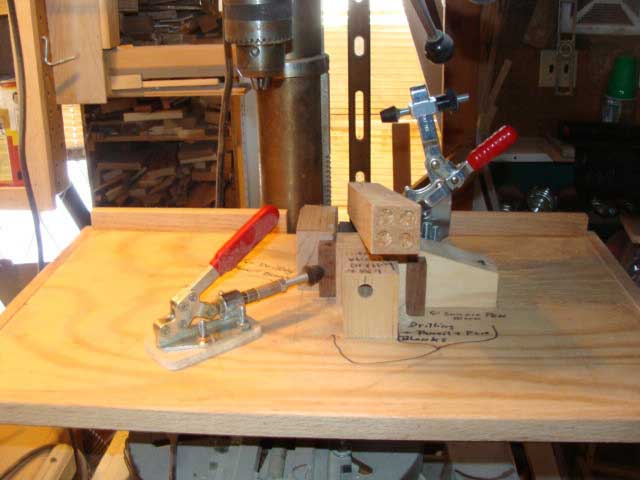
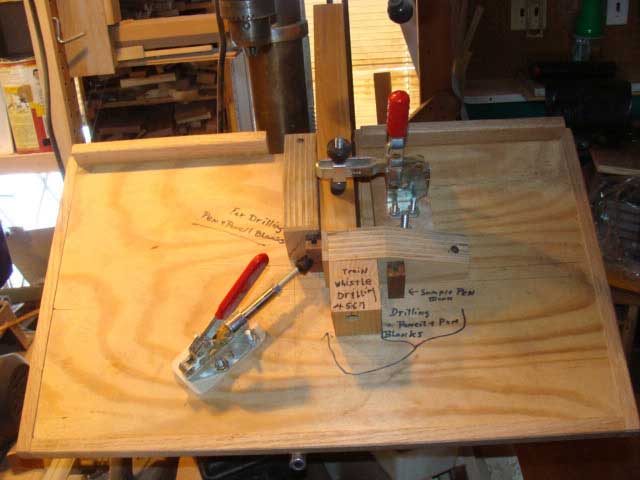
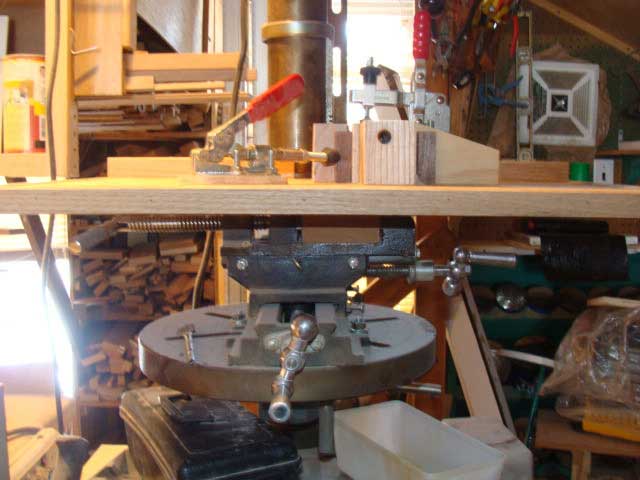
 Henry Parslow's Pen, Pencil & Train Whistle Jig
|
||||||||
|
| ||||||||
 Bill Akins' Pen Press Jig
I had been using my wooden bench vise to press my pens. Last year I turned pens for 2 straight days at a North Georgia Festival. I needed something portable. I used a 4" wide piece of scrap oak 18" long. I attached a push/pull toggle clamp at one end. I glued a small block into place to hold the pen blank at the proper height. The large block is used to press the pen blank and pen mechanisms into place. There are a row of ¼" holes on the back of the base and the large block has a ¼" dowel in the bottom. This will allow for adjustments for the various pen lengths. I should have made this a long time ago. |
||||||||
|
| ||||||||
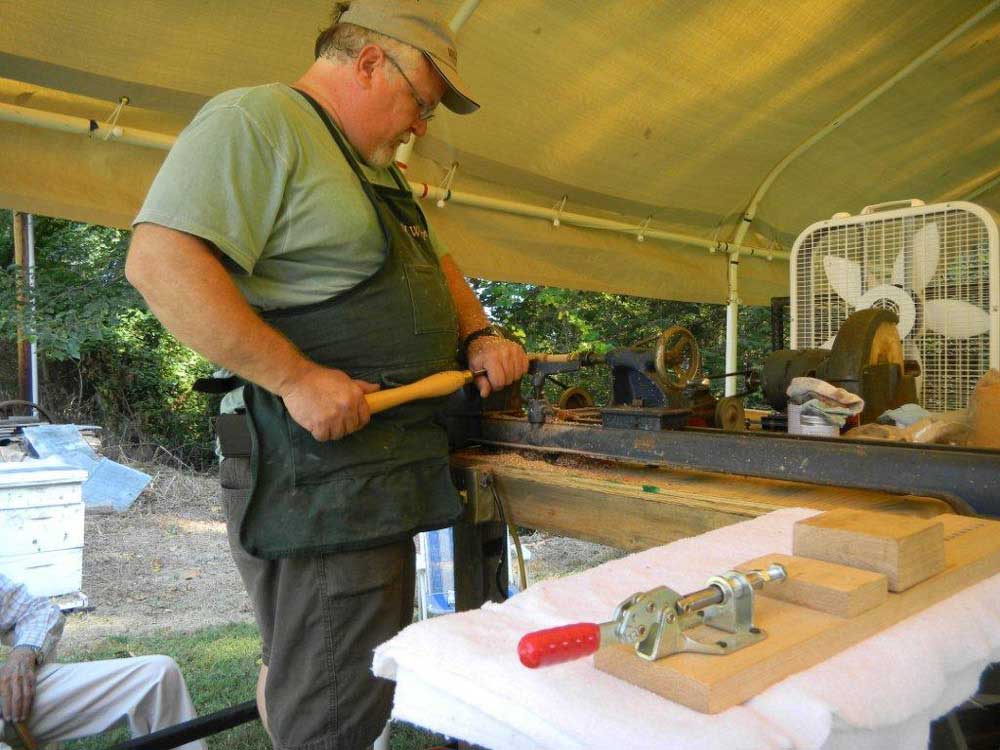
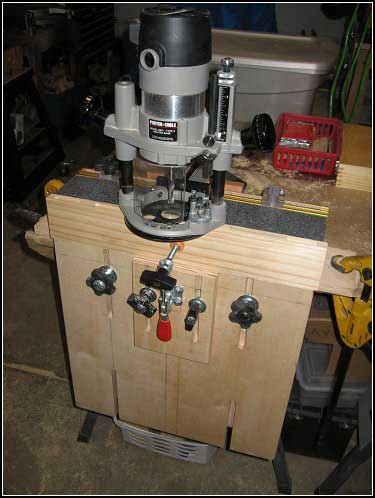
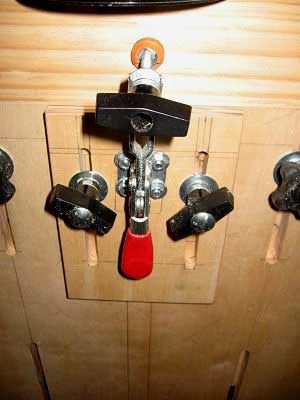
 Bill Akins' Tool Sharpening Jig
Several years ago I made this jig to assist with sharpening my turning tools. All pieces came from 2 ½" wide stock. Two pieces are screwed to the work table that act as guides. The center piece has a pocket made onto the end to hold the tool handle. The toggle clamp is fastened to the outer guide piece. I slide the center piece to the correct location and lock it into place with the toggle clamp. I have made marks across the outer guide and sliding pieces for the perfect sharpening location for each tool. I also have the Wolverine Vari-Grind Attachment that I use for my bowl gouge. This works well with the pocket in the sliding piece. |
||||||||
|
| ||||||||
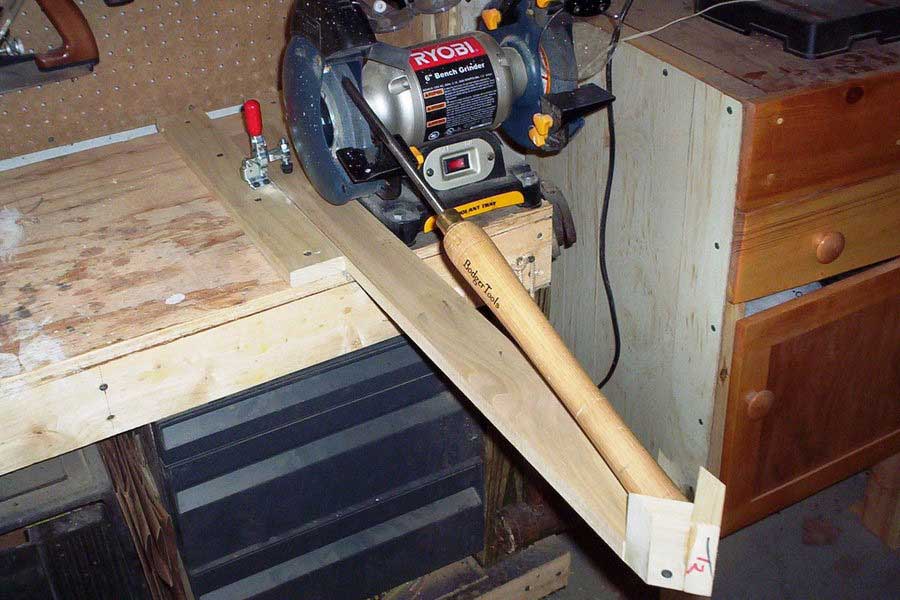
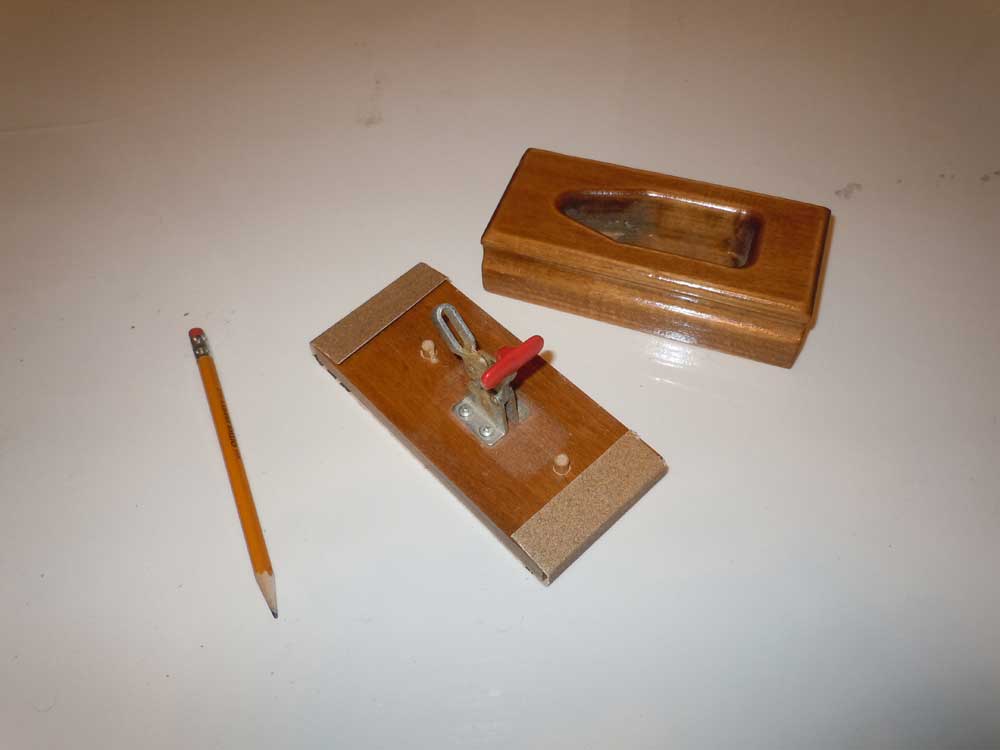
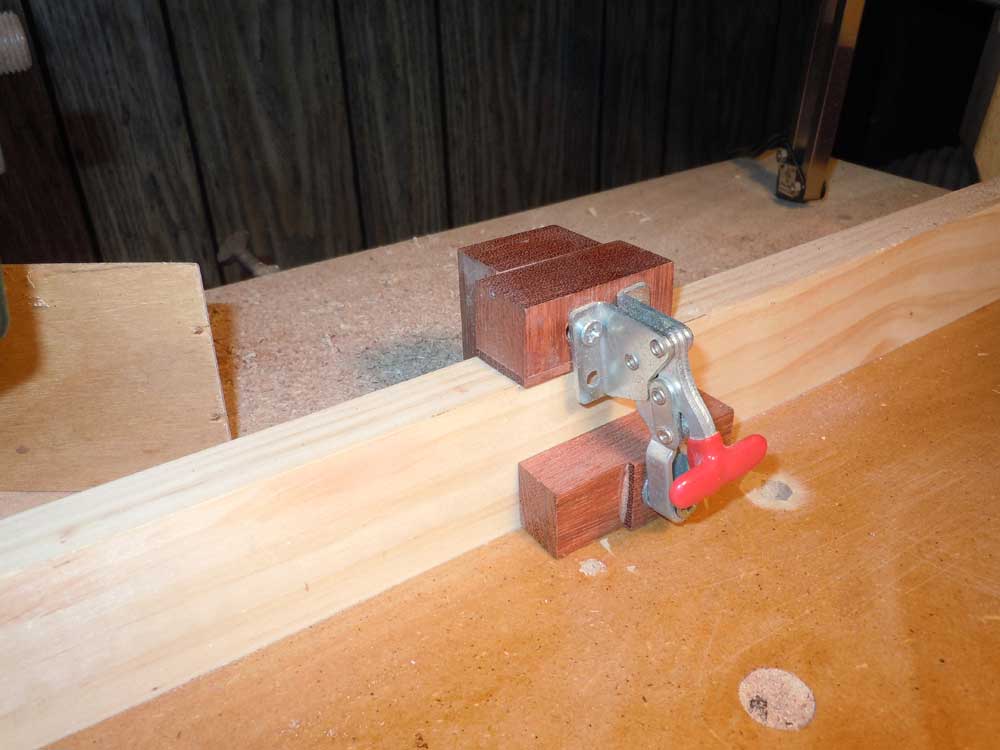
 Bill Akins' Pen Drill Jig
This is a simple jig I made to drill pen blanks. I cut the base to fit my drill press table. I connect 2 3" wide pieces at a 90 degree angle and fastened them to the base. An extra riser block attaches the toggle clamp to the sides. Once I center the first blank I clamp it to the drill press. This really comes in handy when I am making large batches of pens. |
||||||||
|
| ||||||||
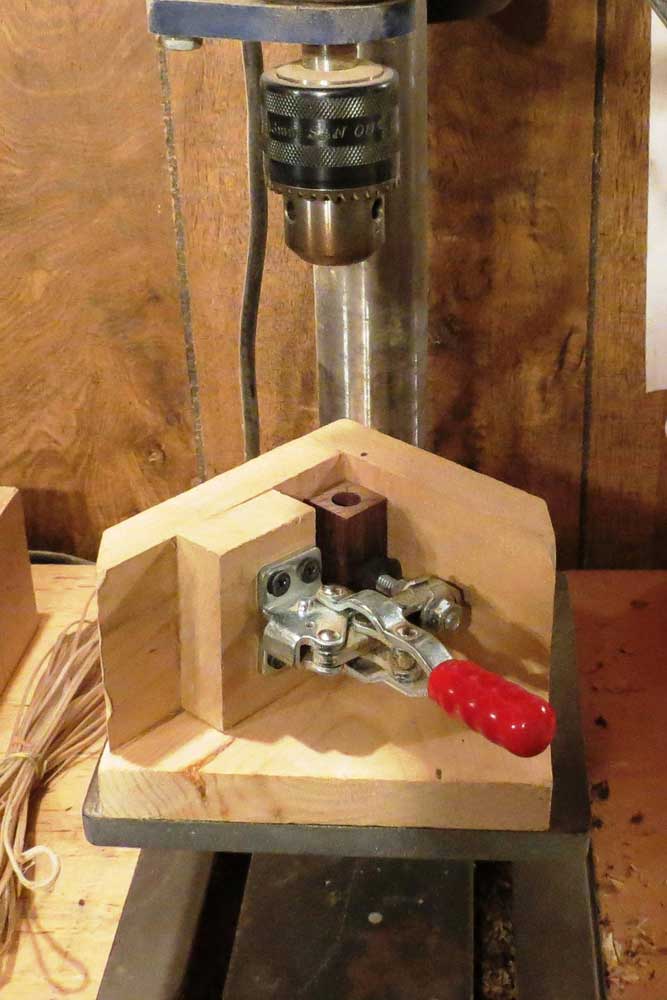
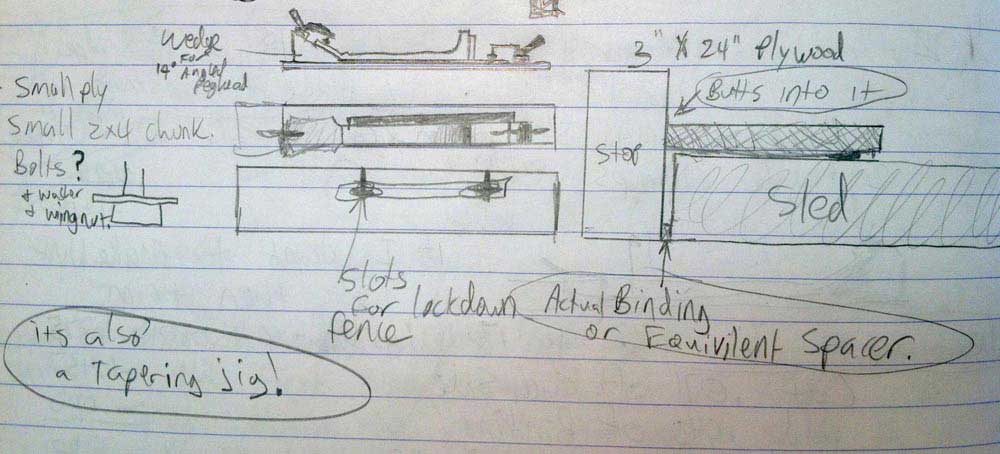
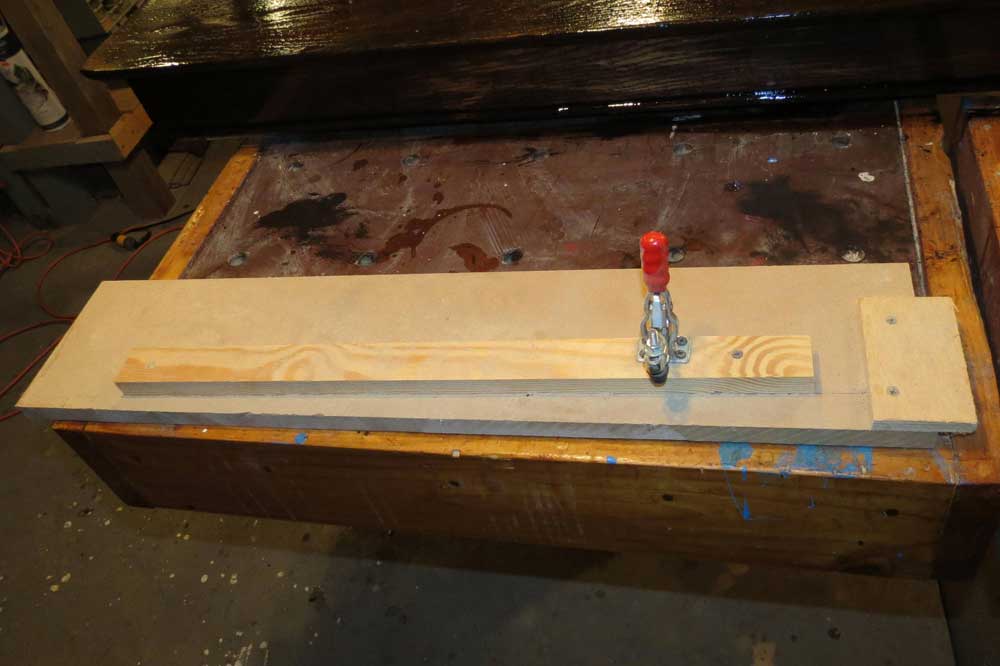 Bill Akins' Tapered Leg Jig
I really love using toggle clamps in all sorts of jigs and applications. This is a simple jig that I made to make tapered legs on my table saw. The base is a piece of MDF 3/4" thick, 6" wide and 30" long. A piece of scrap is screwed on the MDF for a guide at the proper angle for the taper. A stop block is screwed to the MDF to hold the end of the leg. The toggle clamp is connected to the top of the guide to hold the leg in place. I adjust the table saw fence the width of the jig. Tapered legs come out perfect every time. Also included is a shaker table I made with the jig.
|
||||||||
|
| ||||||||
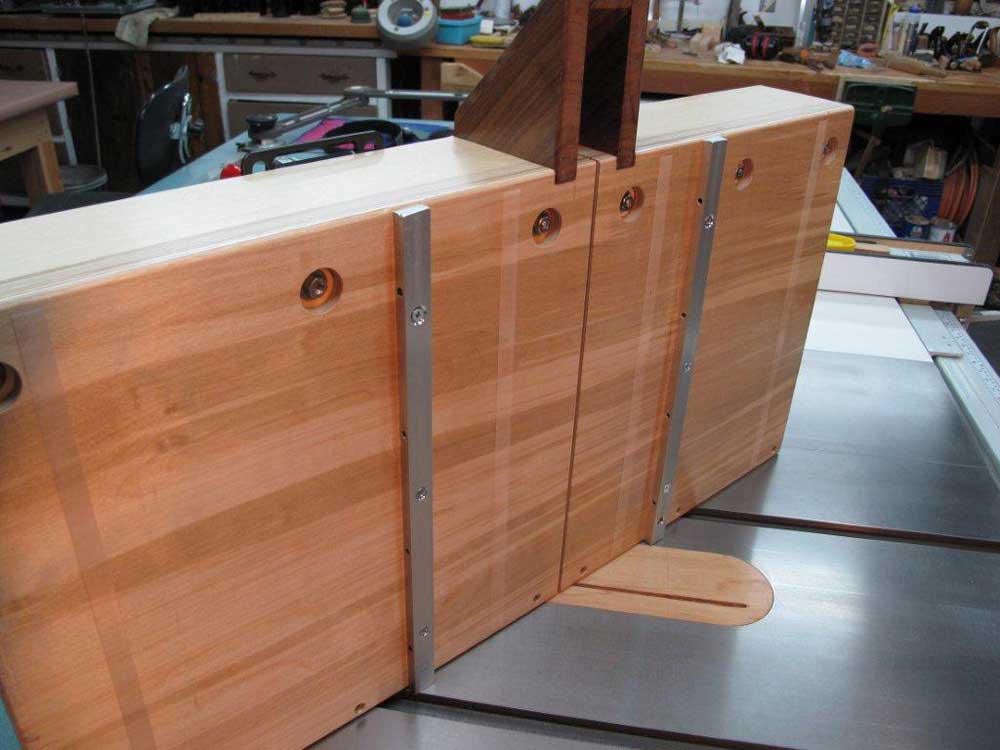
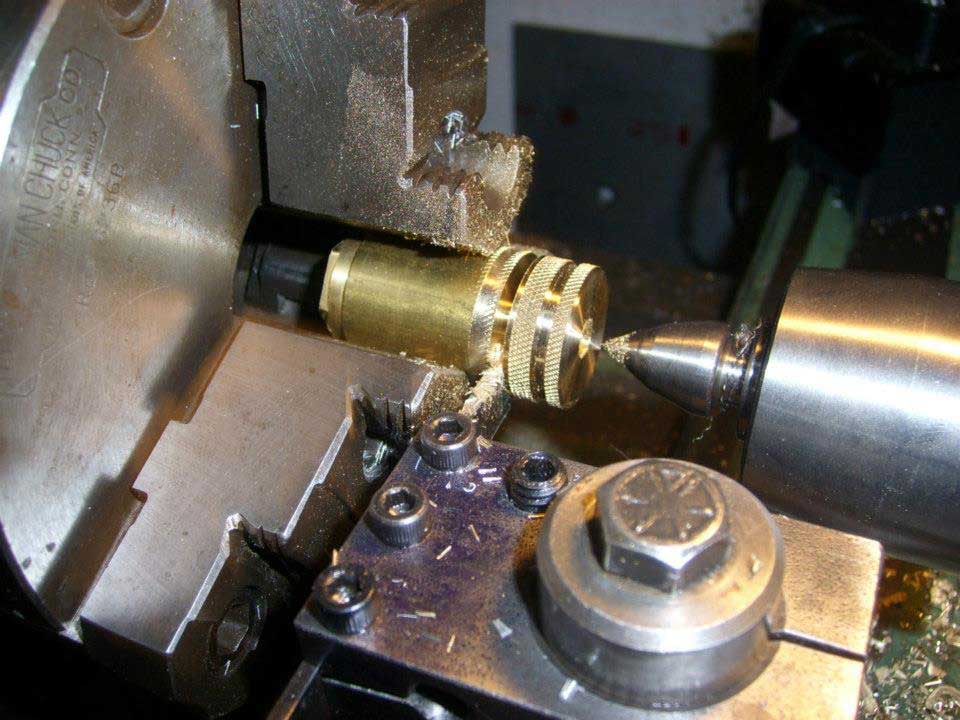
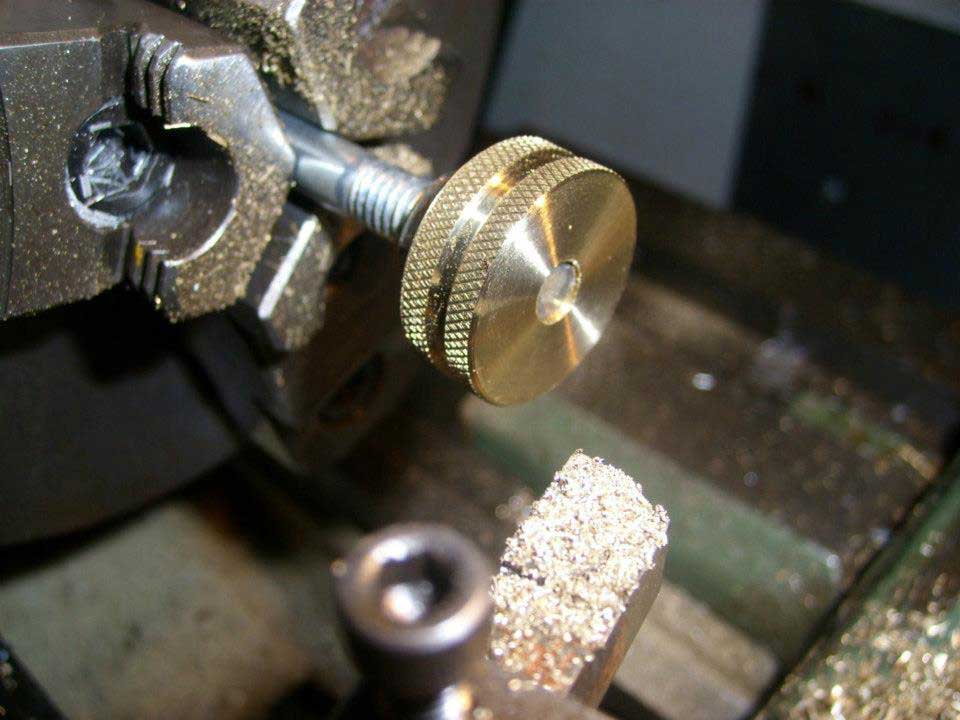
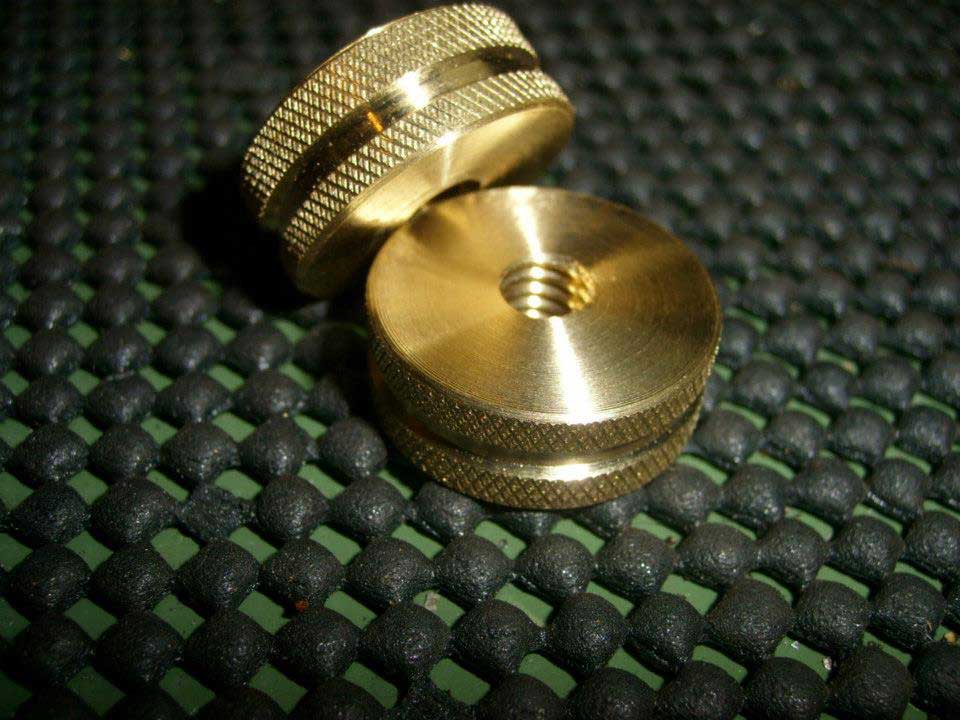
 Rick Redfield's Tablesaw Jig
This jig is used to hold resawn pieces to trim on the table saw. I machined the aluminum clamp nuts and the brass toggle tension adjusters in my machine shop. The body is angle aluminum. The base is MDF with aluminum channel underneath riding in the table saw slot. Had an old rubber handle which I added. Works great!
|
||||||||
|
| ||||||||
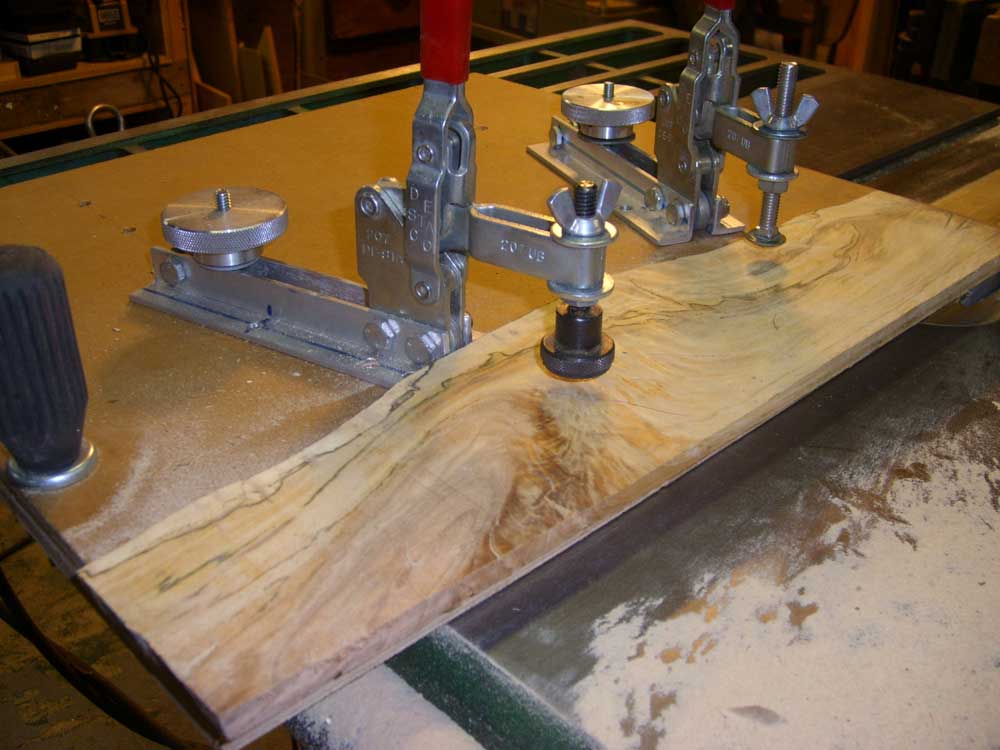
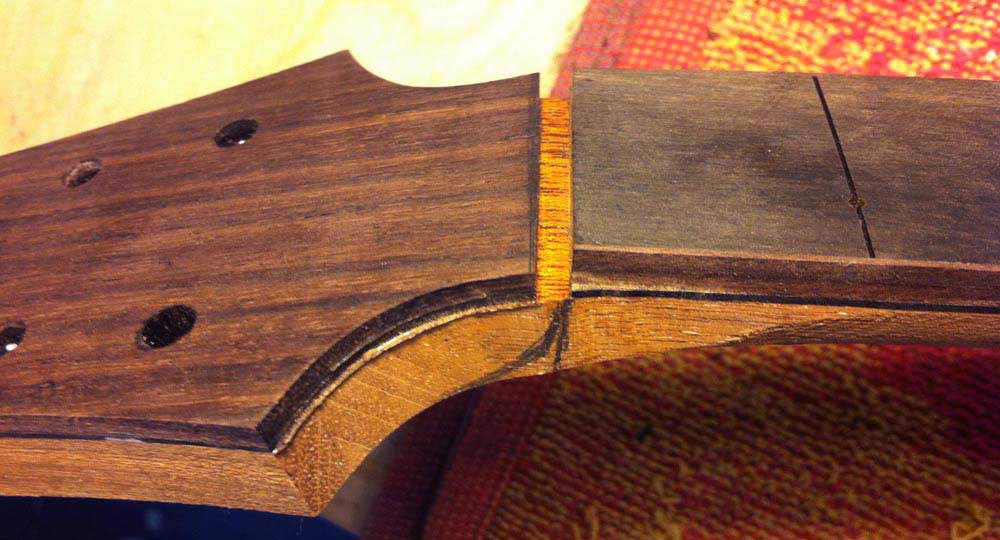
 Micah Bruce's Guitar or Mandolin Building Jig
This jig holds a guitar or mandolin neck in a flat and parallel orientation so the user can use a router table (or tablesaw, for that matter) to cut a channel for binding on the fingerboard edges. It is unique because usually the binding on a fingerboard is cut and glued on PRIOR to gluing the fingerboard onto the neck. This jig allows for the binding channel to be cut AFTER the fingerboard and neck have been glued together. I included a sliding fence for adjusting for various tapers and sizes of fingerboards, as well as for adjusting the desired width of cut. Side Note: If you have a bit that can handle it, you could potentially install frets into the fingerboard, and then cut the binding channel while also trimming the fret ends perfectly to the inside of the channel in one pass! That could be a very cool and unique design feature that could otherwise not be executed.
|
||||||||
|
| ||||||||
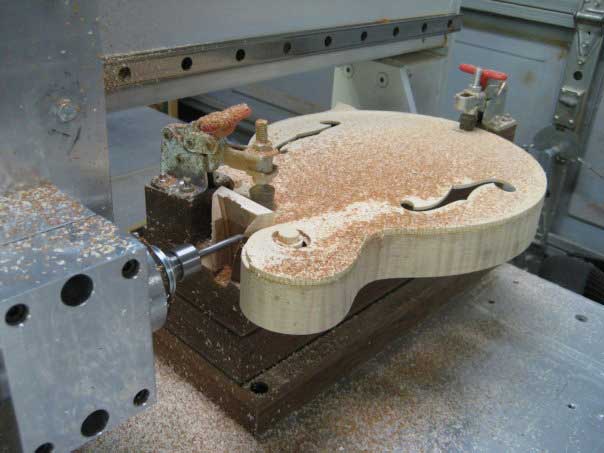
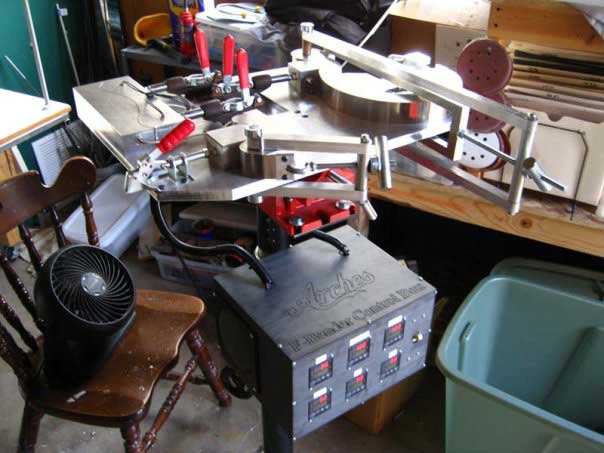
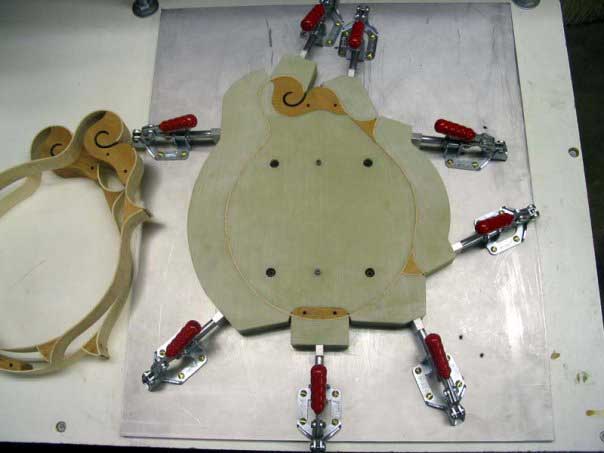
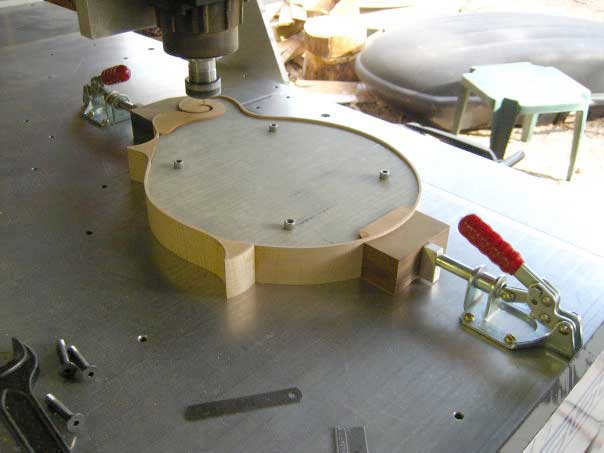 Chris Baird's Jigs for Building Mandolins
These are all jigs designed for building mandolins. The first one holds a mandolin rim while a CNC cuts the scroll channel. The second jig pictured holds a mandolin rim while a CNC cuts the dovetail neck joint. The third jig is a heated mandolin side bending machine (of my own design and build). And finally, the fourth jig shown is a glue-up form for the mandolin sides (made with the third jig) and the interior blocks.
|
||||||||
|
| ||||||||
 Michael Hamilton's Table Saw Jig for cutting 45 degree miters
Here's my table saw jig for cutting 45 degree miters. Sliding sled set at 45 degrees. Adjustable Bessey clamp (the new one) for different widths/thicknesses of wood. Entire unit is tweakable - mostly screwed together. Replaceable backing strip to reduce chipout.Aluminum glides. Plexiglas fine adjustment stop plate attached using screws in tapped holes in saw top. |
||||||||
|
| ||||||||
 Mark Thiel's Sanding Block
Clamps a 1/4 sheet of sand paper to block that is large enough to easily hold. Screw head allows easy adjustments of clamping pressure for different thickness of paper. Dowels align top to bottom.
|
||||||||
|
| ||||||||
 Mark Thiel's Fence Clamp
This clamp attaches to the fence on my miter saw and easily adjust up and down the length. It easily clamps down to set the length for repetitive cuts.
|
||||||||
|
| ||||||||
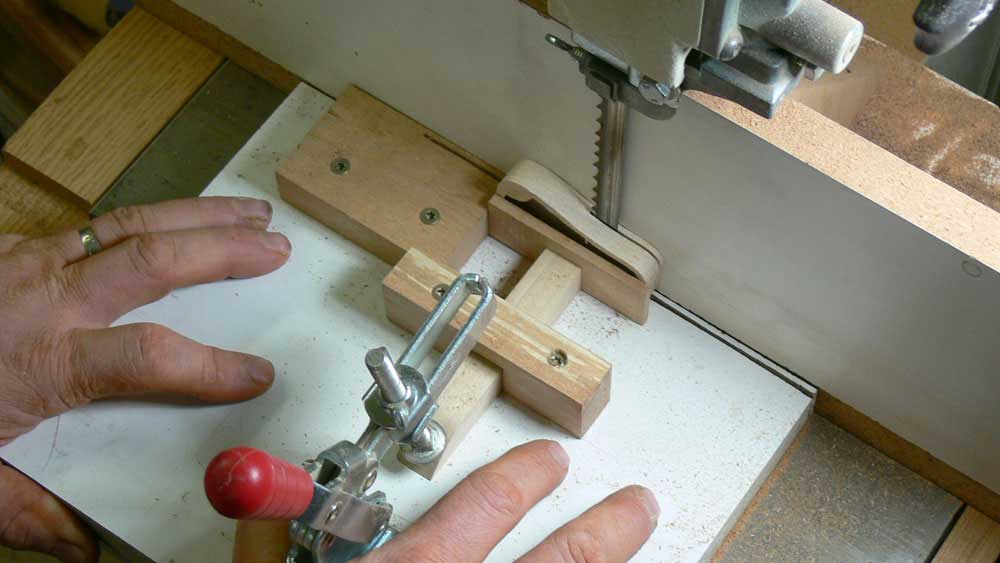
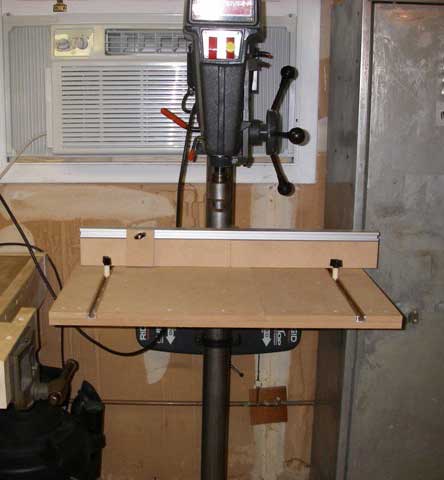
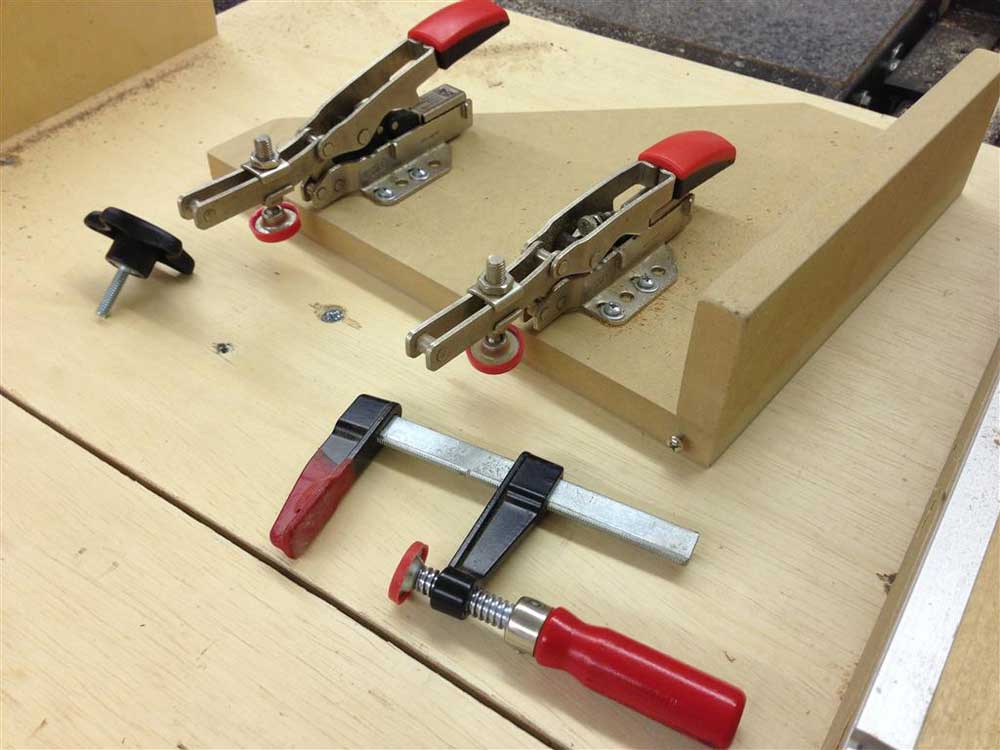
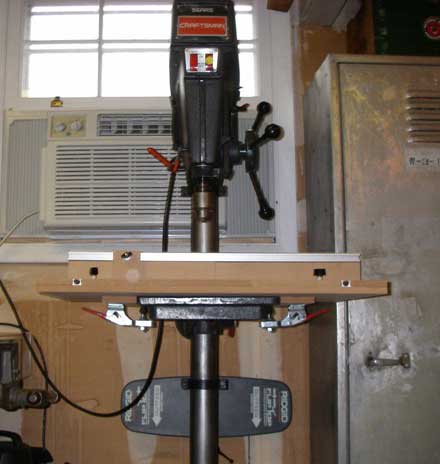 George Vincent's Drill Press Jig
Drill Press Jig using toggle clamps to hold jig to drill press table. Using two layers of 1/2 inch MDF, the table measures 27" x 18". The top layer utilizes T-track and the fence is from my router table and serves a dual function. Hold down clamps are used in the T-track. The center section of the top layer has a sliding dovetail to allow replacement as needed and the insertion of a piece with a hole to allow for a drum sander to be placed just below the surface of the MDF.
|
||||||||
|
| ||||||||
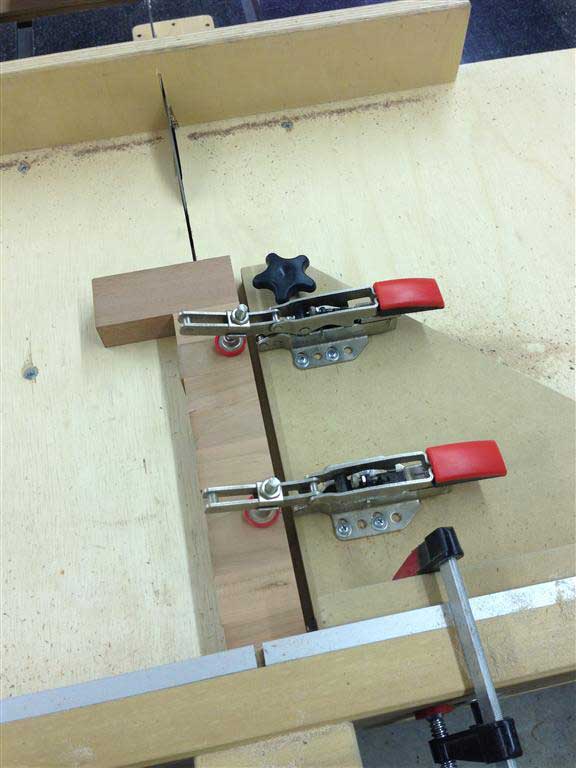 Cory Hoehn's Cross Cut Sled Stop Block
This is a stop block for my cross cut sled. I attach it with clamps to the fence on my sled. I made it to help secure pieces I’m cutting for an end grain cutting board. It’s especially useful (as shown in the photo) near the end of the glue up when getting your hands near the blade would be very dangerous. The jig holds the workpiece to the sled for consistent cuts and keeps my hands safe and far away from the blade. The screw in the corner allows the workpiece to consistently register against the stop block without chips or dust getting in the way.
|
||||||||
|
| ||||||||
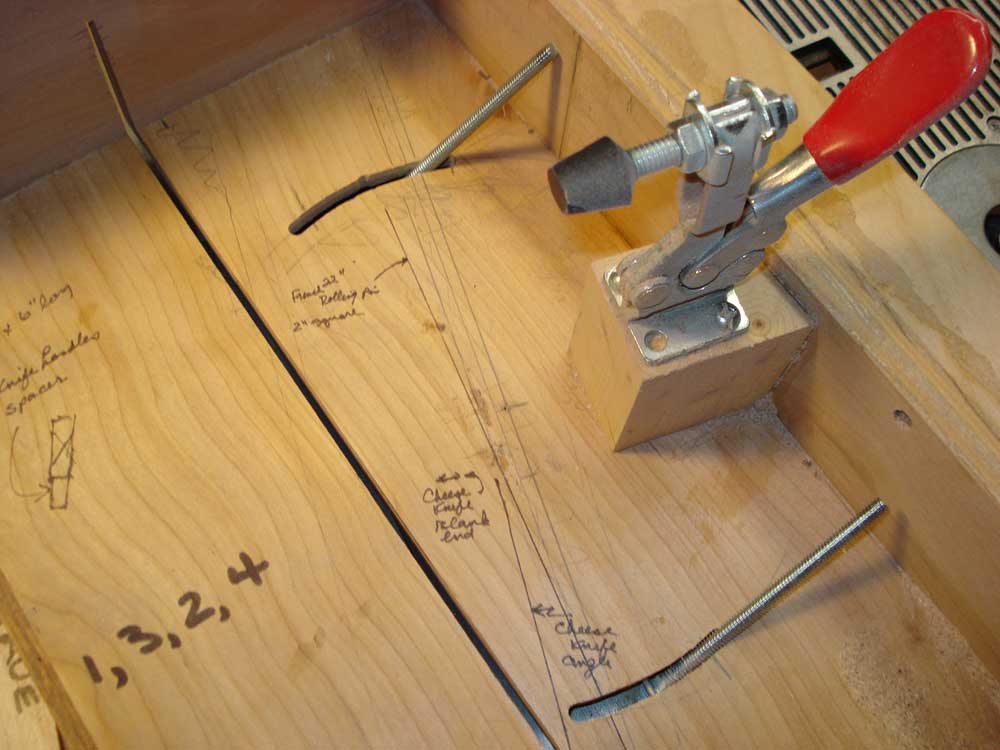
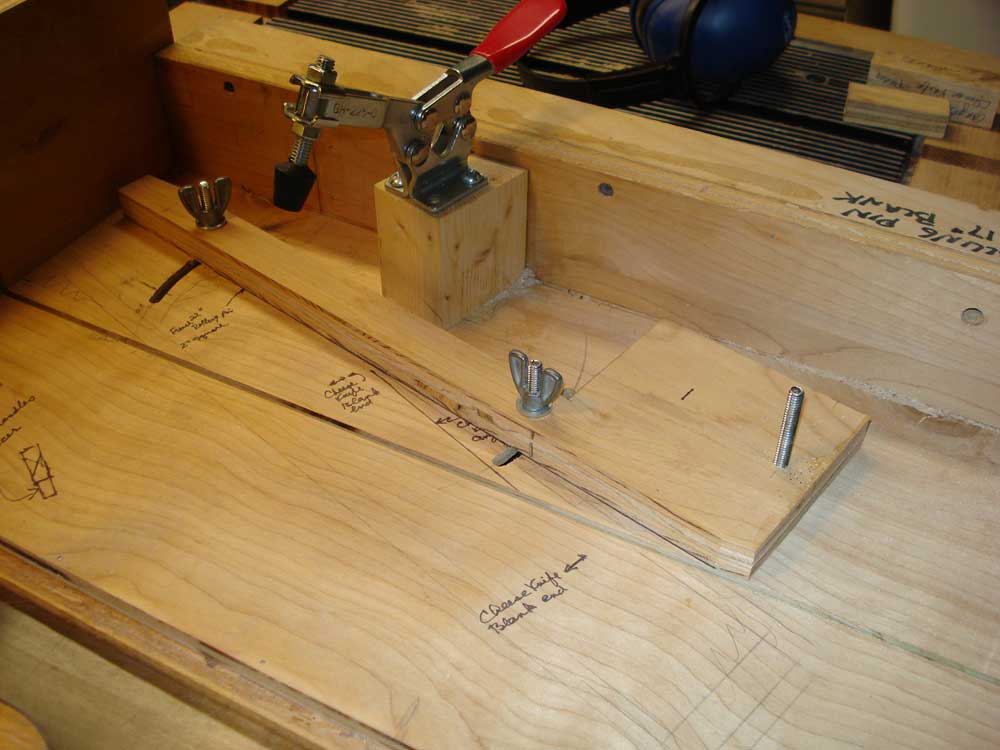
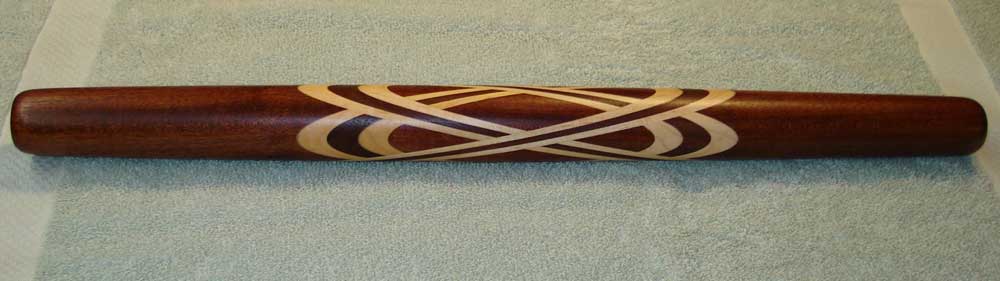
 Lewis Kauffman's Celtic Knot Insert Jig
I use toggle clamps to hold a rolling pin blank secure when creating the slot for the Celtic Knot inserts. The clamp allows easy access and at the same time holds the blank immobile; allowing hands and fingers to be kept at a safe distance.
|
||||||||
|
| ||||||||
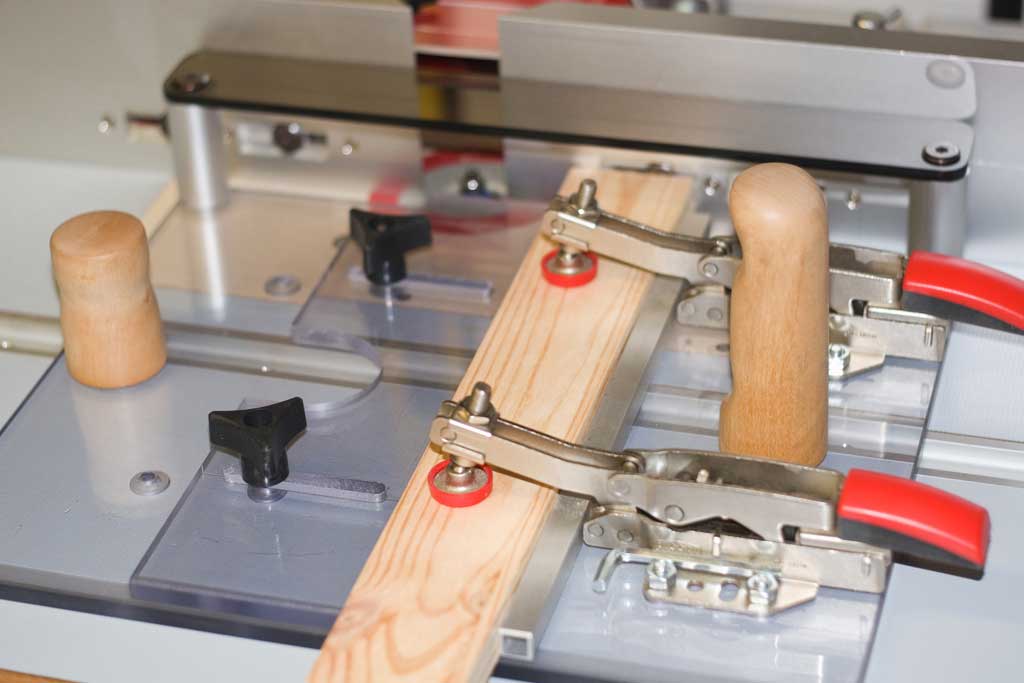
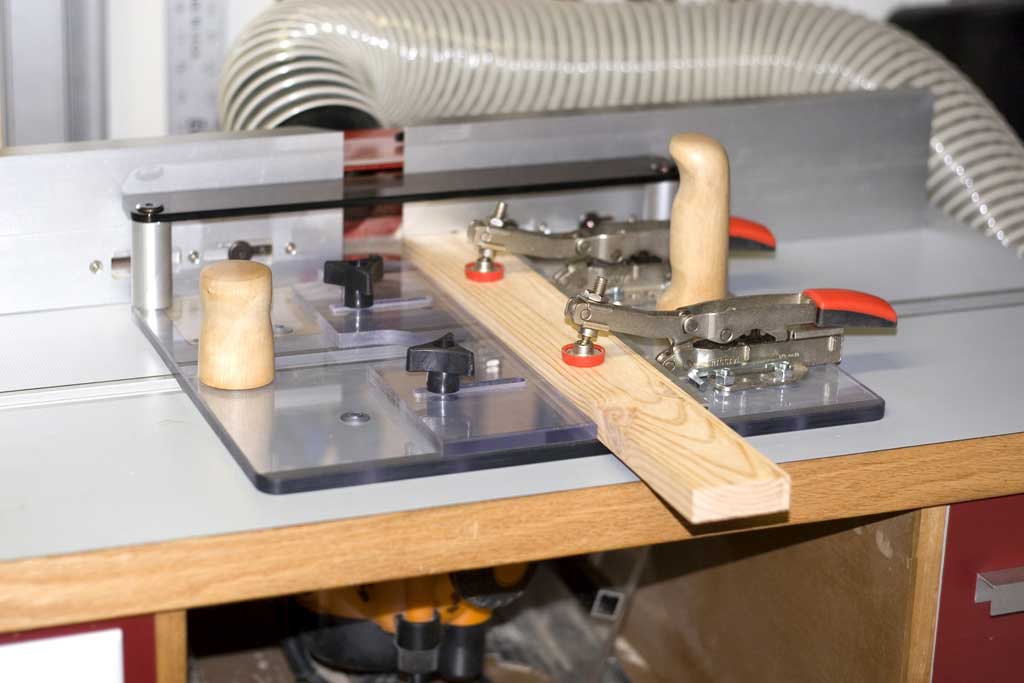 Richard Nord's Coping Sled
I choose 3/8" polycarbonate for the base plate because it will not wear down the table top laminate surface and it dos not flex. The sled is guided by the router table fence set in line with the router bit's bearing. The sled top guide has a 3/4" adjustment range to accomodate various bit widths. Low profile Bessey Auto-Adjust Toggle Clamps are simply the best made and most efficient I could find for this application. This sled is accurate, safe and a joy to use.
|
||||||||
|
| ||||||||


Go to Highland Woodworking Home Page