By Fred Kachelhofer
A member of the Barnesville Woodturners
Nick Cook is well known for his turned pepper mills. I have twice watched him turn a
pepper mill, and have also read the excellent article posted on his website
www.nickcookwoodturner.com
(follow link and then click on "Pepper Mill"). When I tried it myself, I found it
difficult to get the pieces to align on the four jaw chuck after turning the tenons
so as not to be off center when changing ends in the drilling process. After various
trials, I have arrived at the following method which I would like to share with you:
First a little background on pepper mill mechanisms. The total length of the
pepper mill wood is the same as the stated length of the mill (except for the 4"
mechanism. The rod is a little shorter on this size). The mechanisms are
basically 4", 6", 8", 10" 12", 14", 18" and 24". The most popular sizes are the
10", 12" and 14".
The raw block of wood for the grinder needs to be about 2-1/2" longer than the
mechanism to be used. At this point I will stay with making a 10" mill since it is
one of the most popular sizes. On a 10" mill the base is usually 8" and the top
2". This of course can vary according to your preferences but for now let's
establish that these are the dimensions we are going to use. For a 12" mill I
usually make the base 9-1/2" and top 2-1/2", for a 14" mill the base is 11" and
the top 3" and for an 18" mill the base is 15" and the top 3". Again there is
nothing special about these dimensions. Make them to suit yourself.
For an example for a 10" mill start with a block of wood about 3" to 3-1/2"
square and determine which end would be best for the bottom of the mill based
on the grain pattern etc. Lay the piece with the base to the left and mark going
left to right these dimensions: 1/2" for a tenon, 8" for the base, 1/2" for a tenon,
1/8" for a saw kerf, 3/4" for the spigot for the top to fit in the base, 2" for the top
and at this point you should have a little over 1/2" left before the end of the
piece. Don't let this bother you. It will work out during the turning.
It is important to mark each tenon/spigot location to keep up with the turning
procedure. Mark at the first tenon on the left a "B" for "Bottom". Place any
mark at the next tenon (I just use an "x") to denote the top of the bottom. At
the right of the spigot place the same mark again so you will know that these are
"match points". At the tenon on the extreme right, place a "T" for "Top".
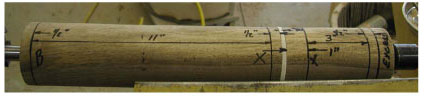
As an example with pictures I am going to show the construction of a 14" mill
(since that is the only blank I have made now) that will maybe illustrate the
verbiage to make the instructions easier to follow. Note that I have marked the
pieces as described above plus added dimensions. This piece had all ready been
"rounded" up and cut prior to starting the instructions. The white shim in
between the top and bottom represents the saw kerf. I am using 11" for the
base and 3" for the top.
