Make a Small Parts Cut-Off Sled
by Fred Kachelhofer
Barnesville Woodturners
Safety should be the prime consideration in any shop. The cutting of small parts always causes great concern because of the close proximity of the hands to the saw blade. I tried cutting parts on the radial arm saw using auxiliary devices such as wood blocks to push against the fence to hold the piece in place. While this solved the problem of keeping my hands away from blade, it did not fully address positioning the piece for an accurate cut.
The pieces I wanted to cut were pen blanks about 3/4" square, ranging in length from about 1-3/4" to 2-1/2". Cutting the blank too short of course means it is a total loss. If the blank is too long, then time is lost trimming it to the proper length using a barrel trimmer. What I needed was a safe way to hold the piece at a precise length to make a quick and efficient cut. I could see no solution on the radial arm, so I went to the sled idea on the table saw.
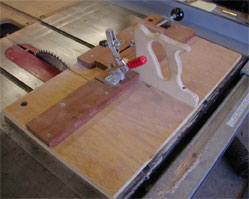
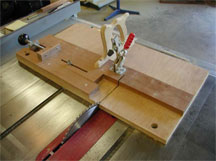 The completed solution is shown here. It is simply a piece of plywood mounted
with two runners in the slots on the table supporting a guide, hold-down and
push handle. I wanted a way to precisely move the measuring block, hence the
black knob on the left end of the sled. For those who do not need this
precision, then the building of the sled is much simplified. I used cherry for
the upper pieces since it was some scrap I had on hand at the time. Any good hardwood
would work here. The two holes in the sled at the front are for storing onto
matching dowels on the wall.
The completed solution is shown here. It is simply a piece of plywood mounted
with two runners in the slots on the table supporting a guide, hold-down and
push handle. I wanted a way to precisely move the measuring block, hence the
black knob on the left end of the sled. For those who do not need this
precision, then the building of the sled is much simplified. I used cherry for
the upper pieces since it was some scrap I had on hand at the time. Any good hardwood
would work here. The two holes in the sled at the front are for storing onto
matching dowels on the wall.
To start construction on the sled, cut two pieces that will fit into the slots on
the saw. I had some plastic type of material that was almost friction free to
use, but any good hardwood should work here. If you are using hardwood, be sure to
wax it to help reduce friction in the slots. Drop the slides in the slots and
position the plywood over the strips. My plywood base is approximately 14" x 25
-1/2". You can see it might be oversized for what you need. It can be smaller.
Using
a square in the slots, or what ever method you prefer, square the plywood to the
slots/blade and attach to the slides.
For reference, the three pieces that make up the top pieces are:
• 3/4" x 3" x 25-1/2" for the piece supporting the hold-down and handle
• 3/4" x 2" x 10" for the slide
• 3/4" x 2" x 15-1/4" for the back slide support
Let me emphasize here that all these dimensions are for reference only. You
should use the material you have on hand to make the sled. Change the dimensions
to suit your needs.
Attach the long piece to the plywood, squaring to the blade back about 5" to 6"
from the front of the sled. Place the slide piece in front of the long piece and
fasten the back slide support making sure the slide can move freely from left to
right.
 Using the picture at left for reference, cut a slot in the slide about 1/4" wide,
leaving about 1" to 1-1/2" of wood on each end to keep from splitting during use.
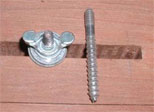
Mount the slide using a hanger bolt shown at the left. A hanger bolt has a wood
thread on one end and a machine screw on the other end. Position the slide as
close to the blade as you think your shortest cut will be and then place the
screw at the end of the slide slot at the end furthest from the blade. You will
then be able to cut a piece from this setting to the distance of the length of the
slot.
Using the picture at left for reference, cut a slot in the slide about 1/4" wide,
leaving about 1" to 1-1/2" of wood on each end to keep from splitting during use.
Mount the slide using a hanger bolt shown at the left. A hanger bolt has a wood
thread on one end and a machine screw on the other end. Position the slide as
close to the blade as you think your shortest cut will be and then place the
screw at the end of the slide slot at the end furthest from the blade. You will
then be able to cut a piece from this setting to the distance of the length of the
slot.
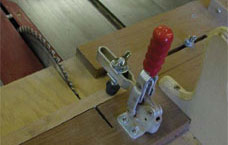
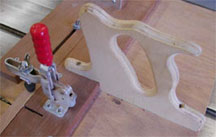 I found a handsaw that had a comfortable handle on it and transferred the
outline of this to a piece of plywood. I then made a projection at the front and
back of the handle to place a screw. I also notched the front of the handle to
fit around the long piece. I then used a round-over bit on the router to break
the sharp edges for comfort. I positioned the saw handle where it would be
between the two slots to minimize binding when pushing and pulling. I then added
a hold-down just to the right of the saw kerf to hold the pieces while being
cut.
I found a handsaw that had a comfortable handle on it and transferred the
outline of this to a piece of plywood. I then made a projection at the front and
back of the handle to place a screw. I also notched the front of the handle to
fit around the long piece. I then used a round-over bit on the router to break
the sharp edges for comfort. I positioned the saw handle where it would be
between the two slots to minimize binding when pushing and pulling. I then added
a hold-down just to the right of the saw kerf to hold the pieces while being
cut.
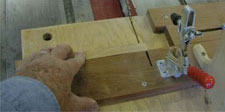
Using the Sled
 To use the sled, I position the reference piece on the sled and move the slide
into position and lock it down as shown at the left. In this case I use the tubing
and do not have to make any measurements. I set the slide back the distance I
want for extra length for the barrel trimmer. With that done, I make a squaring
cut as shown below left. Note that my left hand is safely away from the cut.
To use the sled, I position the reference piece on the sled and move the slide
into position and lock it down as shown at the left. In this case I use the tubing
and do not have to make any measurements. I set the slide back the distance I
want for extra length for the barrel trimmer. With that done, I make a squaring
cut as shown below left. Note that my left hand is safely away from the cut.
 The piece is then moved to the right and the hold-down locked in place. Make
sure there is no sawdust or debris in the way of seating the piece in place.
Make the cut, pull the sled back, remove the piece and then position for a new
cut or squaring off another end, etc.
The piece is then moved to the right and the hold-down locked in place. Make
sure there is no sawdust or debris in the way of seating the piece in place.
Make the cut, pull the sled back, remove the piece and then position for a new
cut or squaring off another end, etc.
 At this point we have positioned the slice by loosening the wing nut and sliding
the adjustment bar without the aid of a screw adjustment. I might suggest here
that if you want to use this method, consider adding a small knob at the right end
of the slide to help with adjustment.
At this point we have positioned the slice by loosening the wing nut and sliding
the adjustment bar without the aid of a screw adjustment. I might suggest here
that if you want to use this method, consider adding a small knob at the right end
of the slide to help with adjustment.
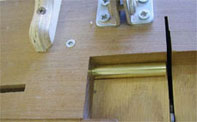
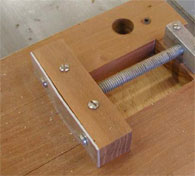
 If you would like to have the ability to make very fine adjustments, you can add
a screw adjuster as shown in the pictures. To make this addition, you will need
to take a piece of steel, aluminum or brass about 1/2" wide by 5/8" high and 1-1/2"
long and drill and tap for a 3/8"x16 all-thread rod about 6-1/2" long.
Mount the piece on a block of wood at the right end of the sled as shown at
right. The black knob in the picture is from an old tool that was scrapped and
is held in place with a jam nut. This is used for the adjustment knob.
If you would like to have the ability to make very fine adjustments, you can add
a screw adjuster as shown in the pictures. To make this addition, you will need
to take a piece of steel, aluminum or brass about 1/2" wide by 5/8" high and 1-1/2"
long and drill and tap for a 3/8"x16 all-thread rod about 6-1/2" long.
Mount the piece on a block of wood at the right end of the sled as shown at
right. The black knob in the picture is from an old tool that was scrapped and
is held in place with a jam nut. This is used for the adjustment knob.
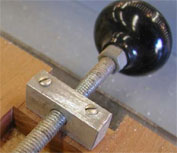
 Next take a nut and turn it round. On second thought I realized that the nut
need not be turned round, but the hole to receive it must be a larger diameter to
compensate. Drill a hole in a block of wood (in this case 1" x 1" x 3-3/4") for
the nut. This is where great caution must be taken in drilling the depth of the
hole. It needs to be the exact depth of the nut, or else it will create slack in the
movement of the block. When the hole is the appropriate depth, drill through for
the all-thread rod. Note that the block is long enough to ride over the two
slide guides, but the block is screwed to the slide. Note that the center
distance of the holes from the bottom in the two blocks must be the same in both of
the blocks for alignment purposes.
Next take a nut and turn it round. On second thought I realized that the nut
need not be turned round, but the hole to receive it must be a larger diameter to
compensate. Drill a hole in a block of wood (in this case 1" x 1" x 3-3/4") for
the nut. This is where great caution must be taken in drilling the depth of the
hole. It needs to be the exact depth of the nut, or else it will create slack in the
movement of the block. When the hole is the appropriate depth, drill through for
the all-thread rod. Note that the block is long enough to ride over the two
slide guides, but the block is screwed to the slide. Note that the center
distance of the holes from the bottom in the two blocks must be the same in both of
the blocks for alignment purposes.
 Now take a piece of aluminum or steel plate and cut it to fit the size of the
block and drill two holes to mount over the nut and rod assembly. Now when the
knob is turned to advance the slide, it will push against the metal faceplate
and when turned to retract, it will pull back against the block of wood. This
will give a very precise method for positioning the slide in relation to the
blade.
Now take a piece of aluminum or steel plate and cut it to fit the size of the
block and drill two holes to mount over the nut and rod assembly. Now when the
knob is turned to advance the slide, it will push against the metal faceplate
and when turned to retract, it will pull back against the block of wood. This
will give a very precise method for positioning the slide in relation to the
blade.
 I have found this to be a very safe, efficient, accurate, fast way to cut short
pieces. It takes about one minute to place it on the saw. It takes another
couple of minutes to adjust the length and then I can cut three or four pieces a
minute. Removing the sled from the saw takes about another minute. I have two dowels on
the wall to store the sled when not needed.
I have found this to be a very safe, efficient, accurate, fast way to cut short
pieces. It takes about one minute to place it on the saw. It takes another
couple of minutes to adjust the length and then I can cut three or four pieces a
minute. Removing the sled from the saw takes about another minute. I have two dowels on
the wall to store the sled when not needed.
Fred can be reached at
kplus10@bellsouth.net
for ideas or comments.
Return to
Wood News
front page
