Make a Jam Chuck for a Live Center
by Fred Kachelhofer
Barnesville Woodturners
Recently while starting a new project, I needed a round disk. This disk needed to be more perfect
than just being cut out with a hole saw, and could not have a hole in the center. My first thought
was using a circle cutter on the bandsaw, but the diameter of the disk was small and it needed to
be a more perfect circle than the bandsaw would cut. The next solution seemed to be turning them on the lathe.
But, the big question was how to hold the wood while turning them round?
All the centers for
the tailstock have a cone end to support a piece from the center. The center
could be used to start a piece from a dimple or marking on the end of the piece
of wood. The other centers would be used to start the piece on the inside of a
cylinder. But it was still just a cone. Looking for other solutions, I could find
a live center with a semi-spherical head but nothing was flat to support the
disk on the tailstock side of the lathe.
I started with the idea that I could make a chuck out of MDF for the drive side
(see my
July
and
August
Wood News
articles for
details on how to do this). Note that there are different qualities of MDF as
discussed in the second paragraph of the first article. Please be mindful of
this in selecting the MDF for this project also. I started looking around the
shop and I found a perfect candidate live center to start with. There are
several manufacturers that make a similar center but the one I started with is a
Jet that came with my Powermatic Lathe (reference Jet No. 709933 Live Center).
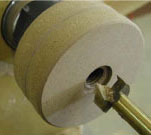
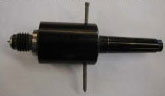 This center has a 3/4" x 10 threads/inch (standard 3/4" NC tap) with a 1"
diameter flat face beyond the threaded portion. The picture at the left shows
the center. Note I have placed a nail through the moving and stationary parts of
the chuck to illustrate how the chuck can be used as a drive chuck. This is
important later on in the making of the jam chuck.
This center has a 3/4" x 10 threads/inch (standard 3/4" NC tap) with a 1"
diameter flat face beyond the threaded portion. The picture at the left shows
the center. Note I have placed a nail through the moving and stationary parts of
the chuck to illustrate how the chuck can be used as a drive chuck. This is
important later on in the making of the jam chuck.
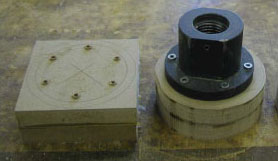 To start with you need to take two pieces of MDF about 4" square and glue them
together. The picture at right shows the piece with center located, a circle to mark
the outline of the metal faceplate used to turn the piece and a circle for bandsawing
the rough circle. The holes for mounting the faceplate are already located and pre-drilled to mount the faceplate. The
picture also shows another piece that has been sawn round and has the metal
faceplate attached.
To start with you need to take two pieces of MDF about 4" square and glue them
together. The picture at right shows the piece with center located, a circle to mark
the outline of the metal faceplate used to turn the piece and a circle for bandsawing
the rough circle. The holes for mounting the faceplate are already located and pre-drilled to mount the faceplate. The
picture also shows another piece that has been sawn round and has the metal
faceplate attached.
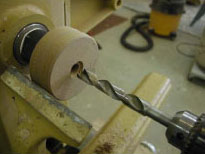 The faceplate is then mounted to the lathe and the outside rim is rounded up
using the tool of your choice. Then a 1" Forstner Bit is used to drill a hole
about 1/4" deep into the MDF. This is followed up with a 5/8" hole drilled all
the way through. While technically the proper tap drill for a 3/4" NC tap is
21/32", the 5/8" will work fine in the MDF. The picture at the left shows the
recess for the flat face of the live center to rest and the 5/8" hole completed.
The faceplate is then mounted to the lathe and the outside rim is rounded up
using the tool of your choice. Then a 1" Forstner Bit is used to drill a hole
about 1/4" deep into the MDF. This is followed up with a 5/8" hole drilled all
the way through. While technically the proper tap drill for a 3/4" NC tap is
21/32", the 5/8" will work fine in the MDF. The picture at the left shows the
recess for the flat face of the live center to rest and the 5/8" hole completed.
 Next the threads have to be tapped into the MDF. The first try I used the tap
driven by the socket drive as in the MDF Faceplate. Try as you might, it is hard to
hold the tap centered exactly on the axis of the hole. To solve this problem I
used a 3/8" socket adapter in a chuck mounted to the tailstock. The socket
adapter can be one purchased with a hex-drive attachment, or just cut off a short
drive extension as I did. The key to doing this properly is to not use the feed of
the tailstock in any way. Just use the tailstock to support and align the tap. I
used my left hand on the wheel on the outboard side of the headstock and my
right hand on the body of the chuck in the tailstock. By applying lateral
pressure from the tap into the MDF and counter rotating the lathe wheel and the
chuck, I was able to tap the threads with perfect alignment. I ran the tap all
the way through the MDF rather than trying to reverse the tap to remove it. I am
not sure that reversing the tap would do any damage to the threads but by
running the thread all the way through I know I have a clean thread all the way
through. All the thread really has to do is penetrate the MDF the depth of the
thread on the live center. Keep in mind that with a plug tap the first four or
five threads are not full depth, allowing the tap to cut its way into the
material. I guess that is the real reason I just run the tap through. When the
tap is clear of the MDF I removed the metal faceplate from the lathe to retrieve
the tap.
Next the threads have to be tapped into the MDF. The first try I used the tap
driven by the socket drive as in the MDF Faceplate. Try as you might, it is hard to
hold the tap centered exactly on the axis of the hole. To solve this problem I
used a 3/8" socket adapter in a chuck mounted to the tailstock. The socket
adapter can be one purchased with a hex-drive attachment, or just cut off a short
drive extension as I did. The key to doing this properly is to not use the feed of
the tailstock in any way. Just use the tailstock to support and align the tap. I
used my left hand on the wheel on the outboard side of the headstock and my
right hand on the body of the chuck in the tailstock. By applying lateral
pressure from the tap into the MDF and counter rotating the lathe wheel and the
chuck, I was able to tap the threads with perfect alignment. I ran the tap all
the way through the MDF rather than trying to reverse the tap to remove it. I am
not sure that reversing the tap would do any damage to the threads but by
running the thread all the way through I know I have a clean thread all the way
through. All the thread really has to do is penetrate the MDF the depth of the
thread on the live center. Keep in mind that with a plug tap the first four or
five threads are not full depth, allowing the tap to cut its way into the
material. I guess that is the real reason I just run the tap through. When the
tap is clear of the MDF I removed the metal faceplate from the lathe to retrieve
the tap.
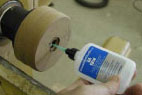 MDF is only a pressed fiberboard and it will wear with repeated use. To help
alleviate this wear I "case harden" the threads with
CA Thin Glue
.
Watch and be careful applying the glue to the threads. You do not want to remove
the jam chuck from the metal faceplate at this time due to realignment problems.
You want to soak the MDF with the CA glue but be careful that you do not let it
run between the MDF and the metal faceplate. You could glue them together and
then you will find out how really strong the CA glue is when you try to separate
the two. Use the
CA glue activator
to get a fast and thorough cure time on the
CA glue.
MDF is only a pressed fiberboard and it will wear with repeated use. To help
alleviate this wear I "case harden" the threads with
CA Thin Glue
.
Watch and be careful applying the glue to the threads. You do not want to remove
the jam chuck from the metal faceplate at this time due to realignment problems.
You want to soak the MDF with the CA glue but be careful that you do not let it
run between the MDF and the metal faceplate. You could glue them together and
then you will find out how really strong the CA glue is when you try to separate
the two. Use the
CA glue activator
to get a fast and thorough cure time on the
CA glue.
 After applying the CA glue and it has had time to cure, reuse the 1" Forstner
Bit to clean up the recess for the flat plate on the live center. Also pass the
tap back through the threads to clean out the "fuzz" left by the glue hardening
in the threads. Maybe this step could be skipped but I know from experience that
the jam chuck will screw onto the MDF easier and you will have a better seat for
the face of the live center by cleaning this up. At our last club meeting it was
suggested that the CA glue be used twice to give a harder thread in the MDF. If
you do use the glue again, don't forget to chase the threads a second time.
After applying the CA glue and it has had time to cure, reuse the 1" Forstner
Bit to clean up the recess for the flat plate on the live center. Also pass the
tap back through the threads to clean out the "fuzz" left by the glue hardening
in the threads. Maybe this step could be skipped but I know from experience that
the jam chuck will screw onto the MDF easier and you will have a better seat for
the face of the live center by cleaning this up. At our last club meeting it was
suggested that the CA glue be used twice to give a harder thread in the MDF. If
you do use the glue again, don't forget to chase the threads a second time.
The purpose of the next step is to true up the jam chuck to run true on the live
center. At this point you will have to convert the live center to a draw bar
chuck. This conversion allows you "o draw the chuck up into the headstock so
it will not try to come out while you are working on it.
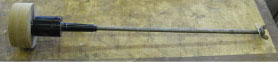 The draw bar looks like
the picture at the left. On the Morse Taper end of the center it is drilled
5/16".
The draw bar looks like
the picture at the left. On the Morse Taper end of the center it is drilled
5/16".
 This is the proper drill diameter for a 3/8", 16 threads/inch (3/8" NC)
tap for a 3/8" all-thread rod. The metal on the live center is hard to tap but
you only need a few full threads on the center.
This is the proper drill diameter for a 3/8", 16 threads/inch (3/8" NC)
tap for a 3/8" all-thread rod. The metal on the live center is hard to tap but
you only need a few full threads on the center.
 All you are trying to do is hold
the center in place and that does not take many threads. Make the rod long
enough to go through the headstock of your lathe. The draw bar rod is inserted
into the headstock placing the Morse Taper all the way into the lathe spindle.
The other end is secured with washers and a wing nut to hold the live center in place.
All you are trying to do is hold
the center in place and that does not take many threads. Make the rod long
enough to go through the headstock of your lathe. The draw bar rod is inserted
into the headstock placing the Morse Taper all the way into the lathe spindle.
The other end is secured with washers and a wing nut to hold the live center in place.
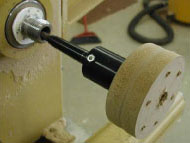
 Now comes the part where being able to lock the moving part of the live center
makes the approach work. Take an 8/32 machine screw long enough to reach through
the live center and secure it with a nut on the other side. The jam chuck is now
firmly attached to the live center and the live center attached so that it will
act as a drive center. At this point touch up the rim of the jam chuck to make
sure it is running true and face off the front of the jam chuck so the face is
true and flat to the axis of the lathe. Remove the nut and bolt locking the
tailstock center to the Morse taper and you now have a flat face jam chuck! You
can add another piece of MDF to the two pieces if you need something longer. If
you do this, don't forget to use the draw bar again and true the rim and face of
the chuck before using.
Now comes the part where being able to lock the moving part of the live center
makes the approach work. Take an 8/32 machine screw long enough to reach through
the live center and secure it with a nut on the other side. The jam chuck is now
firmly attached to the live center and the live center attached so that it will
act as a drive center. At this point touch up the rim of the jam chuck to make
sure it is running true and face off the front of the jam chuck so the face is
true and flat to the axis of the lathe. Remove the nut and bolt locking the
tailstock center to the Morse taper and you now have a flat face jam chuck! You
can add another piece of MDF to the two pieces if you need something longer. If
you do this, don't forget to use the draw bar again and true the rim and face of
the chuck before using.
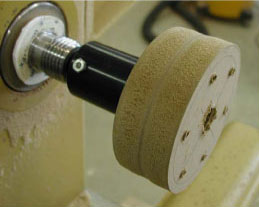
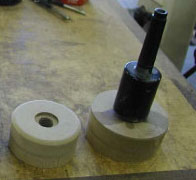 The picture at left shows the resulting finished products. On the left of the
picture is a completed chuck ready to place on the live center. Remember you
will have to insert the tool furnished with the center to screw the center onto
the new chuck (a nail or bolt will suffice if the tool is not handy). On the
right side of the same picture is a completed jam chuck mounted on the live center and
ready to place on the lathe.
The picture at left shows the resulting finished products. On the left of the
picture is a completed chuck ready to place on the live center. Remember you
will have to insert the tool furnished with the center to screw the center onto
the new chuck (a nail or bolt will suffice if the tool is not handy). On the
right side of the same picture is a completed jam chuck mounted on the live center and
ready to place on the lathe.
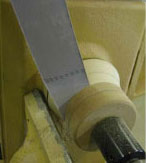 Now it was time to try out my scheme. Using the method of making an MDF
faceplate, I made a new blank to use for this project. I removed the draw bar
hardware from the headstock and screwed on the MDF faceplate. I put the jam
chuck into the tailstock and brought the two together with a slight pressure.
When I started the lathe there was a terrible "squalling" like a
bearing that had gone bad. It sounded like a screaming banshee. I backed off the
tailstock and the noise quit. It was very evident that I did not have the two
faces as true as I thought. To remedy this I placed a piece of 80 grit sand
paper with the grit side facing the headstock between the two faces (as shown
above). I then started the lathe slowly and advanced the tailstock into the
headstock. I pulled the sandpaper out from between the two faceplates. I did
this a few times to remove only a very slight amount from the faceplate. I had
to do this a couple of times to alleviate the noise.
Now it was time to try out my scheme. Using the method of making an MDF
faceplate, I made a new blank to use for this project. I removed the draw bar
hardware from the headstock and screwed on the MDF faceplate. I put the jam
chuck into the tailstock and brought the two together with a slight pressure.
When I started the lathe there was a terrible "squalling" like a
bearing that had gone bad. It sounded like a screaming banshee. I backed off the
tailstock and the noise quit. It was very evident that I did not have the two
faces as true as I thought. To remedy this I placed a piece of 80 grit sand
paper with the grit side facing the headstock between the two faces (as shown
above). I then started the lathe slowly and advanced the tailstock into the
headstock. I pulled the sandpaper out from between the two faceplates. I did
this a few times to remove only a very slight amount from the faceplate. I had
to do this a couple of times to alleviate the noise.
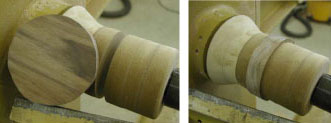 At this point I was ready to see if the two MDF faceplates actually would do
what I wanted. First I mounted the two faceplates opposing each other and tuned
them to the diameter that I wanted. Then I took a piece of scrap and rough sawed
a circle out of it (left photo). I then inserted the scrap between the two
faceplates (right photo).
At this point I was ready to see if the two MDF faceplates actually would do
what I wanted. First I mounted the two faceplates opposing each other and tuned
them to the diameter that I wanted. Then I took a piece of scrap and rough sawed
a circle out of it (left photo). I then inserted the scrap between the two
faceplates (right photo).
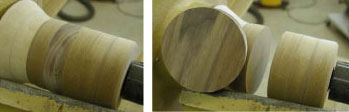 I then turned the piece to be the diameter of
the two faceplates (left photo). When it was removed from the lathe
(right photo) it was a perfect round circle exactly the diameter that I wanted.
I then turned the piece to be the diameter of
the two faceplates (left photo). When it was removed from the lathe
(right photo) it was a perfect round circle exactly the diameter that I wanted.
This satisfied what I needed for my project. However there are many more
possibilities for using a rotating jam chuck that fits the live center of the
lathe. It could be used for all types of supports, including bowls and platters.
NOTE: If you find any errors in this article, please report them to the author so they can be
corrected. Fred Kachelhofer can be reached at
kplus10@bellsouth.net
.
