A Dream Comes True
 by Dilo Marcio Fernandino
Belo Horizonte, MG, Brazil
For five years I have been dreaming and working towards the completion of a rather complex woodworking project. It has been a time of intense concentration and inspiration during which I have depended upon my heart to guide my brain and my hands.
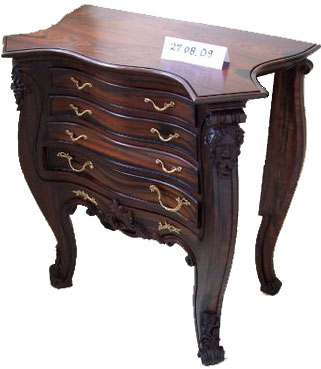
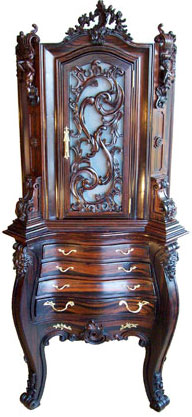
At last the "Rococo two-section cabinet" became a reality when I placed the
upper cabinet
(completed on October 12, 2008) on top of the just-finished
chest of drawers
(completed on November 6, 2009).
Construction
At the time the last article was published, the upper cabinet had already been completed and work had begun on the chest of drawers that would comprise the base unit. By then I had built and carved the base unit's frontal face which I rigidly attached to the base unit's top board.
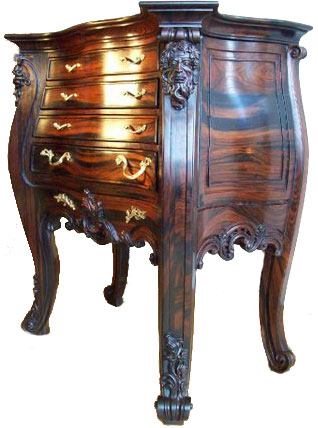
Subsequently, I have designed the profiles of the back legs to correspond approximately to a 45 degree projection of the front legs, allowing their curves to be somewhat straighter. The back legs would also receive simpler carved details, only scrolls on the foot and on the top.

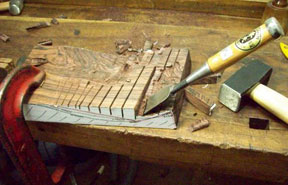
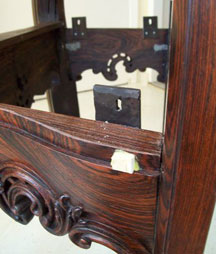
After sawing the back legs, I cut by hand a narrow lengthwise dado on both of them for the eventual insertion of the back panel, and epoxy-glued them to the top board using my "half-screw" system (see photo at left).
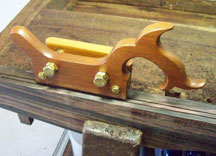
I should mention that I had previously customized a stair saw, a tool whose depth of cut can be manually adjusted. I was able to increase the accuracy of the cut by adding an adjustable side fence to the stair saw that kept the blade parallel to the edge of each leg as I cut two parallel kerfs along its length (see the photo at right). From there I was able to make the necessary dadoes using a chisel to remove the wood between the two parallel kerfs.
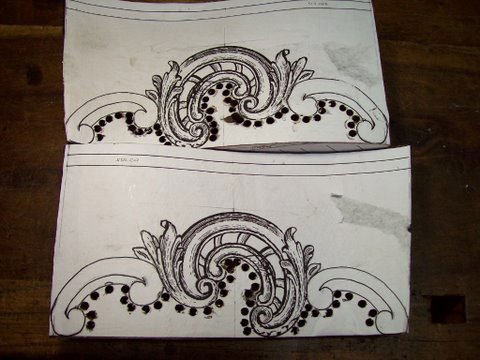


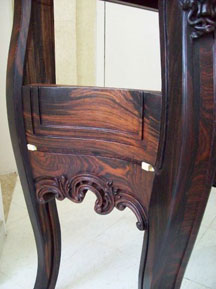
Next I prepared two thick pieces of wood, each of which would accomplish two simultaneous functions, namely to serve as the stretcher between the front and back legs as well as support the side apron. Then, its overall surface was carved according to a carefully-determined concave-convex shape, and its border was carved into intricate pierced scrollwork. I also carved a lengthwise recess along its upper edge intended to be a part of an expansion joint created for receiving a protruding lip from the massive side panel. The joint looks like a decorative dado.
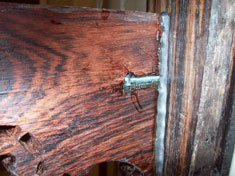
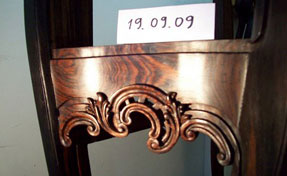
Considering that the union between each stretcher and the respective front leg would be curved, a difficult problem of surface matching was encountered. To deal with this problem, here I gave up using the mortise and tenon method of joining and replaced it with an "anchorage" method, in which I drove a thick steel screw halfway into the leg and cut a corresponding slot on the back of the stretcher, where the screw was embedded with epoxy glue (see photo above left).
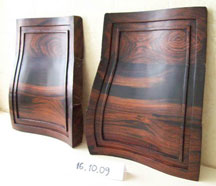
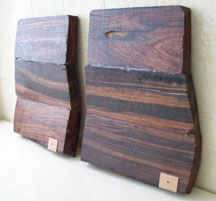
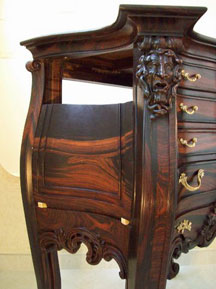
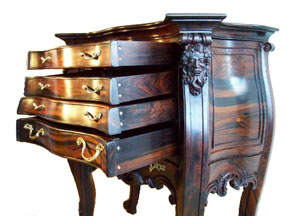
The construction of the twisted-shaped side panels was done by gluing side by side three thick boards that had been individually sculpted according to specific concave-convex shapes. During that process those boards were temporarily fixed between the legs in order to get the better match between the panel and its neighboring surfaces. Afterwards the whole panel was withdrawn from its actual position and finished outside. Its final positioning was done by gluing only its central section to the legs in order to allow the expansion/ contraction of its upper and lower extremities. In addition, its lower section was internally linked to the stretcher using screws with washers thatpassed through slots of the linking wood slips (see sequence of photos).
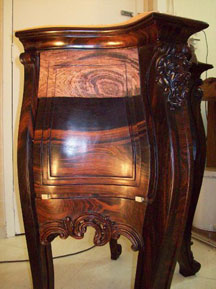
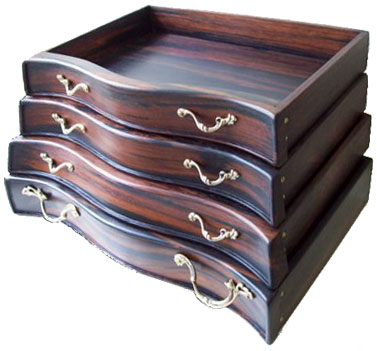
I completed the drawers by making glued-up solid rosewood sections that were then housing-jointed, glued and screwed to their respective front boards. I decided not to carve dovetail joints on the front boards because of their twisted shape, which would challenge much of the precision carving process. Afterwards I built the internal structure for the sliding rails and inserted the back panel into the preexisting dados. The job had been finally accomplished!
I chose these particular joinery methods in order to render full respect to the natural reactions of solid wood to atmospheric changes (temperature and humidity). A piece of furniture that is entirely made of solid wood does not expand (or contract) in all directions evenly. The dimensional changes provoked by the weather affect only the width of the wood, not its length. Therefore the whole assembly must not be built completely rigid but instead should have some built-in expansion joints, an approach much recommended since olden times in order to avoid undesirable cracks on the surfaces.
***
In conclusion, in this project I dared breaking many of the woodworking conventions that I had previously taken for granted, especially the logical construction sequence (in which the structural elements should be made first) and the basic need for right angles and flat surfaces. I wanted to build a piece of furniture similar to an architectural project where the action of the earth's gravitational force on heavy construction materials results in a sloping overall profile, as if it were discharging forces down to the ground. Thus, I acted rather as a stone sculptor than as a woodcarver.
The present accomplishment reminds me back to my childhood when I liked to build my own toys. My elder brother had wisely challenged me with the following words: "It is easy to start making a new toy. The difficult thing is to bring it to completion." Another wise suggestion he gave was for me to try woodcarving in rosewood – a practice completely lost over the centuries.
This job also reflects my obsession for materializing abstract ideas. For me it is not enough to be proficient in the field of ideas. It is necessary to have some proficiency in the material field too.
I assure all the
Wood News
readers that the current year (2009) has been the most productive, pleasant and rewarding for me in large part because of the warm and invigorating reception you provided me at the time my first article was published in January. As a result, I was introduced to many fantastic Web bloggers around the world who have become my dear "trek mates," and to whom I have no words sufficient to express my eternal gratitude.
Dilo can be reached via email at
dilofernandino@gmail.com
Return to
Wood News
front page


