Recently I was contacted to renovate a kitchen in Petaluma, California. It's a beautiful town in
the North Bay with lots of great examples of turn-of-the-century architecture. Unfortunately it is
about an hour and a half from my shop in San Jose. I thought this would be a good opportunity to
demonstrate how, with SketchUp, I can create a virtual environment to design the new kitchen in
without having to drive to the job to check a measurement or the clearance for a cabinet door or
drawer. Even if you are designing a kitchen that is under the same roof, I think you will find
SketchUp can be a powerful tool in designing your project. This process is for modeling a single
room. Some of the techniques would not be the same for modeling multiple rooms or a whole house.
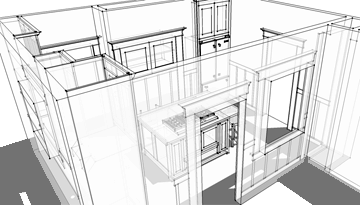
First thing is to model your building environment.
-
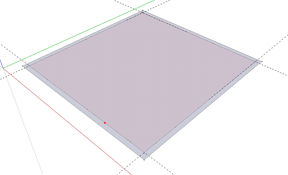
Measure the widest dimensions of the room you will be modeling
-
Lay out
construction guides
to determine the walls of the room
-
Use the
rectangle tool
to draw the floor
-
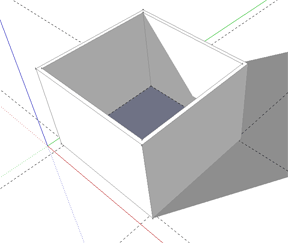
With the
offset tool
create the thickness of your walls
-
Then Push/pull the walls up to your ceiling height
Note:
All of the tools in SketchUp show the value of their operation in the measurements box.
If you don't see the measurements box on your screen, you can enable it by clicking on
View>Toolbars>Measurements
. Just about every time I use a tool, I input a value for that operation.
It is not necessary to click in the measurements box to enter a value. After using a particular tool,
simply type the value and press enter. SketchUp will recognize any format of measure regardless of
the format you are currently working in. For example, while working in inches, you can type 35mm,
and SketchUp will convert to inches. You can also input values other than what is represented in the
measurements box. When drawing an arc, the value indicates the bulge distance from a line drawn
between the two ends of the arc. By typing 3'r Sketchup will create an arc with a radius of 3 feet.

-
With the construction guides, lay out the doors and windows in the room
-
Draw rectangles where the openings are located and push/pull through to the opposite face. You
will see this cuts a hole through the wall
-
For your last step use construction guides to determine the position of
wall switches and
outlets
At this point I like to make a group of the room geometry. By making things in your model into
groups you can edit the different parts more easily without affecting other parts of your model. A
good rule to follow would be when in doubt , make it a group.
To create a group,
select all the geometry
you want to include. In this case, triple clicking on
the room will select all connected geometry. Right click on the selection and choose
Make Group
from the drop down menu.
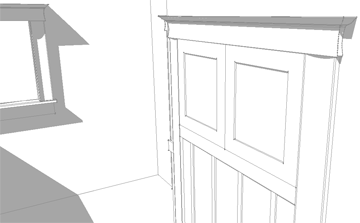 In order to have an accurate modeling environment you will want to detail your model with all the
trim details. Since the width and thickness of the molding is most important, you could make all
your molding as simple rectangular profiles. However if you are as detail oriented as I am, you can
try out your modeling skills recreating the profiles in your project. You may find a
profile match
in SketchUp's 3D warehouse. There are a number of standard molding profiles, as
well as plinth blocks, rosettes, and door casings. Once you have finished all the molding as well as
doors and windows in your model, you should make them all a group. With the select tool while holding
down the shift key to select multiple items, select all the trim and mill work in your model, right
click, and choose
Make Group
. To edit a group, all you have to do is double click on that group.
When you see all the rest of the model faded you are in the edit mode for that group.
In order to have an accurate modeling environment you will want to detail your model with all the
trim details. Since the width and thickness of the molding is most important, you could make all
your molding as simple rectangular profiles. However if you are as detail oriented as I am, you can
try out your modeling skills recreating the profiles in your project. You may find a
profile match
in SketchUp's 3D warehouse. There are a number of standard molding profiles, as
well as plinth blocks, rosettes, and door casings. Once you have finished all the molding as well as
doors and windows in your model, you should make them all a group. With the select tool while holding
down the shift key to select multiple items, select all the trim and mill work in your model, right
click, and choose
Make Group
. To edit a group, all you have to do is double click on that group.
When you see all the rest of the model faded you are in the edit mode for that group.
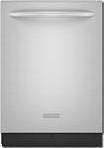
Create Your Appliances
For a kitchen, it is my practice to model the appliances first, then build in the cabinetry
around it. You can often find appliances in the 3D warehouse. Several manufacturers have created
models of their product lines for you to use in your models. Even if you can't find the exact model
you are looking for, you can find something that is close and
to the correct dimensions. If
you still can't find a suitable model, here are the steps I use to model appliances for a kitchen.
-
Find a web page that has a good image of the appliance as well as the dimensions of the
product you are modeling. I try to get images that are a good front view, not an isometric view.
Right click on the image and choose "Save image as...." from the drop down menu. Save the image
somewhere you can find it. Your desktop is always a good place. Once you have the image saved, you
can right click on the file and open it in "paint" or a similar program. With the image open in
paint , I like to use the select tool to crop out any negative space around the image I am using.
This step is not critical, but it makes placing the image much easier.
-
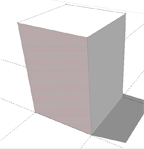
Using the dimensions given for the model you are building, draw a square that matches the
width and depth. Then use the push/pull tool to raise it to the proper height.
-
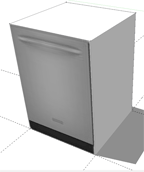
To add a photo texture, choose
File>Import
from your toolbar. A dialog box will open where you
can locate the image you saved. Locate and select the image and choose "Use as Texture" from the
choices at the right, and import the image. To place the image, click once in the lower left corner,
dragging the image up and to the right to enlarge, and click again to finish.
-
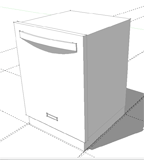
At this point you can either use the model like it is, or as I like to do, using the textured
image for reference, add details like knobs, handles, etc. for a better model.
Whenever I finish making an appliance or other useful model, I like to make it available to other
SketchUp users by uploading it to the 3D warehouse. In the latest version of SketchUp (SU7), it is
easier to share components. You used to have to save a component to a new file and upload that file
to the 3D warehouse. Now once you create a component in your model, right click that component, and
choose "Upload Component" from the menu. I assure you someone will be quite happy to find the
30" Viking Professional gas stove
you just built so they won't have to. [You may have to sign up or log in to SketchUp
for access to the 3D warehouse.]
Next month I will continue this project and show you some of the methods I use to model the
cabinetry, and set up views to make navigating your model a little easier as well as sharing your designs
and ideas with others.
Sean Headrick, a former Atlantan once seen frequently at Highland Woodworking, now lives
in San Jose, California where he does woodworking and design.
His website is
www.headrickdesigngroup.com
.
Sean was
interviewed by Wood News
in 2007.

 Recently I was contacted to renovate a kitchen in Petaluma, California. It's a beautiful town in
the North Bay with lots of great examples of turn-of-the-century architecture. Unfortunately it is
about an hour and a half from my shop in San Jose. I thought this would be a good opportunity to
demonstrate how, with SketchUp, I can create a virtual environment to design the new kitchen in
without having to drive to the job to check a measurement or the clearance for a cabinet door or
drawer. Even if you are designing a kitchen that is under the same roof, I think you will find
SketchUp can be a powerful tool in designing your project. This process is for modeling a single
room. Some of the techniques would not be the same for modeling multiple rooms or a whole house.
Recently I was contacted to renovate a kitchen in Petaluma, California. It's a beautiful town in
the North Bay with lots of great examples of turn-of-the-century architecture. Unfortunately it is
about an hour and a half from my shop in San Jose. I thought this would be a good opportunity to
demonstrate how, with SketchUp, I can create a virtual environment to design the new kitchen in
without having to drive to the job to check a measurement or the clearance for a cabinet door or
drawer. Even if you are designing a kitchen that is under the same roof, I think you will find
SketchUp can be a powerful tool in designing your project. This process is for modeling a single
room. Some of the techniques would not be the same for modeling multiple rooms or a whole house.