Genesis of a Lower Cabinet
by Dilo Marcio Fernandino
Belo Horizonte, MG, Brazil
Historical Background
In Portugal between 1750 and 1777, the Portuguese National Style melded with the Italian Baroque Style, along
with some Rococo Style influences that drifted over from France and England. The resulting rather peculiar
fashion style, known as "Dom Jose I," was distinguished by its decorative motifs embellished with curves in
the "C" and "S" shapes, and by asymmetrical (though balanced) scrollwork. The abundant Rio-rosewood that was
imported to Portugal from colonial Brazil became closely linked to this style of furniture. The many pieces of
furniture still in use today testify to the extraordinary craftsmanship associated with the Dom Jose I style,
as well as its elegance of design.
The use of rosewood for fine furniture making originated around 1580 when the Spanish King Filipe II took over
control of the Portuguese kingdom. He prohibited from use the allegedly mundane fashion of decor that
Portuguese furniture makers had imported from India and China, such as ivory and silver inlay, lacquer and
gilding. So using this special type of Brazilian rosewood, known by the indigenous people as Jacaranda, or
"unbreakable wood," whose bare features were inherently quite decorative, the creative Portuguese woodworkers
developed their own national style utilizing the rosewood's excellent structural characteristics as well as
the peculiar way that it reflected light. Special carving motifs were created in order to contrast light
against shadow. The only finishing required was the application of wax, which must have delighted the king! At
that time Brazilian rosewood was exported to Portugal in the form of huge planks used to construct temporary
sugar containers inside the galleon hulls.
By this time the technical influence of the Portuguese woodworkers who had been sent to colonial Brazil had
spread to some of the coastal villages. They found a more receptive marketplace, however, in the Minas Gerais
(General Mines) province, from whose mountains streams of gold and diamonds flowed back to Portugal. Among the
trained native Brazilian woodworkers, "Aleijadinho" (Little Cripple) became the paramount sculptor.
Historians believe that the provincial capital of Ouro Preto (Black Gold) grew so rich and busy that it became
the most crowded town of the Americas, more populous even than New York at the time.
Rio-Rosewood Carved Cabinet
This photo of a Rio-rosewood carved cabinet appeared with my
article
in the January 2009 issue of
Wood News
. This cabinet is intended to serve
as the upper cabinet of a two-bodied cabinet (like the American highboy).
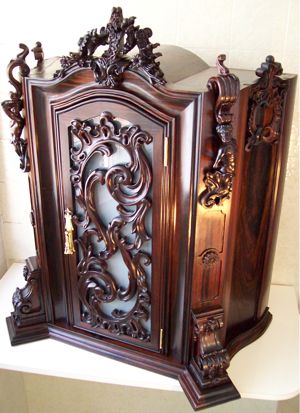 Guided by my own interpretation of traditional Dom Jose I style principles, I am working towards completion of this assembly relying exclusively on
hand tools and my usual carving methods (which replace the more popular mechanized woodworking operations).
Guided by my own interpretation of traditional Dom Jose I style principles, I am working towards completion of this assembly relying exclusively on
hand tools and my usual carving methods (which replace the more popular mechanized woodworking operations).
I am currently addressing the sweet problem of conceiving and building the corresponding lower cabinet, an
undertaking that will provide additional technical challenges which I will relish overcoming.
As the lower cabinet will have its own original design, thus far I have only its overall concept in mind
without any details. Thus I must refine the concept on a step-by-step basis, calculating the relative
proportions and establishing the final dimensions of each individual part, which will be completed in a
logical building sequence. Usually this planning time is actually much greater than the handworking time. But
as I said in the January issue, I am not in a hurry.
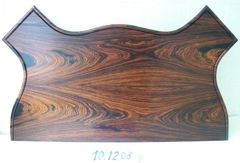
So, based on the shape and dimensions of the bottom of the already-completed upper cabinet, I have just built
the top of the lower cabinet as described in the following procedures and photos. Please note the sequence of
the many woodcarving operations that I performed in order to approximate the intended goal.
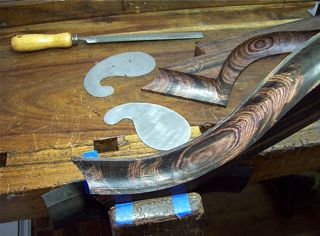
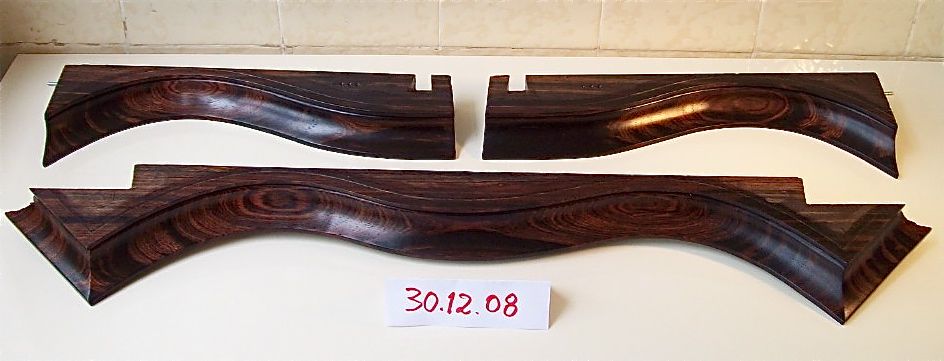
Considering that the top board is contoured by a sinuous and broken line, its supporting railing was conceived
as a concave section molding divided into three parts (plus a straight back rail), in order to improve their
assembling strength and to reduce the quantity of sharp corners to be joined.
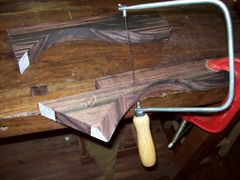

Once the three sinuous rails were cut and trimmed, I glued small paper drawings of the molding profile onto
the corners to use as visual guides, since a pencil line appears invisible on rosewood. Then using a coping
saw, I took off a slice through all the extension of the moldings according to the slope angle, after having
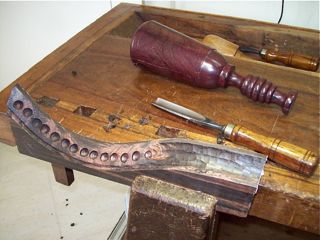
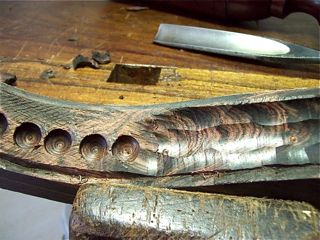
marked its limit lines. Afterwards I drilled many depth-controlled holes using a hand drill in order to
establish the lowest level for the next operation, the gouge carving. In this operation I delighted in seeing
the shining result produced on the rosewood each time my mallet struck my heavy gouge. The next step was to
refine the concavity using rasps, files and goose-neck scrapers. Finally, I used three different grits of
sandpaper for the final smoothing.

Next I applied a fine coat of sealer (quite diluted) on the exterior face of the molding and rubbed it with
steel wool after it dried. Then I applied a thin coat of a personally prepared wax (combining carnauba,
beeswax, turpentine, etc.) in order to avoid any future undesired impregnation of glue. At this point I
considered the individual curved rails to be completely finished.
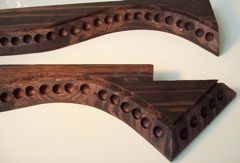
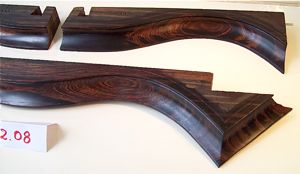 Continuing on, I cut a straight beam of wood to use for the back rail, upon which I cut a half-thickness
dovetailed tenon at each extremity, thus creating a half-thickness shoulder. The corresponding half-thickness
mortises were cut on both curved rails. The two corners formed by the assembly of the three curved pieces were
internally reinforced by two half-driven steel screws with heads cut off, which fit snugly into two
corresponding holes on the opposite piece.
Continuing on, I cut a straight beam of wood to use for the back rail, upon which I cut a half-thickness
dovetailed tenon at each extremity, thus creating a half-thickness shoulder. The corresponding half-thickness
mortises were cut on both curved rails. The two corners formed by the assembly of the three curved pieces were
internally reinforced by two half-driven steel screws with heads cut off, which fit snugly into two
corresponding holes on the opposite piece.
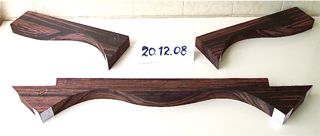
The four pieces were then glued together using 24-hour epoxy glue that I had previously warmed to accelerate
the reaction time. The screws and their encasing holes were stuffed with epoxy as well. Because the rosewood's
shining surfaces derive from a kind of natural resin, I do not trust the common PVA glues usually sold in
Brazil. The warmed epoxy glue also performs a good gap filling function.
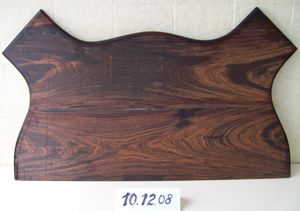
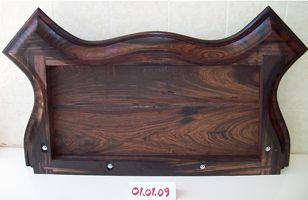
After the rail structure finished drying, I attached it to the previously made top board, which was composed
of two glued-up pieces. The front rail was then glued to the top board using the aforementioned glued
half-screw system. However the side and back rails were screwed through slots that permit some gliding in
order to avoid future cracks caused by seasonal expansion and contraction. The top of the lower cabinet was
thus completely finished.

I must say that I seriously doubt if I could get better results using the normal machinery available in
typical Brazilian workshops, especially with regard to the accuracy necessary on the sharp-ended corners. For
example, Rio-rosewood is a quite stubborn wood that does not easily accept being worked by routers. Router
bits used on it are known to break almost immediately, even on very shallow cuts.
Thus far I have won just the first battle of a long war. My next battles will be to conceive and build the
sinuous carved legs ("cabriolet" in French") followed by the convex carved sides ("bombe") and then the curved
front drawers. I hope you will join me in a future issue of Wood News for this continuing merriment.
Dilo can be reached via email at
dilofernandino@gmail.com
Return to
Wood News
front
page
