An Infrared Heater for a Small Workshop
by Steven D. Johnson
Racine, Wisconsin
In Wisconsin we anticipate a nice autumn and a smooth and gradual transition to winter. We prepare,
with diligence, for the frigid months ahead. We rake leaves, drain hoses, protect outdoor faucets,
and lay in a winter's worth of firewood, ice melt, and gasoline for the snow blower. We look
forward to additional time in the workshop, and plan our projects. And throughout the autumn season
our thoughts inevitably drift to the one common necessity we woodworkers share – heat.
We need heat for comfort, and for our finishes to dry properly. We need heat for our wood to
acclimate and for our glues to set. We need our heat source to be efficient and safe and we need it
to be effective. We ponder last year's utility bills and think about smelly fumes and noisy
heaters, or worse, the money we have wasted on ineffectual units. Inevitably, at this time of year,
we all wonder if there is a better way.
In the throes of my annual heating dilemma, I ran across some information about electric infrared
heating. There seemed to be many attributes to infrared heating that would be appealing to
woodworkers. First, there is no combustion. Open flame heaters seem to me to be unnecessarily
risky in a shop environment full of wood dust and flammable finishing supplies. Infrared heaters
are purported to be energy efficient. They are also quiet, as they do not have blowers that stir
the air (and dust). In fact, infrared heaters do not heat the air, but instead heat objects that
are in the path of the infrared rays. It is like standing in the sun on a cold, still day. The sun
warms you even though the air temperature around you has not changed. Inside your shop,
infrared-heated objects and people will re-radiate some of the heat they absorb, so there is some
eventual overall air warming of the internal environment. At least, that is what the literature
claims.
With further research, certain infrared heaters were ruled out as potentially less appropriate for a
shop environment. Heaters that use glass elements seemed fragile, and the decorative boxy
floor-standing units simply would consume too much of my limited and valuable floor space. Many
units emit a reddish light that is not just distracting, but is probably wasting some of their
energy in the visible spectrum. Some units seemed to be designed for household or office use. Some
seemed, at least cosmetically, more appropriate for a shop environment.
Some electric infrared heating units are advertised for "patio" or "outside" use, though all require
a roof to protect them. This seems to be a wise precaution with electric heat. Simply because the
words "patio" and "outdoor" connote a more robust construction, I narrowed my focus to these units.
Almost all the units require direct wiring and some need a thermostat. For my purposes, I preferred
a unit that could be plugged into a 20 amp 115 volt line or a 30 amp 220 volt circuit, both
available in my shop. Buried in a descriptive sentence on their website, the SunRayz unit
(http://www.sunrayz.us/index.html) was said to include a 55 inch white flex cord for installation to
an "electrical box or wall outlet." That sounded like just the ticket and helped me make a
purchasing decision.
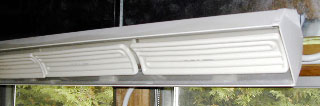
SunRayz produces 4 sizes of heaters, the difference being the number of ceramic heating elements.
Each ceramic heating element consumes about 650 watts, therefore a SunRayz 3, with three elements,
is rated at 1,950 watts (17 amps at 115 volts) and is advertised as able to heat a 12' X 12'
enclosed area. The key to remember here is that the SunRayz heats the woodworker and the tools and
workbenches in the path of its infrared rays, not the air. My shop is 23' X 28', but my main
interest was in heating the area where I spend the most time – in front of the workbench.
Heating the entire shop would have required three or more of the SunRayz 3 units, but electrical
service availability, the cost of three units, and ongoing utility costs mandated that, at least
initially, I concentrate on heating the area where I spend most of my time. My trusty old 220 volt
forced air electric "garage heater" could serve as a backup. Turned to "low," it could provide
"idling" heat to keep the shop above freezing in our Wisconsin winter (no small feat!).
On other web sites for other makers of infrared heaters, there were recommendations to wall mount
heaters near the junction of wall and ceiling, and place them above windows or doors, where they
would, in addition to providing heat, create an invisible "curtain" between the cold air from the
window or door and the room. Someone would have to convince me there is scientific validity to
this, but it just happens that there is a window centered behind my bench, so that was my targeted
mounting area.
Ordering the SunRayz unit through their web site was easy, fast, and secure. The unit, shipped from
Michigan, arrived within days. I had already prepared the area where I intended to mount the
heater, thanks to installation instructions that were helpfully available on their web site.
 The ceramic heating elements, although they emit no light and only harmless infrared radiation, do
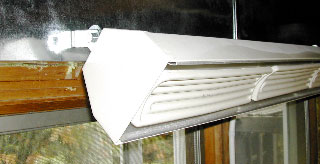
get very hot, as does the housing of the unit. Installation instructions mandate a mounting height
of at least 90 inches, ostensibly to help prevent incidental contact. Further, the directions
recommend angling the unit down at 45 degrees and refers to mounting to a brick or concrete wall.
The only concrete in my shop is the cold floor, so I fashioned a steel plate to cover the fire
resistant tongue and groove siding covering my shop's interior walls as a safety precaution. I
predrilled mounting holes according to the template in the instructions.
The ceramic heating elements, although they emit no light and only harmless infrared radiation, do
get very hot, as does the housing of the unit. Installation instructions mandate a mounting height
of at least 90 inches, ostensibly to help prevent incidental contact. Further, the directions
recommend angling the unit down at 45 degrees and refers to mounting to a brick or concrete wall.
The only concrete in my shop is the cold floor, so I fashioned a steel plate to cover the fire
resistant tongue and groove siding covering my shop's interior walls as a safety precaution. I
predrilled mounting holes according to the template in the instructions.
After the unit arrived, I mounted the 2 included steel "L" brackets firmly to the wall, and the 2
included metric (#12) bolts were then used to secure the heater to the "L" brackets. The unit sits
about 1-1/2 inches from the wall when mounted and angled downward 45 degrees.
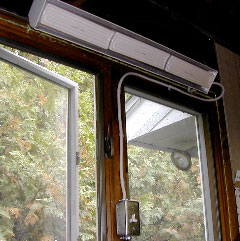 While the SunRayz unit did mention wiring to an "electrical box or wall outlet," and I had intended
to simply add an appropriate 20 amp plug to the wire, the 55 inch cord length was not enough to
reach my outlet. After some pondering, and a visit with the electrical expert at my local big-box
retailer, I decided to run a wire up the wall, install a switch, and wire the heater's cord to the
switch. In the long run, this is easier than plugging and unplugging the cord to control the
heater, and is probably a safer alternative.
While the SunRayz unit did mention wiring to an "electrical box or wall outlet," and I had intended
to simply add an appropriate 20 amp plug to the wire, the 55 inch cord length was not enough to
reach my outlet. After some pondering, and a visit with the electrical expert at my local big-box
retailer, I decided to run a wire up the wall, install a switch, and wire the heater's cord to the
switch. In the long run, this is easier than plugging and unplugging the cord to control the
heater, and is probably a safer alternative.
Of course, I couldn't wait to turn the heater on, so even though the temperature outside was 61 and
inside was 63, I flipped the switch and went about putting away the tools I used to complete the
installation. Within minutes, I was perspiring, and with high hopes for the winter months, switched
off the heater and called it a day.
The next morning, my shop and the outside air had stabilized to a chilly 44 degrees. I usually
drink my morning coffee in my shop, listen to the news and plan my day. While the coffee was
brewing, I ran out and flipped the switch on my new SunRayz heater. When the coffee was done about
five minutes later, I drank it in toasty comfort under the warming infrared rays. Since then, I
have spent a couple of weeks enjoying the noise-free, odor-free warmth the SunRayz heater emits.
As far as electrical consumption, only time and my monthly utility bill will tell, but I ran a
highly amateurish test as a comparison. With the SunRayz unit on, I counted the number of times the
infuriating little wheel in my electric meter turned in a ten second span of time. I then turned
off the SunRayz and turned on my old 220 volt garage heater. With identical background electrical
consumption in my house, the meter made just shy of 4 rotations in 10 seconds with the SunRayz.
With my old garage heater, the meter spun a dizzying 17 rotations. If this is even a partially
accurate and representative test, I will expect significantly lower utility bills this year! The
SunRayz web site provides some interesting cost data comparing their unit to gas and LP heaters. If
you currently use either type of combustion heat, this information should be helpful.
Over the years and in several different homes, I have tried everything from woodstove heat, to
gas-fired heaters, to LP radiant, to electric heat, and so far, nothing has come close to providing
the clean, fumeless, safe, and energy-efficient heat of the SunRayz infrared system. Highly
recommended!
Sources of electric infrared heaters:
Comfort Cove Radiant Cove Heating Systems
Radiant Electric Heat, Inc.
SunRayz (Weco International, Inc.)
Steven Johnson is recently retired from an almost 30-year career selling medical equipment and supplies,
and now enjoys improving his shop, his skills, and his designs on a full time basis (although he says home
improvement projects and furniture building have been hobbies for most of his adult life).
Pictured below is a photo of Steven's latest woodworking project, a contemporary two-tiered coffee table in maple and walnut.

Return to
Wood News
front page