Last summer I was fortunate enough to attend a seminar called "3D Basecamp." It was a 3-day seminar
for SketchUp users from novice to expert level. There I discovered several new techniques and
applications. The most exciting ones were some applications known as "ruby plugins."
Housebuilder
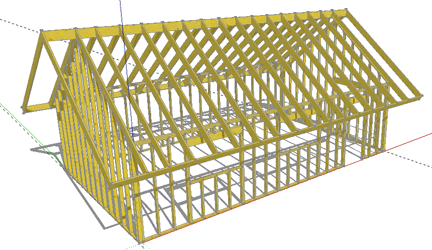 As the name suggests, Housebuilder provides you with a set of tools for creating typical framing
components like walls, gabled walls, floors, and roofs. Separate tools in the set allow you to
insert door and window rough openings into a selected wall.
As the name suggests, Housebuilder provides you with a set of tools for creating typical framing
components like walls, gabled walls, floors, and roofs. Separate tools in the set allow you to
insert door and window rough openings into a selected wall.
First step with any of these plugins is to get them installed in the right location on your
computer. You can find Housebuilder on
"Ruby Library Depot"
.
All of the plugins available here are
free. Another great place is a website called
"Smustard"
.
Get it, S-kechtup, S-mustard. (That one went right over my head at first.)
While a lot of the scripts offered are free, some of the applications on
Smustard require you to pay for the download. These range from $4.00 to $20.00 in most cases and in my opinion are
well worth the expense.
Once you have located the plugin you want from the list, follow the instructions to download the
file. Most of the files are "zipped" or compressed and must be extracted before you copy or move them
into the Plugins folder of your SketchUp program. I will walk you through the Housebuilder install
to get you started.
-
Locate Housebuilder.zip from the list on
this page of Ruby Library Depot
.
-
Right-Click on the script name (Save target/link as...) to download.
-
Save the file. My computer unzips the files automatically. If yours does not, right-click on
the zipped file and choose "extract all" from the drop down menu.
-
Double click the computer icon on your desktop and choose your C: drive>Program files
[Program files (x86)] on dual core processors>Google>SketchUp (your version, 6 or 7) and locate the
plugins folder in the list.
-
Drag all the files into the plugins folder. There is often documentation or instructions for
using the program included in the zipped files and scripts required for the plugins to run
correctly.
-
Restart your computer and open SketchUp.
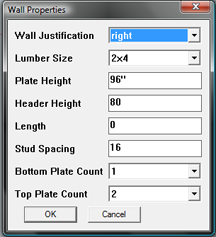 Choose Draw>Housebuilder>Wall tool. A dialog box will open for you to determine variables such as
wall height and thickness (2x4, 2x8, etc.) as well as header height and stud spacing. You should try
different settings to see how they affect the model.
Choose Draw>Housebuilder>Wall tool. A dialog box will open for you to determine variables such as
wall height and thickness (2x4, 2x8, etc.) as well as header height and stud spacing. You should try
different settings to see how they affect the model.
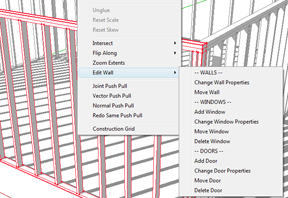 With your wall created, select it and right-click. When you scroll over "Edit Wall," a sub menu
will open with a number of options allowing you to add doors and windows. Choosing "Add Window" or
"Add Door" will open a similar dialog box requesting information related to the rough opening of
your door or window. All the tools in the set work about the same way. You should just start
building and don't forget, as with all tools, step by step instructions are found at the lower left
corner of the modeling window if you need help.
With your wall created, select it and right-click. When you scroll over "Edit Wall," a sub menu
will open with a number of options allowing you to add doors and windows. Choosing "Add Window" or
"Add Door" will open a similar dialog box requesting information related to the rough opening of
your door or window. All the tools in the set work about the same way. You should just start
building and don't forget, as with all tools, step by step instructions are found at the lower left
corner of the modeling window if you need help.
Tools on Surface and Joint Push/Pull
Have you ever wanted to draw a shape on a curved surface or extrude a shape off a curved face. You
probably know SketchUp is limited in this regard using the basic tool set. "Tools on Surface" is a
plugin that gives you the ability to draw lines, circles, and polygons on curved surfaces. You also
have an offset tool and buttons that allow you to edit and erase tools on surface.

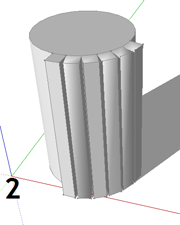
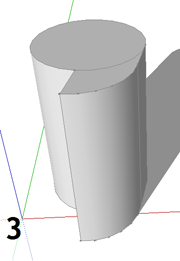
A perfect complement to tools on surface is "Joint Push/Pull". This plugin has three main
features. "Joint push/pull" (figure 1) and "Normal Push/Pull" (figure 2) work like Push/Pull you are
familiar with in that they extrude a selected face perpendicular to the face you are extruding from.
The difference between the two is that Joint Push/Pull keeps the facets of the curve joined as you
extrude while Normal Push/Pull extrudes all the faces within a given area the same distance, but does
not keep the original shape intact. "Vector Push/Pull" (figure 3) allows you to determine the
direction the extrusion takes.
Sketchy Physics
For the grand finale, I give you Sketchy Physics. Here is a
video
to give you an idea of what
Sketchy Physics can do. This program allows you to give components or groups in your model the
ability to act as real physical objects. You also have mechanisms called "joints." Joints basically
determine the relationship between separate groups in your model. Hinges, servos, and motors allow
rotational movement, while sliders, pistons and springs provide movement in a given direction. All
of the joints have a user interface that allows you to control the different aspects of their
function such as motor speed and direction, servo limits, piston travel, etc. You can also record and
export animations of the physics simulations.
Here are links to the
download
and
documentation
but you will likely still have a few questions. I
would recommend watching some of the
tutorials
that can be found here on YouTube.
Beyond the dozens of ideas that begin to percolate once you see what Sketchy Physics can do,
clients and friends alike are simply amazed when I prepare a model of their new kitchen or linen
closet with functioning doors and drawers.
Next Month
I hope you found the information here to be helpful. Join me next month when I begin a kitchen
remodeling job for a client in Petaluma, California. With my being over an hour away from the jobsite,
I will rely on SketchUp to
provide a virtual environment in which to design and build. I will share the process with you from designing my
client's ideal kitchen all the way to creating shop drawings for the individual cabinet components.
Sean Headrick, a former Atlantan once seen frequently at Highland Woodworking, now lives
in San Jose, California where he does woodworking and design.
His website is
www.headrickdesigngroup.com
.
Sean was
interviewed by Wood News
in 2007.
