
 Do you want to achieve a finish youll be proud of on that piece that you worked hard to put together? Have you not used a lot of different finishing products? Would you like to produce such a finish without wearing your arm out sanding coats of polyurethane? You can still attain a very smooth finish without a lot of hard work, using basic oil-based products.
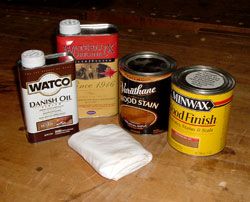
Those products include oil-based pigment stains, like
Minwax
and
Varathane
; oil-based finishes, such as
Waterlox
or
Watco
; and oil-based polyurethanes, including the regular form, the wiping varnishes, and spar varnishes. This process also works well for homemade oil finishes, like the ever-popular mixture of tung oil, mineral spirits, and polyurethane. If there is oil in it, you may like to try this method.
Wiping varnishes are just great, but what they amount to is the regular product with a thinning agent added. They prove to be more expensive than the standard products. If you use the following process, you do not need a specialized wiping varnish. The regular stuff works just fine - the process does the thinning for you.
The methods are simple, and they require minimal hard work. The tools are basic, consisting of
t-shirt cloth
,
high-grit sandpaper
, and a lubricant.
If you are using a pigment stain, such as Minwax or Varathane, bear in mind that pigment stains work best on large-grained woods like oak and worst on tight-grained woods like maple. Pigment stains are fine for soft woods as well, especially if you use them according to these instructions.
Begin with workpieces that you have sanded to
150 or 180 grit
. The pieces do not need to be sanded any finer, because at finer grits, pigment stains become less likely to bind to the wood. If you follow this procedure, the final finish will be smoother than that by several hundred grit numbers. One of the benefits of this process is that you will not have to sand the finish between coats. The only sanding you should have to do will come after you apply the last coat of the final finish.
The process involves three steps:
These steps are for oil-based stains like Minwax and Varathane , and the steps are simple enough for new woodworkers:
This goes for anything with oil in it, whether an oil-based finish like Waterlox or Watco , or any kind of oil-based polyurethane. The process is the same for any homemade type of oil finish. The wiping varnishes, thinned-out versions of the more common products, make this process a little easier, but it works with the full-thickness products as well. The Wiping Off part is the key.
The wiping off keeps you from having to sand between coats, and the buffing contributes to the evenness and smoothness of the finish. If you started with a decently smooth surface, and you have done the wiping off procedure correctly, you should not need to sand between coats. Save the high-grit sandpaper until the end.
When you have put on your last coat and allowed it to dry thoroughly, run your fingers across the surface. If it feels just fine, that is, if your surface preparation was right, and you followed the process successfully, you should have a very smooth surface. Ideally you should be able to leave the surface alone at this point, but ending with a wet-sanding procedure will get you the best finish possible.
If the surface feels very rough, then the wiping off process has not gone just right, and you will need to start sanding at a lower grit. Try always to sand with the highest grit that will make a difference. If you have to do a lot of sanding, the higher the grit you use on your last step, the smoother your finish will be. Most non-professionals think that a 600 grit finish is fabulous. Keep at it until you are satisfied, and then wet-sand with the next higher grade of sandpaper (see below).
If the surface feels a tiny bit rough, or if your fingers bump across the surface like rocks skimming across the pond, you will do well to sand the piece lightly, using a lubricant. This is called Wet Sanding, and it does great things for a sturdy oil finish.
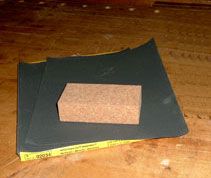 Get some high grit wet-dry sandpaper,
600 to 1000 grit
, and fold some of it onto a cork sanding block or a hardware store drywall sander. This writer does not recommend doing this with just your hand, because your hand is not flat. Put just a few drops of mineral spirits or water onto the sandpaper, and spread it around on the sandpaper with your fingers. Lightly sand the surface, going with the grain. When you begin to feel a difference in the sander, or when the sanding process begins to sound abrasive, add a few more drops of lubricant. A little of it will go a long way.
Get some high grit wet-dry sandpaper,
600 to 1000 grit
, and fold some of it onto a cork sanding block or a hardware store drywall sander. This writer does not recommend doing this with just your hand, because your hand is not flat. Put just a few drops of mineral spirits or water onto the sandpaper, and spread it around on the sandpaper with your fingers. Lightly sand the surface, going with the grain. When you begin to feel a difference in the sander, or when the sanding process begins to sound abrasive, add a few more drops of lubricant. A little of it will go a long way.
As you begin to wet-sand, use your free hand to feel the wood that you have just sanded. You will probably love the feel of the wood, even if you are using regular polyurethane. If you are not quite satisfied, then sand (dry, without lubricant) to the next higher grit.
Highland Hardware has
wet-dry sandpaper
up to 2500 grit. Do not wet-sand again unless you find yourself doing two or more passes of dry sanding after you wet-sand. The last sanding pass should generally include a lubricant. Feel the finish as you go ("Become one with the finish", says the Zen master), and you will know what to do.
If you used mineral spirits as a lubricant, several hours later you may see patches of a hazy-looking residue. Simply wipe it off with some t-shirt cloth. That may show up for a day or two on the piece, but it is harmless.
If you test this procedure successfully before you try it on a workpiece, and follow the steps closely, you will get some gorgeous finishes, and people will notice that the quality of your work has just gone up, especially if you are a beginner!
If you are a bit beyond beginner, give this a try, and take note that Highland Hardware has finishing
classes and seminars
, a
book department
, and
staff
who are happy to help you with finishing questions!
Bob took up woodworking as a matter of necessity. After he had moved his particleboard bookcases twice, he watched in amazement as one of them fell apart before his eyes. Shocked at the cost of real wooden cases, he got out his circular saw and made his own. Bob still builds a lot of pieces that are "way bigger than me". He tells people that if they can draw it, he can build it. He is perfecting his finishing skills. In his free time Bob serves as Chairman of the Committee to Remove All Particleboard.