|
You've just purchased that new smoothing plane you've had your eye on for so long. Or you've lovingly brought an older Stanley Hand Plane to bright and shiny condition. And now you're ready to put a fine finish on a treasured piece of wood. But is your plane ready to make the wispy shavings you're hoping for? What can you do to set up your plane for the best results? Here are seven steps to get peak performance from your hand planes.
Sharpen and Hone the Blade
Your plane will never work as it should without a well-sharpened and honed blade. Premium planes will cut reasonably well right out of the box, but to perform their best even they need a little preparation. Budget planes and survivors from an earlier era require even more attention.
First, flatten and polish the back of the blade to remove any machining marks. Work your blade back and forth across the sharpening stones, starting with your coarsest grit and working up through the grits until all scratches have been removed and you achieve a mirror polish. This job only needs to be done once, but even on premium planes it's a necessary step. Don't go overboard; you are really only concerned with the final half inch or so of the blade's back. The rest of the blade will never touch the wood and can be safely ignored.
Next turn your attention to the bevel. The primary bevel on most plane blades should be 25°. Exceptions are blades set at a higher cutting angle for difficult grain. If your bevel is not at the right angle, the edge is not square to the sides, or the cutting edge is nicked you'll need to regrind it. This can be done on a grinder—an 8 inch slow-speed grinder is best for this work, a water-cooled, large wheel grinder even better—but good results can be achieved by working the blade on PSA sandpaper attached to a dead flat surface. I start with 80 grit paper and work up to 120 grit. Once the bevel is shaped to the proper angle, it, too, will need to be polished mirror smooth by working your way through the grits of whatever stone or sandpaper method you use. While some woodworkers are able to get good results by hand holding their blades, I highly recommend a honing guide to produce consistent, repeatable results.
If your restored plane has a blade that's in very rough condition, you may find it easier to purchase an aftermarket replacement blade. Not only will you start with a blade that's in premium condition, but it will be made of a more durable modern steel than was available when the older planes were originally made.
Once you have a high polish on your primary bevel, you want to establish a secondary or micro bevel about 2–5° higher than the primary bevel. This will need to be done on all blades, as even premium blades do not come with a micro bevel. Once again, start with your coarsest stone and stroke until you've established a thin line evenly across the tip of the blade. Then proceed to the next higher grit. Finish by giving it a mirror polish with your highest stone. Do a careful job here; it's the micro bevel that meets the wood and produces those fine shavings.

Finally, to get the sharpest edge, use David Charlesworth's ruler trick to put a very slight back bevel on the blade. Place a thin ruler lengthwise on the rear edge of your stone. Then, lay the blade on the stone bevel side up with the cutting edge off the far edge of the stone. While making back-and-forth sideways motions, carefully pull the blade onto the stone, then push it off again, repeating the process up to 10 times. Do this using each of your stones, working to your highest grit. The result—a high polish on the extreme tip of the blade back that gives the sharpest edge. Once done, this step need not be repeated, though you may wish to refresh the back bevel with your finest stone each time you re-hone your microbevel.
Now that your blade is sharpened and honed to perfection, you will ordinarily only need to refresh the micro bevel on your finest stone from time to time to keep it in top cutting condition.
|
Upgrading Your Plane Blade
If your blade is in bad shape—either badly nicked or rusted—you might be better off installing a new replacement blade. Several manufacturers offer replacement blades in a variety of widths to fit older Stanleys, Records and other brands. Some blades are as much as 25 percent thicker than the original blades and use modern steels, including both A2 and 01 steel. Replacement chipbreakers are also available.
Thicker blades reduce the likelihood of chatter and offer greater stability, but they may require adjustments to the frog or even the size of the mouth opening to accommodate the greater thickness. Available blades vary in thickness, so take this into account when purchasing. A thickness of .095 inches or less will likely work in most older planes.
Replacement chipbreakers in particular may be thicker than the original parts and may not fit older planes. Check with the manufacturer before ordering. Highland Woodworking carries Stanley replacement blades and chipbreakers.
|
Set the Mouth Opening
While the lion's share of attention goes to getting a keen edge on the blade, several other steps will help you get the best from your plane. One is adjusting the mouth opening. On a bevel down plane, this is achieved by moving the frog forward or backward until the opening is slightly wider than the thickness of the desired shaving. For smoothing planes, very fine shavings are the goal so you will want to set a very narrow gap. The opening can be wider for jointers and wider still for jack planes set up to take thick shavings when roughing out a board.

Set the frog with the blade in place and slightly projected. On planes based on the Stanley Bedrock model, which includes Lie-Nielsen planes, adjust the opening by loosening the two screws on either side of the depth adjustment wheel. Then advance or retract the frog as necessary by turning the large screw located between the two locking screws. Once the frog is adjusted, loosely tighten the locking screws, remove the blade and sight down the frog to the mouth to confirm that the frog is perfectly square to the mouth. Then tighten the locking screws alternately and gradually until tight. Don't over tighten them to avoid stripping the threads.

The more common Bailey-style planes have a slightly different screw arrangement—two locking screws located under the blade-chipbreaker assembly and an adjusting screw at the rear of the frog. This means you may have to insert and remove the blade and chipbreaker assembly several times until you get the mouth set the way you want it. Otherwise, the adjustment process is the same as for Bedrock-style planes.
Some newer planes—including block planes and other bevel-up planes—are built with adjustable mouths. Usually the mouth is loosened by turning a lever at the base of the toe, then sliding the mouth assembly forward or backward to obtain the desired opening.
Adjust the Chipbreaker
The chipbreaker on a bevel down plane should also be set so the distance from the blade edge is slightly more than the width of the shavings you intend to make. For smoothing most hardwoods, 1/32 inch is good, though you may want to set it at 1/64 inch for difficult woods prone to tearout. For softwoods, 1/16 inch may be more appropriate. The distance will vary for individual planes set up to achieve different results. Bevel up planes, of course, have no chipbreakers and need no such adjustment.
Adjust the Cap Iron Pressure
The cap iron should hold the blade and chip breaker firmly to eliminate chatter but not so tightly that the depth adjuster can't be easily moved with two fingers. With the lever loosened, tighten the screw until it holds the blade and chip breaker snugly in place, then snap the lever down and test the ease of adjustment. Once you've achieved the right amount of pressure, leave the screw alone and remove the iron by raising the lever.
Set the Depth Adjuster
Now we come to the business end of the adjustments, where the metal meets the wood. On most planes, you turn the depth adjustment wheel clockwise to deepen the cut and counterclockwise to retract it. However, there are exceptions. I recently came upon an old Crusader where the depth adjuster was turned in the opposite direction, so check your plane to see which rule applies.

Unfortunately, because of the unavoidable condition of backlash—excess play in the wheel adjustment—setting the blade depth so it does not slip in place requires a little more technique. The rule is to finish all depth adjustments with a downward, usually clockwise, movement of the wheel. Failing to keep downward pressure leaves the blade in a loose condition that lets it slip, and you can quickly lose the adjustment you just carefully set.
Thus, if the blade is set too deep, back it off by turning the wheel counterclockwise until the blade is fully retracted. Then make small downward (ordinarily clockwise) adjustments, testing after each movement, until you get the right depth. If you find you need a more shallow set, repeat the entire process by backing the blade out and then deepening the cut by small degrees.
Lateral Adjustments
The rule of thumb here is to slide the lateral adjustment lever toward the side of the blade that is cutting too deeply. You can test the balance of the blade depth by sighting down the sole and looking for the black line that shows the presence of the blade. Or you can look directly into the mouth from the bottom of the plane to judge whether the blade is the same distance from the mouth edge on both sides. A third method is to take a thin wood chip and stroke it gently on each side of the blade, paying attention to the size of each shaving produced as well as the sound as the chip passes over the cutting edge. The acid test, however, is to make a cut on a scrap board to see if you get shavings of equal thickness from each side of the blade. On a flat board, you would expect to get a full-width shaving of uniform thickness. If the shaving is light on one side or missing altogether, move the lever slightly to the side that is cutting heaviest and retest. A series of small, successive adjustments will usually produce better results than making wider swings in the hope of hitting the correct setting in one movement. Often, moving the adjustment lever affects the overall depth of cut, so be prepared for follow-up depth adjustments.

Cambered blades, because the blade corners are curved, are easier to put into balance. This is one reason why they are recommended for most users, especially those new to using hand planes (see below).
|
To Camber or Not to Camber—That is the Question
Plane blades can be cambered or kept straight, according to the user's preference and skill level. The temptation—especially for new users—is to leave the blade edge just as it comes out of the box: straight. But it is precisely new users who can benefit the most from a cambered blade. Why? Because a cambered blade is more forgiving when it is not precisely set to equal depth on both edges. A blade that's not balanced is very likely to dig more deeply into the wood on one side than the other, leaving "tracking" marks on the surface.
To camber a blade, divide the blade edge into fifths and with your index finger on each fifth of the blade take progressively more strokes on your stones as you work farther away from the middle. By taking slightly more metal from the edges than the middle, you'll create a slight curvature to the cutting edge. Count the strokes and use the same number on each side and with each of your stones on both the primary and micro bevels. For best results, record your strokes in your shop notebook so you can repeat the same process each time you re-hone the blade. Smoothing planes can be cambered very slightly; blades on planes intended for heavier stock removal can be given greater curvature.
|
Lubrication
Lubricating the plane's sole makes a surprising difference in the ease with which the plane glides over your workpiece. I generally make a series of X marks on the sole of my plane using a stick of beeswax. How often should you do this? The simple answer is, whenever you feel the resistance begin to build against the smooth movement of your plane. That can range from every dozen or so strokes to every two or three boards. It's a matter of personal preference and whether you're working a rough or smooth surface.
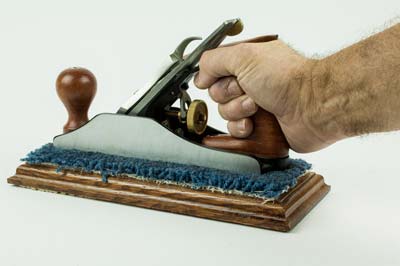
In addition to beeswax, paraffin or mutton tallow work well. Or, you can make a plane oiler by gluing a piece of discarded carpet to a wood block and spraying it lightly with Camellia or jojoba oil. Drag the plane backwards over the carpet to coat it lightly with oil. None of these lubricants will interfere with your finish.
By following these steps and making them a habit, you can turn your hand planes into the fine-performing instruments of craftsmanship they are intended to be.
For more information about using hand planes, be sure to follow Lee Laird's "The Plane Facts" blog series on using different types of hand planes available at Highland Woodworking.
The author is a woodworker, writer and photographer living in Delaplane, Virginia, in the foothills of the Blue Ridge Mountains with his wife, four cats and a woodshop full of power and hand tools. He can be reached by email at nreid@fcc.net.
|


