Ask the Staff
Question:
My wife bought me the Kunz 5plus Jack Plane for my birthday. When I opened the box and examined the bench plane I found there is a hex-wrench, but no instruction manual to show how to adjust the iron blade (advance the blade and retract the blade).
When I attempted to advance the iron blade, it never protruded out the plane mouth. The blade always touched the mouth, so I adjusted the mouth but that didn't help either.
Can you send me any instructions to show me how to set/adjust the blade depth as well how to adjust the mouth? What is the position of the frog I should set and what position should the Norris adjuster be set relative to the frog position?
Thank You For Your assistance.
Best Regards,
Sonn
Answer:
Sonn,
The blade adjustment for the Kunz planes is a bit different than the standard bench planes you are probably familar with. I'll try to steer you through setting the Kunz so you can get some nice shavings. (Kunz does not have instructions.) I'll assume you have honed the blade before use. Though it looks and feels sharp out of the box, the iron will still need a final hone before use.
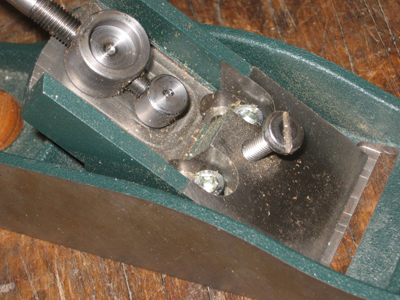
With the blade, chipbreaker and cap iron removed, see the image above that shows the depth adjuster. I started with the edge of the large barrel nut spaced about 1/8" above the small pivot barrel nut. (The end of the threaded bolt should be screwed at least half way into the pivot nut. If the threads just barely go in, when you adjust to move the iron back off, the threads could come out of the pivot barrel nut. Where the large barrel is on the threaded post makes a difference in being able to get the iron adjusted to cut. The reason for all the excess thread on the post is that as the iron is shortened with use, the chipbreaker will be moved back where you screw it to the iron. This will put the screw head of the chipbreaker further back (up) on the iron and as a result, the large barrel adjuster will need to be further away from the pivot nut.
Also notice the frog and where it happens to be resting in the body of the plane. Ours is back about 3/32" from the back edge of the throat opening. (Unless you changed this setting, it should be this dimension from the factory, but you should double check.) Because the iron goes in with the bevel facing down, the fact the frog is set back this far is not an issue. The iron will not touch the back edge of the throat opening on the sole of the plane. Once you start getting shavings at this setting, you can play with moving the frog forward to close down the throat opening if you want. (This is what the hex wrench is for.)
Now that I've said that mouthful, check the chipbreaker attached to the iron (remember, the bevel on the iron faces down towards the sole of the plane). The leading edge of the chipbreaker should be about 1/16" back from the leading edge of the iron. Tighten down the screw that holds the chipbreaker to the iron.
With the plane on a flat surface, drop in the iron/chipbreaker assembly. The chipbreaker screw should be resting in the cup of the large barrel nut and the cutting edge of the iron should be resting into the opening of the sole of the plane. If this looks way off, the large barrel nut is not where it needs to be on the threaded bolt.
OK, now we'll go through the motions to put the cap iron on. Before you start, first back off the slotted screw a bit (the screw that comes through the big cutout hole in the iron and chipbreaker).
This will make it easier to get the iron and chipbreaker into place. Also, back off the cap iron's knurled brass screw so it is NOT protruding out the bottom of the cap iron. In fact, only engage the knurled screw about half way through the thickness of the cap iron. This will make it easier to seat over the protruding threads of the iron/cb bolt.
Now slip the cap iron into place by first slipping it over the slotted screw head and then seating the post of the knurled cap iron knob over the protruding threads of the iron/cb screw.
Now turn the slotted screw down, using your fingers only, till the screw touches the cap iron and then back off the slotted screw half a turn.
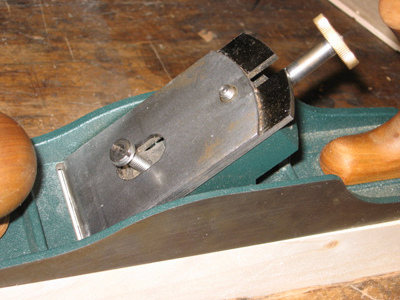
Now tighten down the cap iron knurled knob and you will see the back end of the cap iron come up . Don't over tighten the knurled knob just yet. Just snug enough to hold things in so the mechanism will adjust side to side and in and out without binding.
What folks often overlook about the slotted screw is that it only serves as a pivot point for the cap iron. This is why it does not need to be tightened down. The knurled knob at the back of the chip breaker cannot do its job (lifting the leading edge of the chipbreaker so it will bear tight against the iron out at the cutting edge), if the slotted screw is screwed down too far.
OK, now pick up the plane and turn it upside down with the front of the plane aimed at your nose (your arms are out in front of you) Get yourself facing a light colored background if possible and sight how much blade is sticking out. Adjust side to side and in and out as needed. I look for a 1/32" line protruding evenly above the sole of the plane as a starting place.
At this point you may want to tighten the cap iron knurled knob some more if the settings move a bit too easily. You'll find a place of tighteness that still lets you adjust, but holds the adjustment fairly well. It is not uncommon to super snug the knurled knob once you get the cut right where you want it. You can ease off the knob when you go to readjust if needed.
Now take a practive stroke on some wood. Adjust the iron in or out to get the cutting action and shaving thickness you want.
When backing off the depth setting so the iron takes a smaller bite, I always back off a bit more and then move the iron forward just a hair. This helps insure the iron is supported well by the mechanism (the backlash is removed). Please let me know how it goes.
Regards,
Ed Scent
Highland Woodworking
E-mail us
with your woodworking questions. If yours is selected for publication,
we'll send you a free Highland Woodworking hat.
Return to
Wood News
front page


