Workshop Design, Part 1
by Phil Rasmussen, The Mountain Woodworker
Hendersonville, NC
Click on any picture to see a larger version.
Over the years I have visited many woodworking shops across the country and have viewed even more of them online. Just like their woodworking, the woodworkers' shops are equally individualized. However, in conversations about their shops many woodworkers have told me that they will periodically rearrange their shops. The most often quoted reason for these rearrangements has been "to better utilize my workspace."
So how do we design our woodshops? While there is no right or wrong way to design our woodshops, there are many considerations and approaches to the design process. Following are several approaches to take into consideration when either designing or redesigning your workshop.
The Consultation Approach
This is one of two very common approaches to workshop design. In this approach the woodworker consults books, friends, and/or other woodworkers. This approach often provides ideas for the workshop but it often has the biases of the book's author, friends, or the other woodworker. While these biases are often a con for this approach, the positive aspect is that it may provide some point that the woodworker had not thought of. For example, one woodworker asked fellow woodworkers to help design her new workshop. One response was to turn the table saw that was in front of the garage door around so that the out feed was toward the door instead of toward the bandsaw. The advantage was that she would be able to saw longer boards by opening the garage door.
The Puzzle Approach
The other most common approach is what I call the puzzle approach. In this approach the woodworker sits down at a table or desk with a scaled outline drawing of his shop space and scaled cutouts of the equipment he has. He then arranges and rearranges the equipment within the drawing until he is satisfied with the arrangement. While this approach provides a lot of satisfaction in coming up with a layout, the woodworker usually finds that the layout is not working as well as expected. He may then start moving equipment around or depending upon his level of "change anxiety," leave it until he cannot put up the with plan any longer.
So is there a better way to come up with a workshop design that will work well for the woodworker? The answer is yes! Going back to the first paragraph it was stated that woodworkers' shops were just as individualized as their woodworking. Therein lies the basis for workshop design.
The Analytical Integrated Approach
The analytical integrated approach consists of two major components that while initially considered separately they are later integrated to provide the best layout for the woodworker. This does not mean that it will not change. Change is inevitable because the interests of the woodworker may change, equipment may change, or it is possible that the initial processes for this approach were not complete and/or accurate.
The first component of this approach consists of analytics. The woodworker needs to determine what he currently does and will be doing in the future. So the first question to ask is a two part question: a) What type of woodworking do you do? – furniture, toy, miniature, turner, deÌÂcor, pens, etcetera, and b) "At what level are you and to what level do you want to aspire to? – novice, intermediate, advance, professional" The second part is not an easy question to ask since the woodworker must be honest with him/herself. For example the woodworker may be a carpenter by trade and makes jewelry boxes. In one aspect he is a professional but in another he may be a novice at making boxes.
This leads into the second question, "What is required for the type of woodworking I do or want to do?" This is a very broad question that includes, among other things, the skills needed for the type of woodworking done, the equipment needed, and the space that is needed. These requirements are based in part on the answers of the first question. The following is a scenario of how these two questions are integral to each other:
Let us assume that you have been employed for five years in a kitchen cabinet workshop. Your job title is "cabinet maker," but what you essentially do is assemble the cabinet components as they come in from another shop. On occasion you have had to use some shop power tools in order to "make things fit." You enjoy your job and have decided that you want to set up a woodworking shop in your garage so that you can make furniture for yourself and your family members.
After reflecting on your woodworking skills acquired in your job and through a high school shop class you realize that you are very much a novice. Also after researching furniture making books, although you want to make that Queen Anne Bureau, you do not have the skills to do such complicated work. So you downsize your ambitions to making Shaker or Mission style furniture because it does not look so complicated. At this point you have identified a lot of information toward answering the first question. While there is still a lot more reflection, research, and information that is needed in order to completely answer the question we will leave the answer as is for this example.
Moving on to the second question, you identify some of the skills that are needed to make the type of furniture you have settled upon. These skills include measuring, cutting, assembly using hand tools and possibly using power tools such as a table saw, router or mortising machine. Again the list of skills needs to be longer and more detailed, especially if you want to include your desire to make Queen Anne furniture.
Since you have settled on making Shaker/Mission furniture, you review the books on these styles of furniture. You have eliminated certain pieces such as a hall tree, library stand, and so forth. You have subconsciously decided that you will start by making a Morris chair, especially since you have noticed that apparently there are more plans available for it than for other types of furniture. You need to pull this out of your subconscious and then look at all of the types of furniture you want to make in the Shaker and Mission styles. You need to determine what skills you need to make each type. You will definitely need to be able to make mortise and tenon joints. Splined or biscuit joints may also be required as well as dowel joints. Because of the number of pieces in the various types of furniture you want to make, you note that a table saw will save time and improve accuracy. This is another skill set you will need.
The types of hand and power tools you will need are fairly easy to identify, especially as time goes along with each of your projects. Single items such as a table saw, drill press, and router table are easily identified. The number of multiple items such as the size and number of router bits and clamps are more difficult to determine. While you may be able to purchase an item as the need arises, this is not a good practice when it comes to clamps. You need to have all the clamps that are needed for a project before you do any glue ups. With regard to space, we will discuss this later.
The second component of this approach deals with your equipment as it relates to the woodworking you do and how the equipment will be arranged in your shop. To facilitate shop layout, we will apply the same concepts that are used in designing a kitchen.
The most basic element to kitchen design is the kitchen triangle or work triangle. In a kitchen, most of the activity that takes place revolves around the sink, stove and refrigerator. For an efficient workflow between these three items it is essential that there are no obstacles in the way to interrupt movement between them. For example, you would not want to have the stove on one side of the kitchen with the sink and refrigerator on the opposite side and an island between the two sides. The island interrupts the workflow (work triangle) between the three. Although work flow can be made better by switching the stove and refrigerator, the island is still an obstacle to efficient cooking.
In your workshop you need to also create a work triangle. You need to determine the basic tasks that need to take place for your woodworking. For example, if you are a pen maker the essential tasks in order could be:
-
Selecting the wood to be turned into a pen.-Storage
-
Cutting it to length. -Band Saw
-
Drilling the holes in it for the tubes. -Drill Press
-
Turning and finishing the wood. -Lathe
-
Assembling the pen components. -Assembly Jig
Since storage may be anywhere in your shop we can discount that for the moment. Pen assembly is probably done right next to the lathe for most woodworkers so we can count that as a single area. So our sink, stove and refrigerator triangle in the workshop would be the band saw, drill press, and lathe. We would not want to have any obstructions between the three pieces of equipment.
Now that we have identified the work triangle, it is time to look at the work space that you have. There are essentially five different layouts found in most kitchens. They are:
-
Single wall
-
Galley/corridor
-
L-shaped
-
U-shaped
-
G-shaped
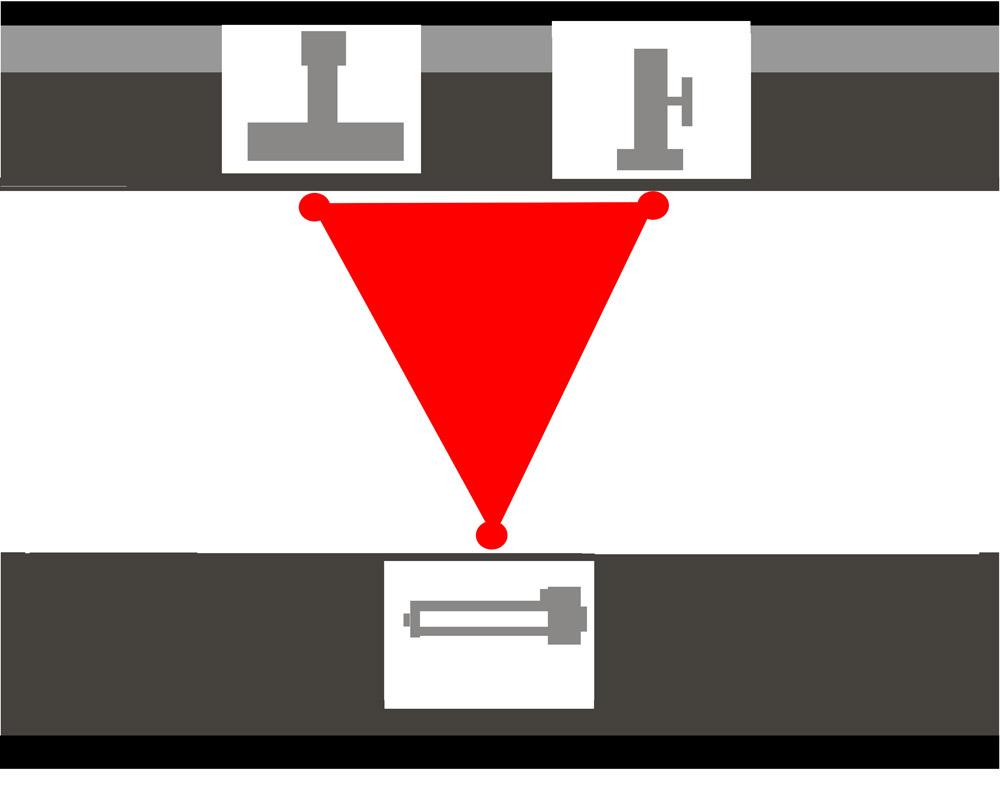
Single wall-
Many woodworker shops are part of a garage. They are usually one wall of the garage. The work triangle in this type of a layout is less like a triangle and more like a work line. In the single wall layout it is important to follow the order of woodworking. In the earlier example moving from left to right you would want the first piece of equipment to be the band saw, then the drill press, and lastly the lathe. Switching any of these items around would interrupt the workflow and create more work and extended time.

|
Galley/corridor–
This type of layout is much like a hallway where there are two walls across from each other. It is not often found in woodworking shops in the typical sense of two walls. What you may find is one wall with a workbench 3-6 feet from it. A "corridor" is then formed between the wall and workbench. The workspace is usually large enough for one woodworker only. Against the wall may be the band saw and drill press. The lathe would be on the opposite "wall" or work bench.
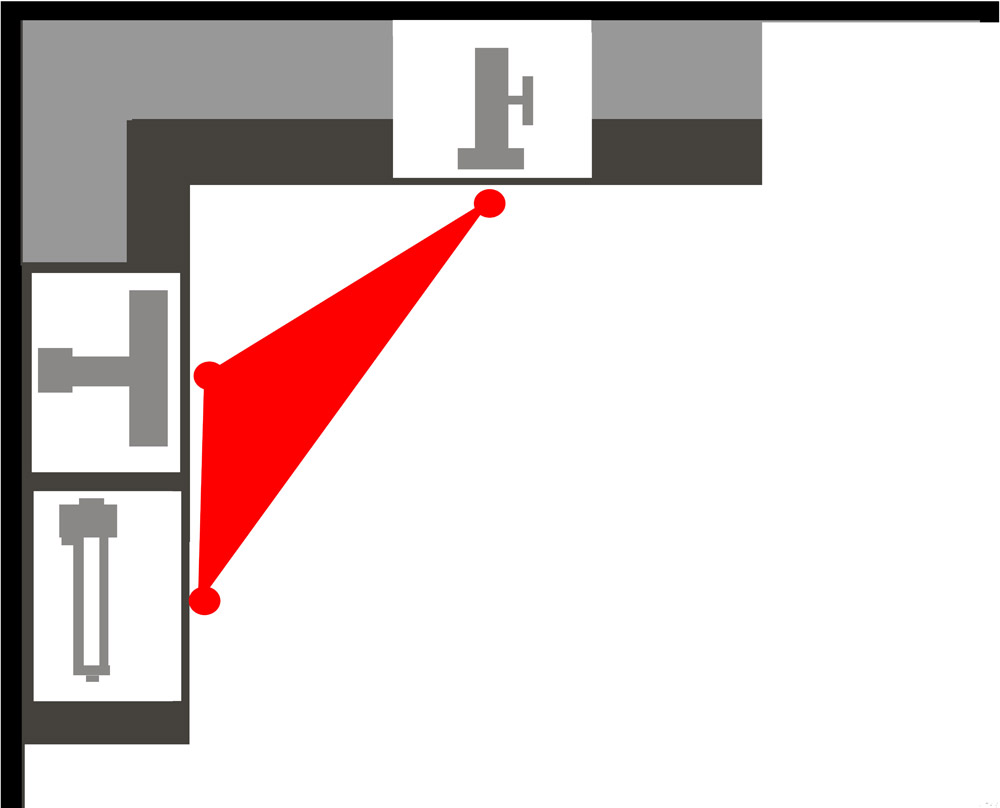
L-shaped–
In the L-shaped layout, a natural work triangle is created from the continuous workbench between two adjacent walls. The advantage of this layout is that it forms a natural work triangle and also opens the shop up for guests.
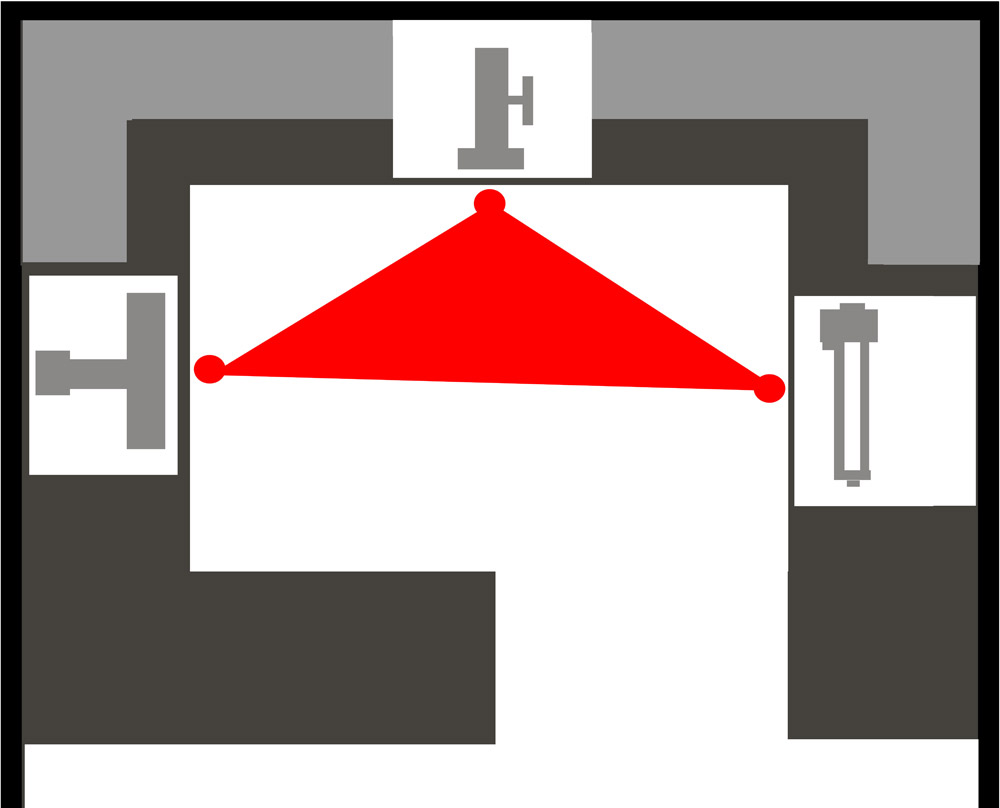
U-shaped–
The U-shaped layout is probably the most versatile layout for all sizes of workshops. It offers lots of storage space and bench top space. This layout can be used in many workshops. The layout can allow the space to be divided into multiple work stations and in some cases, an island can be installed as well.
G-shaped (peninsula)–
This layout is a version of the U-shaped workshop but includes a "peninsula" or partial fourth wall for additional cabinets and counter space. Depending on the size of the workshop, this layout can seem cramped. It may also reduce access to the workshop
Be on the look out in our December issue of Wood News for
Workshop Design-Part 2
, where Phil discusses Zone Design, one of the most critical steps toward the final layout of your workshop.
You can email Phil at
Pmrii@aol.com
. You can also visit his website at
http://www.mountainwoodworker.com
Located in the beautiful mountains of Western North Carolina, Phil Rasmussen is the Mountain Woodworker. His woodworking experience and knowledge goes back to when he started learning woodworking from his grandfather, a European master woodworker. Working his way through college as a draftsman for architectural firms, Phil designed many homes and specialized in kitchen design. Today, as the Mountain Woodworker, Phil makes custom, hand-crafted shaker and mission style furniture and deÌÂcor items, and turns pens. He has done work for clients throughout the US and abroad.
Return to
Wood News
front page