Getting the Best From Your Dovetail Jig
by J. Norman Reid
Delaplane, Virginia
Dovetails have long been recognized as one of the strongest and most beautiful joints in woodworking. And nothing beats a dovetail jig for accurate and repeatable results, especially when many joints need to be cut. But dovetail jigs are not always easy to use, at least until you've built up some experience with them. Following are some tips to help you get to your best results quickly.
Safety
The first concern is safety, for both you and your dovetail jig. Always, repeat, always wear eye and hearing protection when using a router. Wood parts are generally replaceable; your eyes and ears are not. Set your dovetail jig below eye level. At eye level you risk having dust and small cuttings thrust into your face and eyes, a situation that's not only unpleasant but dangerous.
Fasten the dovetail jig securely to your workbench. The best method is to attach it to a base that's large enough to clamp firmly to your benchtop.
When routing, protect your jig by holding the router flat on the jig's fingers until it has come to a complete stop. If you lift the router from the jig while the bit is still spinning, you are virtually guaranteed to hit the fingers, causing damage that's likely to affect the quality of future cuts or requiring you to replace the damaged fingers.
Occasionally, you may need to rout a vertical piece that's longer than the height of your workbench. If that's the case, build a solid bench extension to raise the jig to the height you need and a set of plywood steps to stand on. Never try routing from a ladder; it's too unstable for safety's sake.
Preparing the Router and Jig
A few simple preparations will ease your job. Your router base may have rough spots that inhibit smooth operation. Ease the router base by smoothing it gently with fine sandpaper. Then apply GlideCote or wax to the base to help the router ride smoothly over the jig's fingers.
When you need to mount a long board in the jig horizontally, support the end of the board to keep it level and prevent racking.
Best Practices
It is imperative that your board ends be cut perfectly square. Otherwise, you are guaranteed an imperfect fit when you assemble your joints.
If your jig has moveable fingers, tighten all the finger screws, including those on fingers you are not using. Otherwise, the vibration from the router will work them loose quickly and you'll be hunting for them in a pile of sawdust on the floor. Once you insert your workpiece in the jig, be sure it is firmly and squarely against the left hand stop. Double check that the jig's fingers are lowered to the correct depth and that all knobs are fully tightened. Use a backer board behind any board mounted vertically and make certain that it rests firmly against your workpiece. Failure to secure your workpiece tightly in the jig is the surest way to produce a ruined product.
Sensitive, thin or exotic woods can present special problems, since they are prone to tearout or splitting. Solve this by sandwiching your workpiece between two other boards to stabilize and protect it. Bear in mind, however, that when cutting the pin boards you'll need to account for the extra width of the sandwich to get a proper fit. Move the fingerboard toward you by the thickness of the part of the sandwich closest to the jig. The key to success with any dovetail jig is practice with extra boards milled to the same thickness as your finished workpieces. Use these boards to perfect your setup before making your final cuts. A single pair of practice boards can go a long way since one set of practice dovetails can be cut off on the tablesaw and the board can then be reused. If your budget allows it, having two routers speeds operations and increases accuracy, since you can leave the dovetail and straight bits installed at their final depths after completing your setup tests.
Keep notes on your jig's settings for reference the next time you need to cut dovetails. With the Leigh jig, mark the depth settings in one of Leigh's measurement charts. Record the depth settings in your shop notebook (you do have one, don't you?). Or, save your final test boards and label them with the bits used so you can reset the bit depth using the test boards the next time you are working with boards of that same thickness.
Your experience may vary with different species of woods. Oak, in particular, is prone to tearout when cutting dovetailed joints. Practice on an extra piece of wood before going to your final workpiece. Backing up the board is helpful in reducing blowout.
Cutting Dovetails
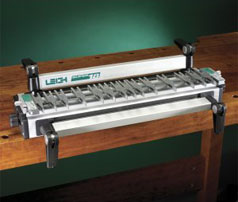
Many jigs are available for making dovetailed joints, but one of the most versatile is the
Leigh D4R Pro
, and this review especially pertains to it. But the tips presented here apply to other jigs as well, including those with fingers that are fixed in position.
Making Through Dovetails
Although the procedures are slightly different for various jigs, the basics are the same. Start with the tails. Mount the fingerboard in the through dovetails position with the finger screws facing upward. Then mount the tailboard on the left side of the jig with the outside face towards the jig. Set the fingers for the desired spacing and tighten them, then rotate the fingerboard to the tails position if it isn't there already. With the tailboard firmly against the left side and tight against the underside of the fingers, hold the pin board horizontally and scribe a pencil line to mark the thickness of the pin board. Then, set the dovetail bit so it meets the middle of the line. Rout the tailboard from left to right in small passes. Check the depth of your cut against the line you drew and adjust the bit depth if needed.
To cut the pins, flip the fingerboard to the through dovetail pins position. Mount the pinboard with the board's outside facing away from the jig. As you did with the tail board, mark a line on the pinboard for the tailboard thickness, then set the straight bit depth to the middle of that line. Make a first shallow cut from right to left to define a crisp shoulder, then rout the remainder of the cuts from left to right in a series of small passes.
Be sure you've fully cleaned out the bottom of the pin socket. Check by eye and feel, then fit the tailboard and adjust as needed. If either the pins or tails are recessed, increase the depth of cut for the recessed part by the amount of the recess; if proud, decrease the depth of cut by that amount. Tightness adjustments are made in the pinboard. If the joints are too tight, move the fingerboard slightly away from you; if too loose, move it toward you.
Making Half-Blind Dovetails
For half-blind dovetails, both the pins and tails are cut using the same dovetail bit set at the same depth. The Leigh jig comes with a selection of dovetail bits to use with boards of different thicknesses.
The cuts can be made in either sequence. If you start with tails, mount the tailboard vertically with the outside face toward the jig. Mark a line to indicate the working depth of the bit and lower the bit to the center of that line. Choose a depth that will give you at least 1/8" at the base of the pin sockets. Anything less will be too weak. Make the first cut from right to left to get a clean shoulder, then finish cutting from left to right in small passes.
Pins are cut with the pinboard mounted horizontally. Rotate the fingerboard to the half-blind pins position and set the scale to the tailboard thickness. Mount a scrap board vertically with its top edge lower than the bit depth but high enough to rest against the front of the pinboard. Mount the pinboard with the inside face upward, tight against the left side of the jig and flush against the vertical scrap. Rout from left to right in light passes; do not climb cut (right to left).
Now test the fit. Looseness is adjusted by changing the bit depth. If the joint is too loose, lower the bit by the amount of looseness. If too tight, raise the bit by that amount. Flushness is adjusted by changing the position of the fingerboard. Tails should be recessed by 1/64" or less. If proud, move the fingerboard away from you by the amount needed; if recessed, move the fingerboard toward you by that amount.
Conclusion
Making dovetails with a dovetail jig will become routine once you have a few trials under your belt. The key is to test your cuts on scrap wood the same size as your finished project. That way, you are sure to get the results you want. And that result will be strong, repeatable joints that will highlight your woodworking skills and grace your projects with their beauty.
CLICK HERE for the Highland Woodworking Dovetail Jigs and Joinery Tools Department
The author is a woodworker, writer, and woodworking instructor living with his wife in the foothills of the Blue Ridge Mountains with a woodshop full of power and hand tools and four cats who believe they are cabinetmaker's assistants.
He can be reached by email at
nreid@fcc.net
.
Return to
Wood News
front page


