Chisel Storage
by Lee Laird
Austin, TX
Click on any picture to see a larger version.
Over the years I've used different strategies to store the chisels I own, and each has its place. My first set of chisels, which were barely a beginner's set, came in a rigid plastic case. Each chisel had a specific indentation in which it lived, and a sturdy plastic cover swung open and closed, keeping them safe, and others safe from them.
While a ready-made case might be somewhat of an anomaly, there are some sets of chisels that still come in decorative display boxes, but many of us do not buy all of our chisels at one time or from one maker. I personally have a number chisels from different makers. When I started to acquire additional chisels, somewhat piecemeal, I initially stored them laying flat in a drawer of my rolling tool chest, with a sheet of dense rubber covering the bottom of the drawer. It didn't take long to see how this might not be the best solution for me. There was always the chance my sharp edges would get banged around (nicks and dings), and when reaching in for a chisel, there was always the chance another cutting edge (always the sharpest) had moved too close to the target tool, and cause an accidental slice in a digit.
Some of the first chisels I bought, after my initial little "set", were from Hirsch (also branded under the name of Two Cherries). I picked up a small range of random sizes, as a woodworking store in the area was no longer planned to carry this product. With the addition of these chisels, along with some I bought in Japan during one of our family visits, I decided to make a wooden rack where they would be organized by size, and also less chance of an accidental injury. The construction of these chisels (Japanese vs German) were significantly different, but when looking at the storage angle, also somewhat the same. The Hirsch chisels were made with a tang (a section of metal that pierces up into the handle) and most with this type of handle connection also have a metal ferrule that fits snugly over approximately the first 1/2" - 1" of the entry end of the chisel. This ferrule helps to prevent the wooden handle from splitting when initially inserting the tang into the handle, as well as during use. The Japanese chisels have a slightly more complex handle connection, and while it looks from the exterior as if it is a basic socket chisel, they also have a tang. So there is a conical section of the chisel (in most it is a separate piece, like a ferrule, blended into the actual chisel neck) down into which the handle fits, while at the same time also fitting over the tang.
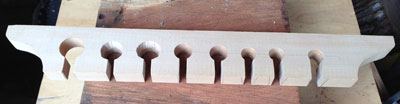
Since the Hirsch and the Japanese chisels I owned had handles that were permanently attached, I could make the rack in a number of ways. I could either have holes that sized to fit the point where the neck meets the handle, or if the handles shape flared out from the connection point to their butt, the hole could be sized so some of the handle slips through and engages the hole. On my first rack, I decided to go with the first scenario. I cut a small "entry" path, which was just slightly larger in diameter than each chisel's neck, which met up with holes I created at my drill press. I chose a forstner bit for each of these holes, that was just slightly larger than the ferrule on each chisel, which allowed them to hang securely, as well as looking nice. It was easy enough to get the chisels out for use, and then back into the rack, when their work was done.
|
|
This is an old mockup of the first chisel rack I made.
|
After a few years, I again fed my habit of adding chisels to my collection, and this time I ended up with some socket chisels. In these, the neck of the chisel is a conical socket, in which the wooden handle's taper must fit precisely, so the two stay firmly attached. As you work with this style of chisel, using a mallet or hammer to strike it on the handle's butt helps keep the connection solid. If you store this type of chisel in a rack, it is even more important that the hole for each chisel is sized correctly. Specifically, the hole must be smaller in diameter than the socket's largest point, so the chisel isn't supported by the handle. With socket chisels, a change in weather can potentially cause the connection to fail, and if the rack only contacts the handle, it could drop the sharp edge onto whatever is below it.
With this in mind, some woodworkers decide to glue the handles into the sockets, but that somewhat negates at least one favorable aspect of this design: when using a socket chisel, you can quickly remove and/or replace the handle, for a repair or perhaps to make a certain job easier. To remove, grasp the chisel by its socket, and with a quick and sharp rap, knock the side of the handle against your workbench or other static object. The feel for how much power to use in this removal will come with just an attempt or two. If you prefer the handles don't release quite as easily, but don't wish to go the glue route, borrow your wife's hairspray (if she has some, or to keep the peace, just pick up a spare can). Just a light spray into the socket, followed by seating the handle by tapping it while holding the chisel upside down, will help to keep the handle/chisel together, after the hairspray has set. You can still remove the handle, but it will require a little more power when you hit the side of the handle against your bench. One more point related to socket chisels, no matter how it is stored: always, and I do mean always, grab the chisel by the socket or the upper portion of the blade, when picking it up. When the weather or humidity changes, the portion of the handle that fits into the socket, can shrink. In that case, you could be left holding just the wooden handle, while your perfectly honed edge falls and is either damaged, or worse, causes personal injury to you or another. When I pick up any of my socket chisels, I grab it by the socket, and give the handle a quick knock (on its end this time) on the bench. This makes certain you and your socket chisel will stay happy with each other.
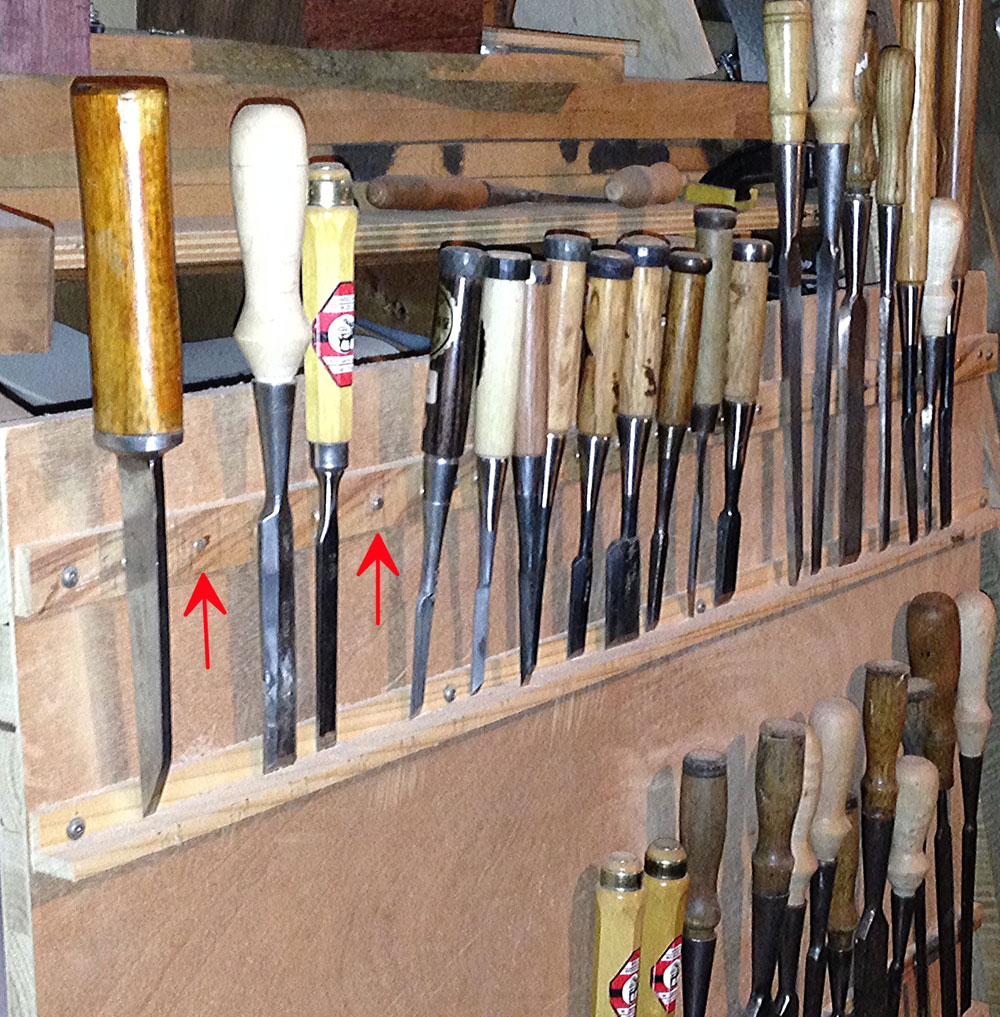
A few years ago I had a number of chisels that followed me home, (you know: eBay, swap meets, etc..), which totally overwhelmed my existing storage, so I made a down and dirty holder that was also quick to access any of the many chisels I had at the time. The other good thing about this design is that it took very little floorspace, as I don't have any to spare. For this build, I got together a partial sheet of structural-grade plywood (not pretty to look at, but workable), a few strips of softwood, some tiny rare earth magnets and a few screws. I attached the strips of softwood horizontally, so they would be a resting point for the sharp end of my chisels, and another as a backer to hold the magnets. The magnets were spaced out so every chisel had their own, and placed so they engaged each chisel's neck. This helped to keep the chisel in place while it was in its resting position. I leaned the whole setup backwards about 10-15 degrees, so gravity and the magnets worked better together. With this setup, it really didn't matter whether a chisel was a socket style or tanged, since I had a strip of wood that each chisel's blade rested on. If you want to upgrade this design, you could drill a hole on each side of the chisel handles, and insert a small dowel so it sticks out perpendicularly to prevent each chisel from falling sideways. This would help counteract any unexpected vibrations, leading a chisel to fall and possibly knock others off.

|
|
A range of chisel types and sizes, all on the cheap and
quick-to-make magnetic rack. The red arrows point
to a couple of magnets not presently holding chisels.
|
|
|
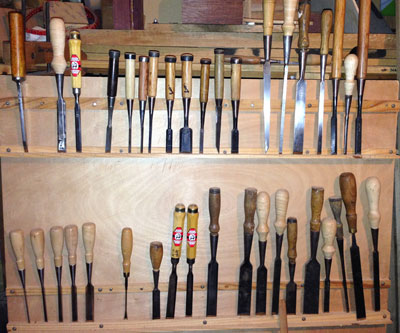
A front view of the same rack.
|
Even though the previous storage designs each work, they aren't the best solution in my opinion. A closed tool chest, either hanging or standing, keeps the chisels safe, secure and helps limit the chances of rust. In your chest design, you can integrate any of the previously mentioned solutions, and the addition of doors will keep dust away from your tools, and you can include a lock if you wish to prevent unauthorized use. I mentioned keeping the dust away from your chisels, since there is a correlation that some find surprising, between dust and rust. We all know that dust settles on everything, including tools. What some may not know is that the dust absorbs moisture from the air. This is why it is so bad to leave shavings or sawdust in/on tools. Just remember dust that settles, and isn't removed, fits into this equation: dust=rust!
While I've focused primarily on chisel storage in a workshop type of setting, you may also need to travel with your chisels. For this, you can buy or make a tool roll out of leather or other materials, which provides a decent amount of protection. If you aren't a tool roll type of person, you could buy some ready-made tip guards or potentially make some, using either heavy cardboard and strong tape for the short term, or if doing this on a regular basis I'd probably use a heavier-duty cover like some leather - folded over, glued and stitched. Just remember, always check to confirm the safety gear is in place and working properly before reaching in to grab a stored chisel. Never assume, and you'll have fewer injuries.
I hope this helps you think through and implement an ongoing storage solution for your chisels. Please let me know if you have any questions or comments.
Lee Laird has enjoyed woodworking for over 20 years. He is retired from the U.S.P.S. and
works for
Lie-Nielsen Toolworks as a show staff member, demonstrating tools and training customers.
You
can email him at
lee@lie-nielsen.com
or follow him on Twitter at
http://www.twitter.com/is9582
.
Return to the
April 2015 Wood News
front page