by Steven D. Johnson
Racine, Wisconsin
(Page 2 of 4)
Previous Page
1
2
3
4
Next Page
Clay Carving Cast
Click on any picture to see a larger version.
Being a minority (left handed) I am a sucker for any product advertised as "reversible," "equally comfortable in either hand," "ambidextrous," or other such pandering. On impulse I bought a toothbrush last week simply because the package exclaimed, "Handle Can Be Reversed For Left-Handed Use." By the way, the advertising was spot-on… best toothbrush I have ever used!
Woodworking tools are, for the most part, notoriously "right-handed." When I read the literature describing the
Mirka Sander
as "just as comfortable whether it's being used in the left hand or the right hand" I knew I had to try one. A manufacturer of an expensive tool would not highlight "ambidextrous" handling if it weren't true, and sure enough, I loved it.
Subscribe to the Highland Woodworking YouTube channel
to be notified of when my new video product tour of the Mirka Sander is released, you won't want to miss it!
Kitchen tools and gadgets are also largely made for the right hand and even though a significant percentage of chefs are male, cooking tools are most certainly designed for smaller (ostensibly) female hands. Yes, to be clear, I am formally accusing most culinary hardware manufacturers of a sexist 1950's "Leave It To Beaver" world view of manly men trudging off to work each morning while their petite (small hands) housewife stays behind to cook. Geez, get with it!
|
|
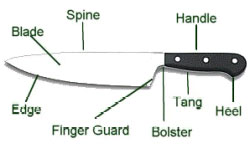
Figure 3 - The parts of a kitchen knife
|
Knives are a particularly irksome example of manufacturers identifying the bolus of their market as small-handed, right-handed people. Whether it is a $19 bargain knife or the $2500 Tsukasa white steel chef's knife, the handles are slim little nothings with an emphasis on looks rather than usability. I did see a German-made Nesmuk Jahrhundertmesser with a nice fat handle that felt pretty good in either hand, but the $91,200 price tag gave me pause. No impulse purchase, that. Anyway, who needs diamonds around the bolster?
The thing is, if you are serious about cooking you need to be serious about the knives you use. You must learn to keep them sharp, of course, but you must also learn how to use them effectively… a feat not made easy when the handles are not conducive to precise handling.
Why it never dawned on me before I don't know, but making my own custom-fit knife seems to be the perfect answer. I get to combine my love of woodworking with my pastime of cooking in a productive way. Perhaps I can finally have a knife that fits my hand!
|
Figure 4 - Conventional knife scales... note how the tang
shows between the two-part handle
|
Purists will likely chide me for not hand-forging my own blade, but I'll stick with woodworking. Finding a blade was easy, anyway. A Google search for "kitchen knife blade blanks" turned up over 78,000 hits. I was pleased to learn that a beautiful Damascus steel blade was less than one-sixth the cost of a ready-made knife with the same blade.
As soon as I received the blade, it was obvious that the tang, while large by today's kitchen knife standards, would be too small to make a conventional set of knife scales… meaning flush with the tang… so I will be making a "hidden tang" handle. As the name implies, a hidden tang handle is one in which the knife tang is fully encased inside the wood.

|
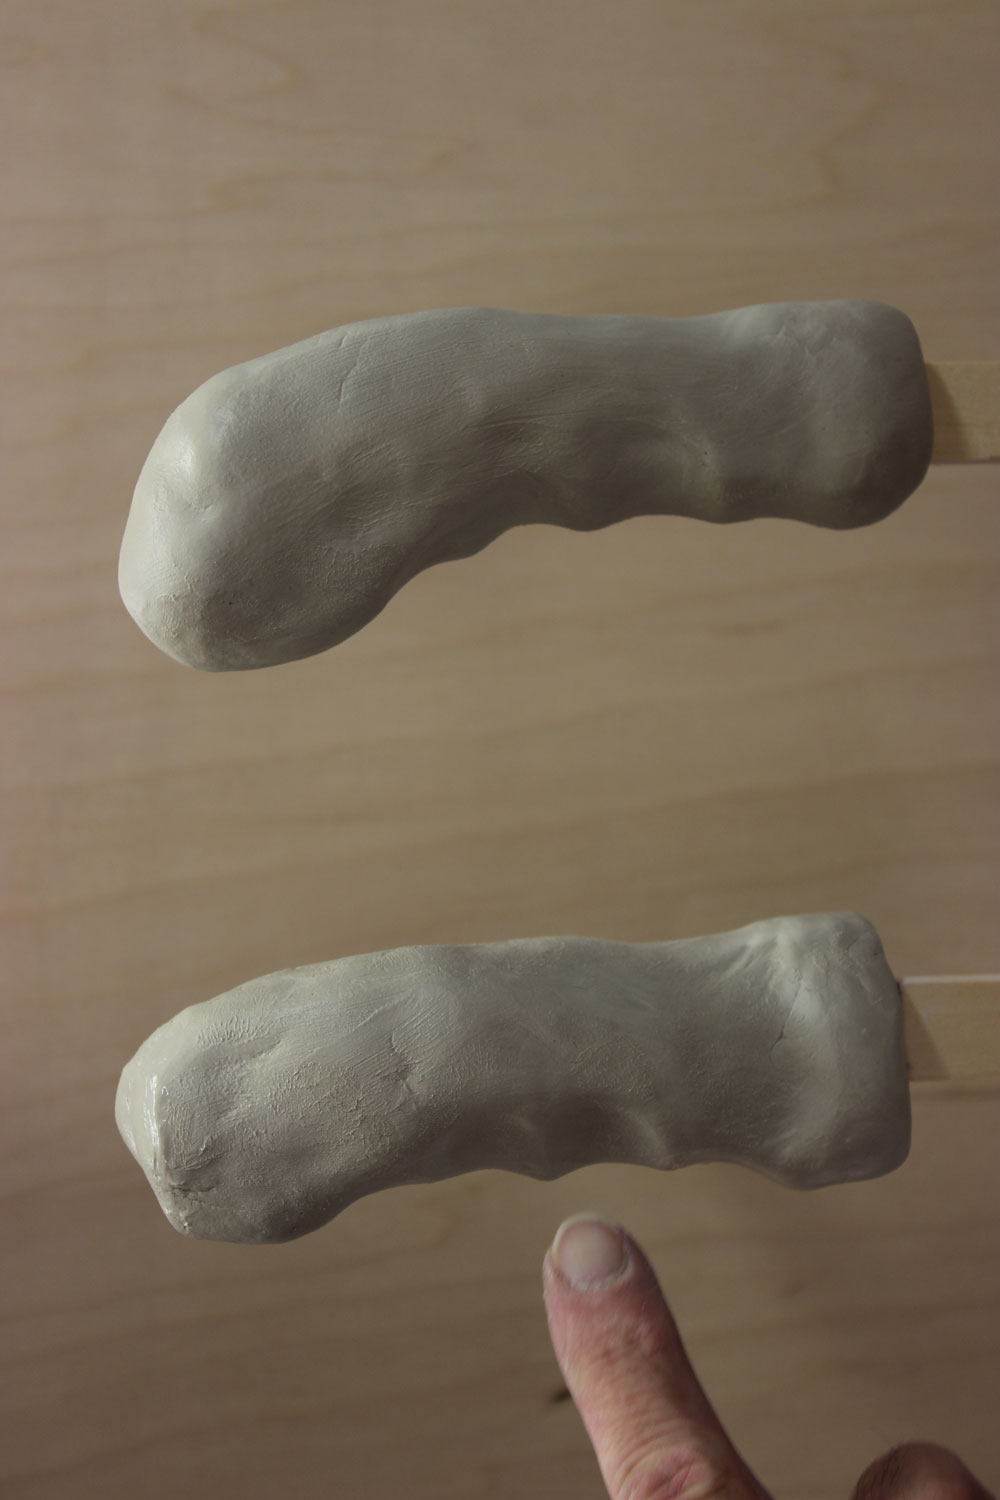
Figure 5 - The clay handle model on top felt best for a slicing
motion, the bottom handle felt best for chopping. The one on
top looks a little like an old-fashioned Derringer grip.
|
Since I saved a lot of money on the blade I could afford to spend a little to get the fit "just right." Rather than start cutting and carving willy-nilly, I decided to make a model. I grabbed a package of air-dry clay at the craft store, cut a couple of pieces of wood that approximated the length of a chef's knife blade, and started squeezing and kneading until I got a shape that felt good. The piece of wood inside the clay gave me a general feel for the direction and angle of the knife blade with different grip angles, and as a bonus provided a convenient way to dry the clay without it touching anything.
The clay was supposed to dry overnight. It actually took two full days and during that time a couple of fissures developed. I thinned a bit of clay, pushed and squeezed it into the cracks, re-smoothed the clay, and let the whole thing dry again.
The next step is to refine the shape. The indentations that match my fingers will be left relatively untouched, but the end of the handle (called the butt, heel, or pommel) needs to be shaped as well as the flat part that will fit against the knife bolster/finger guard. For the most part, I am using files and sandpaper. It is taking a while, but carefully shaping the handle, bit by bit, is better than reading email or surfing the net while taking a coffee break.
I have "sort of" thought through my next steps. When the shape is finalized I will coat the clay with shellac. Why? I have no earthly idea, but it seems reasonable. Then I am going to mix up some plaster, give the clay "handle" a good wipe down with liquid dish soap, and make a plaster cast. I plan on using the plaster cast of the handle to guide my subsequent carving and shaping.
Some of my technologically adept woodworker friends would probably perform some sort of 3D scan of the clay model, program the shape into a 3D printer, and start cranking out knife handles… well, perhaps that is some time in the future. My next step will likely be a bit more prosaic.
I've got my eye on several chunks of wood I have been saving, any one of which would make a beautiful knife handle. Once I finally decide, I will rough out the shape using the band saw and chisels. Then I will start to shape the handle with rasps. I've been looking for an excuse to buy some more
Auriou Rasps
.
When the wood block is perfectly shaped ("perfect" being a relative term), I plan to saw it in half lengthwise, make a mortise for the knife tang, then glue it back together with epoxy. Who knows? Maybe it will be okay. Since this is my first attempt, I won't get upset if it turns out less-than-stellar. What better way to learn?
Talented carvers will likely scoff at my procedure, and rightly so. If I had talent, I would just carve perfectly, from scratch, without a model, until the handle fit my hand. Oh well… next month I'll let you know how it's going.
(Page 2 of 4)
Previous Page
1
2
3
4
Next Page
Return to
Wood News
front page