Project Idea: Goodrich Step-Stool
by Mark Miller
Waco, TX
My Great Uncle James Goodrich (LtCol USMC retired) made step stools for every child in the family; his
children, grand children, great-grand children, nieces, nephews, grand, and great-grand nieces and
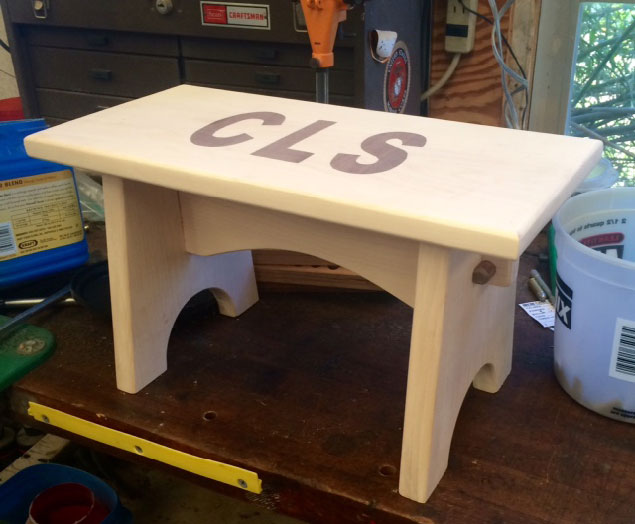
nephews. Four generations in all. In my family, that's a bunch of stools. His design was solid and
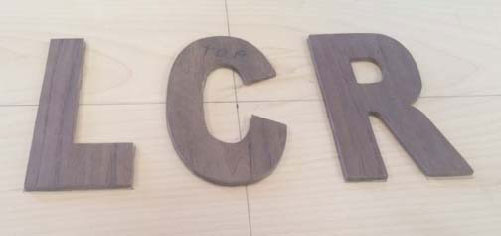
simple to cut and assemble - about 9 inches high with an 8 inch by 16 inch stepping surface inlayed with
the child's initials. The gifts are perfect to help a child "reach and see" and as they grow older, they will
become a treasured family heirloom. With the passing of my Uncle Jimmy, I've stepped in and while I'll
never have his talent or woodworking confidence, I believe this tradition he created is important to
continue.
Unfortunately, my uncle and I never talked about the stools, how he made them, or the materials he
used. The base of the stool is formed from leg/sides joined by a center brace and a pegged through
tenon. The step is secured to the base with dowel pins.
A quick word about the materials list. There are some craftsmen out there who can develop a bill of
material from a plan with perfect confidence in what they'll use and what they'll waste. Well, I'm not
one of those guys and I'm not going to risk having to drive back across town for more wood for the sake
of maybe saving a foot or two. Further, my lumber yard serves commercial enterprises and won't
custom crosscut my one or two boards to length. I wrap all my excuses together in a package and top it
off with the belief that there's always a use for hardwood scraps. Take my materials list as that, and develop
your own to match your own excuses.
Materials List
-
Maple: 50" x 9"x 4/4
-
Walnut: 1/8" thin stock x 4" x 9"
-
Dowel pins: 6 at 3/8" x 1 ½"
-
Tenon pins: 1/2" walnut dowel rod
-
Walnut thin stock (1/8") 4"x 8"
-
Painter's tape
-
Glue
-
Sand paper (220 and 320 grit)
-
Finish of choice
-
4 rubber or nylon feet
Finally, there are many ways to cut wood and tools to help do it. My tools list describes the methods and
tools I use, but it should in no way limit anyone. If you don't have a scroll saw or band saw (I didn't
always have one), substitute a jig saw or coping saw. Mankind made furniture long before Muddy Waters invented
'lectricity.
Tool List
-
Planer
-
Table Saw
-
Radial Arm Saw
-
Scroll Saw
-
Drill
-
Dowling Jig
-
Sander
-
Router
-
Bevel Chisel
-
Square
-
Pencil or marking knife
-
Compass
-
Ruler
Cut List
-
(1) 16" x 8" (top/step)
-
(2) 8" x 8" (leg/sides)
-
(1) 4" x 14" (brace)
-
Thin stock for inlay initials
The step, two sides, and the brace add up to 46 inches. My planer takes a little snipe so I include four
inches, two at either end, to allow for that and the saw kerf. Wanting a final thickness of ¾", I plane
13/16" which leaves 1/16" to sand away.
First I rip the edges of the entire length
on the table saw to true the edges and use
the radial arm saw to cross cut the pieces.
I cut the snipe off one end, then cut 16"
for the step, 8" and 8" for the legs, and 14"
for the brace.
Back at the table saw, I set the fence at 8",
confirm it with a pine board, then rip the
step and legs. You might wonder why I
didn't rip the 50" piece to the final width
before I chopped it up with the radial arm
saw. This is because I have a small table saw and
the longer the board, the more likely I am
to let it wiggle. I find two-footers easier to
rip than four-footers. I adjust the rip fence
to 4", test it on some scrap, and then rip
the brace.
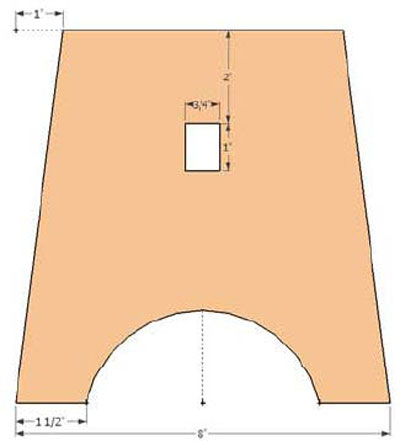
Leg/Side
|
|
Figure 1: Leg/Sides (2 ea)
|
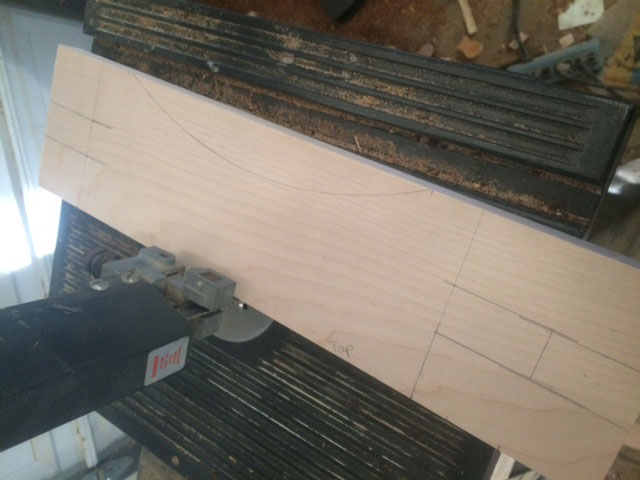
Each leg/side has three characteristics to cut, the 1:8 taper or angle of the sides, the mortise, and the
arch at the bottom. Measure and mark both leg/side boards as shown in Figure 1.
When you cut the angles/tapers with a radial arm saw, it's 1:8 about 7 degrees. I cut one side then flip it over to
cut the other so I don't have to change the saw-arm setup. Now that the radial arm saw table is scored,
setting the angle is a breeze. I got there by sneaking up
on it with several practice cuts on scrap pine. The value
of a true-measured angle is aesthetic rather than critical;
I chose 1" in from the edges because it's easier to
center the step on the base during assembly.
Mark the mortises on front and back with a marking
knife, I use a small craft knife. This is more precise than
the finest pencil and cuts the top layer of wood fiber,
which greatly improves your chances of victory in chisel
combat.
Mark the arch at the foot seen in Figure 1 with a compass.
I use a scroll saw to hog out the middle of the mortise,
leaving a fine, thin 1/16" inside the scribed line to finish out with a very sharp chisel. The fit and
appearance of the mortise and tenon will very clearly show the sharpness of your chisels and the limits
of your patience.
I use the same saw to cut the arch at the bottom of the leg/side and a sanding drum on my drill press to
clean it out.
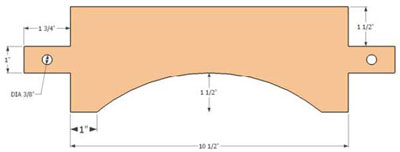
Brace
|
|
Figure 2: Brace
|
Making the brace is a matter of cutting the tenons, the arch at the bottom, and the holes for the pegs.
Mark the brace board like in Figure 2.
The accuracy in cutting the tenons shows
very visibly as gaps in the assembled
stool. Uneven shoulders above the
tenon will show as a gap between the
brace and the inside of the leg. A tenon
cut high or low on the brace will cause
gaps between the step and the "base"
parts of the stool. A marking knife and
marking gauge are well worth the
trouble.
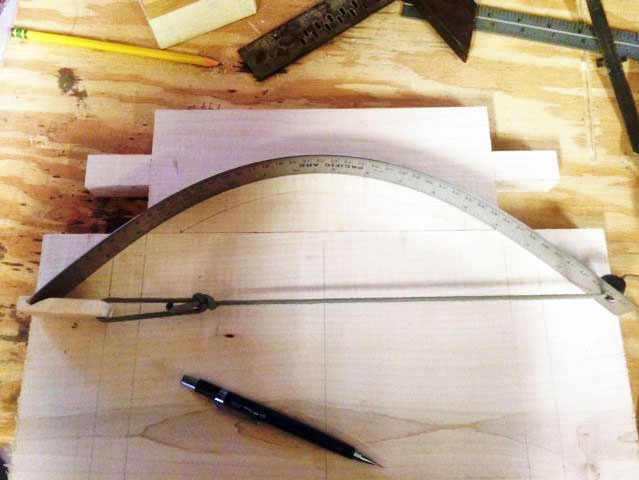
Like the arch in the leg/side, there's no hard-
fast dimensions for the arch in the brace. I
measure in 1" from the shoulders and bend my
flexible steel rule and a shop-made gadget to
for the arch.
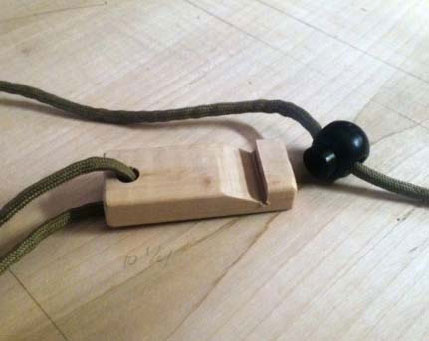
The little toggle is cut from a maple
scrap, the string is 550 chord I had
laying around and the stopper ball is
one of those plastic, spring-piston
thingies sold in craft stores used to
hold the gathering strings on a cinch
sack. Before that, I used the lid of my
turkey fryer. It's about the right size
and lays flat while you trace around
it.
For pins, I use a ½" walnut dowel. The little touch of color draws your eyes away from the step and to the
rest of the stool. Drill the dowel holes in the tenon set 1/16" back into the leg/side. Use a utility knife
and sand paper to "fit" the dowel to tightly hold the tenon through the mortise. I use a trial and error
method of "trim and try" until the fit is what I want. Improper fit may seem tight and sturdy but will cause
the leg/side to cant on the brace. Make sure you work patiently.
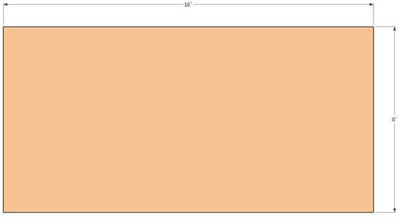
Step
|
|
Figure 3: Step
|
Aside from the inlaid initials, the step is nothing more than an 8" by 16" piece of maple. But for the
Goodrich stool, the initials are the whole point. While this isn't an article about router inlay techniques,
the top-level process is as follows:
Router Inlay
-
Print the initials on paper (I use my PC and ink jet printer)
-
Using carbon paper, transfer the initials onto the step as well as onto the inlay material. The outlines on
the step help you position the cut-out inlays.
-
Cut the initials from the inlay material.
-
Use carpet tape to fix the initials on the step.
-
With a sharp craft knife, carefully trace around each initial. This cuts the wood fiber and aids in keeping
the router "inside the lines."
-
With a thin putty knife, pry the letters off of the step.
-
Use a sharp pencil to draw inside the cut lines and use the eraser to eliminate any extra lines.
-
At this point, the letters are exactly traced onto the step.
-
Use a router and 1/16" bit to cut out the inlay recesses and the craft knife to clean out the corners.
-
Glue and press in the letters, and clamp over night.
-
Sand surface to flush.

|
I don't want to make more of it than there is, but the above procedure just touches the high spots of
free-hand router inlay. I'm self taught and I bet there are experts who can put together a really concise
and helpful article on the topic.
Pre-Assembly
I use a shop-made router table and ½" round over bit to break the edges everywhere but the mating
surfaces. Sand to smooth with 220 grit and you're ready to assemble.
Assembly
It goes together exactly as you'd imagine. Using a dowling jig to drill holes in the base, I put two in each
side and three across the brace. I prefer dowel centers to mark the corresponding locations on the
bottom of the step.
Glue and assemble the legs on the brace and lightly pin by gluing and tapping in the fitted walnut
dowels. Glue and assemble the step to the base. Clamp for 24 hours with bar clamps or cargo straps.
Remove the clamps, tap out the walnut dowel pegs, apply glue and tap them back in place firmly.
Finish
Apply the finish of your choice and keep in mind your intended use for the stool. My stools are mostly used by children. I spray three, thin coats of Deft satin poly, sanding between applications,
then rub the final coat with 0000 steel wool and apply a few coats of furniture wax.
Last step is to install the rubber
feet.
You can email Mark at
leathermech@yahoo.com
.
Return to
Wood News
front page