by Steven D. Johnson
Racine, Wisconsin
(Page 2 of 3)
Previous Page
1
2
3
Next Page
Power Sharpening On The Tormek… Long Term Test, Cost Justifications, More
Click on any picture to see a larger version.
Once, at a gathering of woodworkers, I made several outrageous comments just to see what kind of response I would get. "My shop is too big, I've got to downsize a bit." "I have way too many clamps." Those comments got laughs and a few derisive sneers. But the two comments that got the most incredulous looks were "I love to sand" and "I love to sharpen my tools."
Sharpening isn't woodworking. Yes, of course, it is critical. But so is emptying the dust collection bucket and no one "loves" that chore either, right? The fact is, anything that is not directly related to the cutting, shaping, and joining of wood is, for most woodworkers, merely a necessary means to an end. For some, even applying a finish is a chore… they would rather be building. And from my visits to other shops, apparently cleaning and straightening is a chore that can be easily put off, too. We would all rather spend our time "making things." So it stands to reason that if there is a way to save time on a task we would rather not have to do at all, we will be tempted.
Let's be honest. You likely have one table saw, one drill press, perhaps one jointer and one planer. You may have two routers, one handheld and one mounted in a router table. But I am willing to bet you have multiple different machines that "sand." I'm a little embarrassed to admit I have eleven different sanding machines. Four are random orbit sanders. One pad sander, one detail sander, two belt sanders, a bench-mounted combination disk and belt sander, an oscillating spindle sander, and a hand-held rotary drum sander round out the collection. I didn't buy all these sanders because I love to sand… I bought them because I want to sand as quickly and efficiently as possible so I can get back to "building things." This need and/or desire to spend our time working with wood instead of taking care of other shop-related necessities explains why many woodworkers are tempted to look at power sharpening equipment.
There is another reason power sharpening is popular. Many woodworkers are frustrated, bewildered, or dare I say it, intimidated by sharpening. Without really knowing, they "just know" their tools are not as sharp as they should be. These woodworkers watch videos, buy books, go to classes, and dream of a machine that will guarantee a magical perfect edge on every tool with a minimum of effort and no expertise.

|
Figure 8 - My simple sharpening system...
just three waterstones
|
I've always sharpened tools the same way, by hand and with stones. But that doesn't mean I haven't tried every way possible to speed up the process or make things easier. I've tried several different grinders but didn't like the heat and the sparks. I've tried the record-player-type spinning horizontal machines and was disappointed. I've tried the sandpaper-on-a-block-of-granite method, but it wasn't much different than using water stones and the process was "fussy." No matter what I tried, I always returned to my old-fashioned method… slow and a bit laborious, but very effective.
When Highland Woodworking asked me to do a
Product Tour Video of the Tormek T-4 Sharpening System
, I jumped at the chance. It is the one power-sharpening system I had not yet tried. Yes, I have been tempted many times by the Tormek, but my old-fashioned system works, the cost of the Tormek seemed difficult to justify, and my many prior bad experiences with power-sharpening made me a bit "gun-shy" of pulling the trigger on another significant investment.
Tormek makes two models of sharpening systems. The
T-7
is the larger (dare I say flagship) model. The
T-4
is a smaller, less expensive and relatively recent addition to the lineup, replacing an earlier version called the T-3. The new T-4 has more metal parts, higher precision, a handy handle, and an integrated zinc top as upgrades to the model it replaces.
Out of the box, the set-up/assembly was a breeze. Attach the included Tormek Original 8-inch grindstone (one finger-tightened screw), attach the water tray (snaps into place), and attach the
Universal Support
(slides into precise mounting holes, either vertically or horizontally). Add water to the tray until the stone stops absorbing it and put a few drops of machine oil on the leather strop to soften the leather and you are ready to sharpen.
The T-4 comes with the Stone Grader, AngleMaster, Honing Compound, a DVD and a beefy instruction book. More about those included accessories in a minute. The T-4 does not include any jigs, so at a minimum, woodworkers will need the
SE-76 Square Edge Jig
for chisels and plane irons. The loaner package I received included the Square Edge Jig and the
HTK-706 Hand Tool Kit
which contains a Knife Jig, Long Knife Jig, Scissors Jig, Short Tool Jig, Axe Jig, and Small Knife Holder.
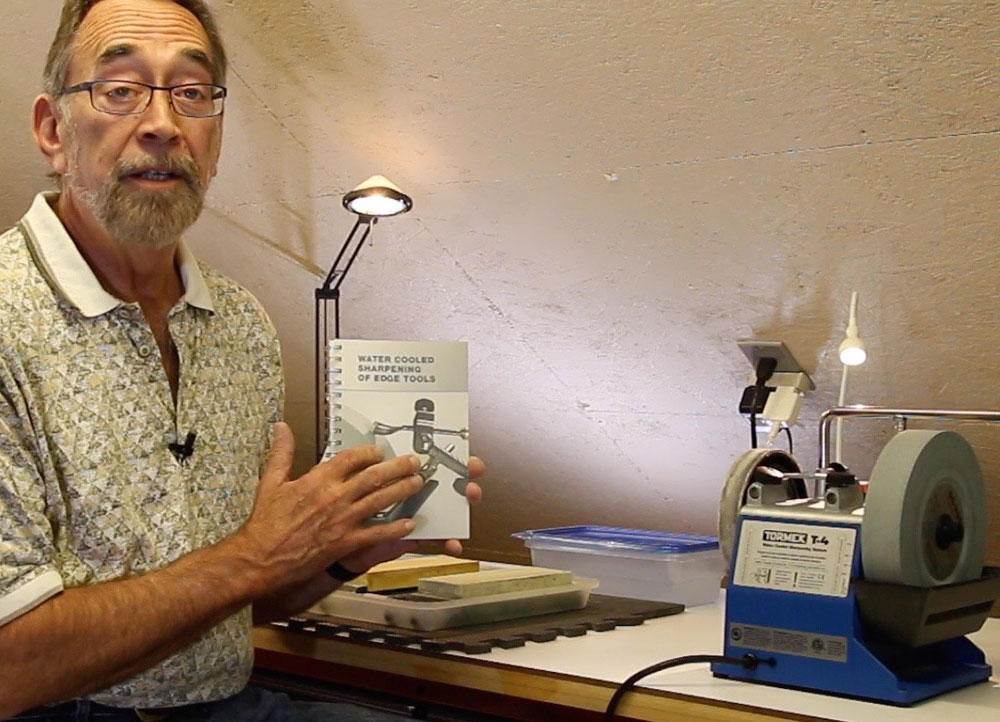
The Product Tour Video explains the shaping/sharpening/honing process pretty well and shows a side-by-side comparison test of hand-sharpened and Tormek-sharpened plane blades. Rather than cover ground already covered in the video, I will focus on some things I have learned after a month of using the Tormek.
The Book

|
Figure 9 - The Tormek manual is big,
well-written, and superbly organized
|
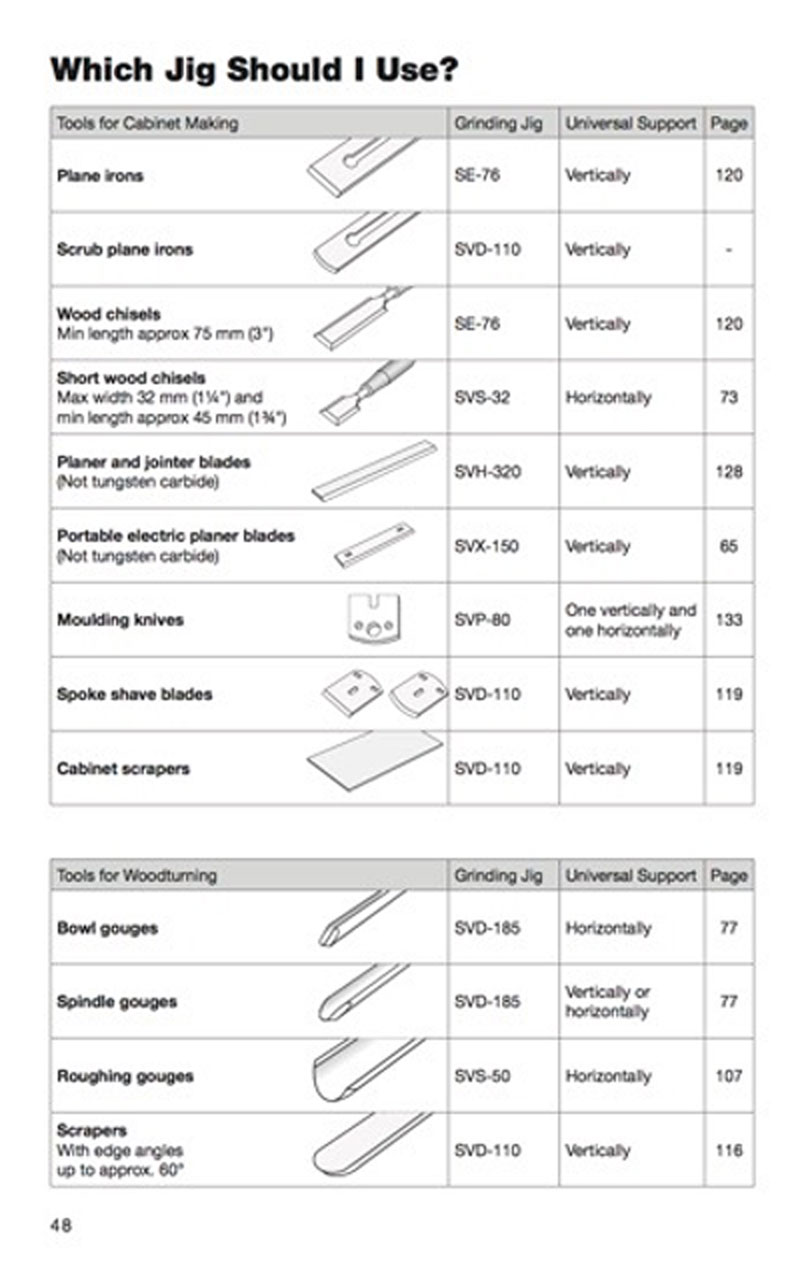
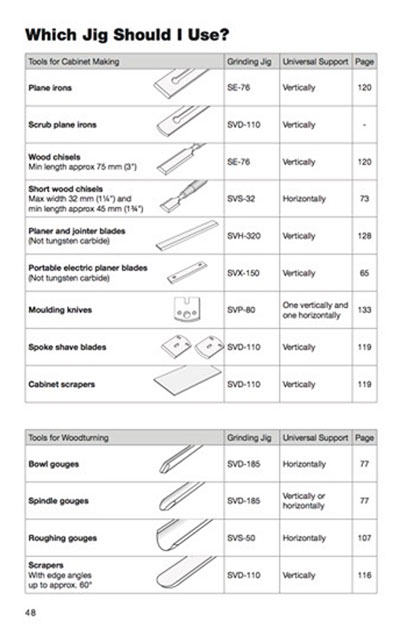
The book that comes with the Tormek system is 164 pages. Pages 10 through 29 contain some interesting sharpening theory, some marketing, and some interesting Q A. If you are in a hurry to get started, turn to page 32 and read carefully to page 46. Pages 48 – 51 show (in easy-to-read chart form) the various blades that can be sharpened, the jig to be used for each, and lists the pages in the manual that give specific instructions. I printed this 4-page chart and taped it to the wall next to my sharpening bench. The next 85 pages are the detailed instructions for the use of each jig. You need only refer to the pages applicable to the jigs you have and the tools you wish to sharpen. Pages 138 through 151 describe the various accessories you will likely use every day with your Tormek system, and you should read through these 14 pages carefully. This is where we will detour a bit and talk about these very important accessories.
|
Figure 10 - Example of 4-page chart in the Tormek
instruction manual that shows which jig
to use for each type of blade
|
The first accessory described is the
TT-50 Truing Tool
. This is a Universal Support guided diamond-tipped tool that will true and dress a stone so that it is perfectly round and flat edge-to-edge. The Truing Tool is included with the T-7 model and is an optional accessory with the T-4. You will need this tool.
Next the manual describes the
Stone Grader SP-650
, included with both the T-4 and T-7 models. As the Original Grindstone is delivered, it has a grit equivalency of 220. Using the smooth side of the Stone Grader, the Original Grindstone can be converted, in 20 - 30 seconds or so, to the equivalent of 1,000 grit. How it works is not important, but that it does work is. Set a tool up in its appropriate jig, do your initial shaping and sharpening at 220 grit, then "re-grade" the stone to 1,000 grit, and without changing a thing in your jig set up, finish sharpening the blade. A real time-saver! Then use the coarse side of the Stone Grader and in another 30 seconds or so you can convert the stone back to its original 220 grit for the next blade you want to sharpen. You can go back and forth between 220 grit and 1,000 grit a virtually unlimited number of times.
The
AngleMaster WM-200
is included with both machines and does two very important things. Grooves on the top of the tool allow you to quickly and accurately determine the existing bevel angle of any tool from 10 to 75 degrees. The AngleMaster also allows you to set jigs so that the desired grinding angle is achieved. The tool compensates for the diameter of the grindstone (it will shrink in size over time) and has two magnets on the back so it can be stored on the side of the Tormek and (hopefully) never get misplaced.
The next couple of Instruction book pages describe the
Turning Tool Setter TTS-100
. This tool helps exactly create and replicate edges on bowl and spindle gouges and flat or oval skews with either straight or curved edges. It is an optional accessory on either model of Tormek.
Page 150 describes the Tormek Original Grindstone and a couple of optional grindstones, including the
Japanese Waterstone
, available as an option for both the T-7 and T-4.
Last in this section is a description of the Profiled Leather Honing Wheel LA-120. This add-on set of leather wheels can only be used on the T-7. The Profiled Honing Wheels facilitate burr removal and polishing on the inside of gouges and V-tools.
In the final pages of the manual there is a nice chart showing the various jigs, accessories, and supplies available and a very short (4 page) set of maintenance instructions.
Nuances Of The Tormek
Both the T-4 and T-7 Tormek models will, by their nature, produce only a hollow grind bevel. The hollow grind will be a little less pronounced with the T-7 because the stone is 10 inches in diameter versus the 8-inch diameter stone on the T-4.
Depending whether the Universal Support is in its vertical orientation or horizontal mounting holes, tools can be ground and sharpened with the wheel turning "into" the blade or "away from" the blade. The discussion and directions in the manual cover this very well.
The Tormek stones turn very slowly (120 RPM on the T-4 model and 90 RPM on the T-7). My so-called slow-speed grinder spins its dry stone at 1,750 RPM. With the Tormek there is literally no chance of overheating the steel in your blades and drawing off the temper.
|
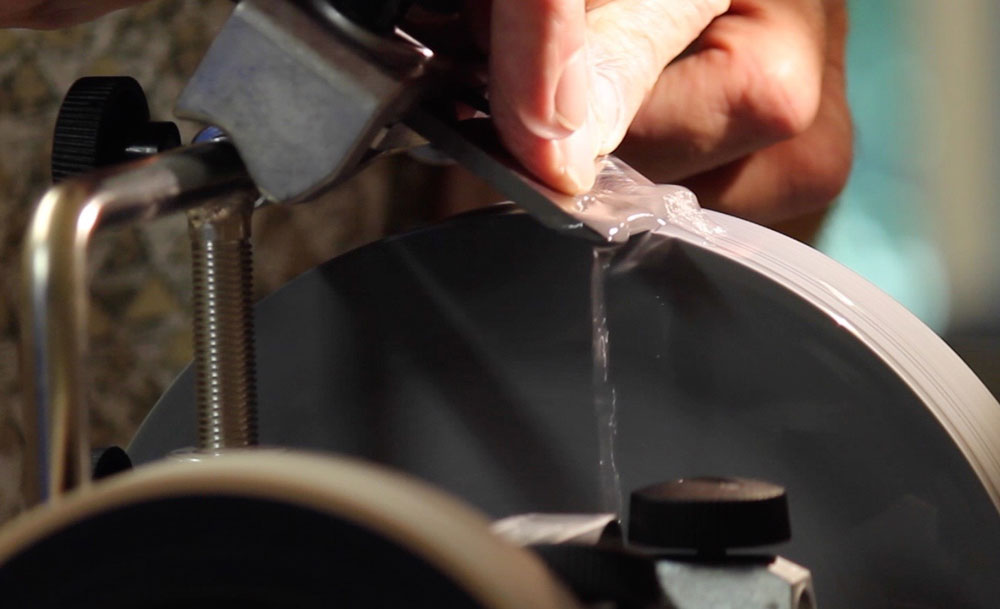
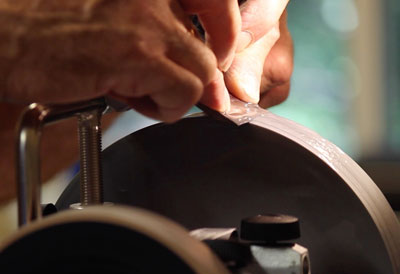
Figure 11 - As a result of surface tension and cohesion,
water actually "adheres" to the outside of the stone and
climbs up the blade as you sharpen
|
The grinding stone absorbs water and is partially submerged in a water bath. The slow speed assures water will not fly all over your shop, but instead, it clings to the surface of the stone. It is actually kind of magical to watch the water climb up and over the edge of a blade as you sharpen (this also provides a very good visual guide to sharpening… too much water on one side of the blade means you are applying more pressure on that side). The T-7 water tray has a magnet to which metal particles in the water are drawn and cling. This helps keep the stone and the water clean.
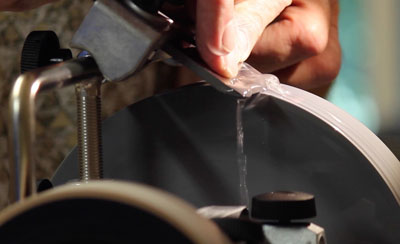
The T-4 machine I tested comes with a stone 1-5/8" wide. The T-7 stone is 2" wide. In practice, a plane iron will most often be wider than the stone, so a back-and-forth sliding motion of the jig is used to sharpen the whole blade. Because the center of the blade will always be in contact with the stone, it is necessary to "linger" a bit when you slide the jig left and right and sharpen the sides of the blade. The video shows this, but it bears mentioning again.
|
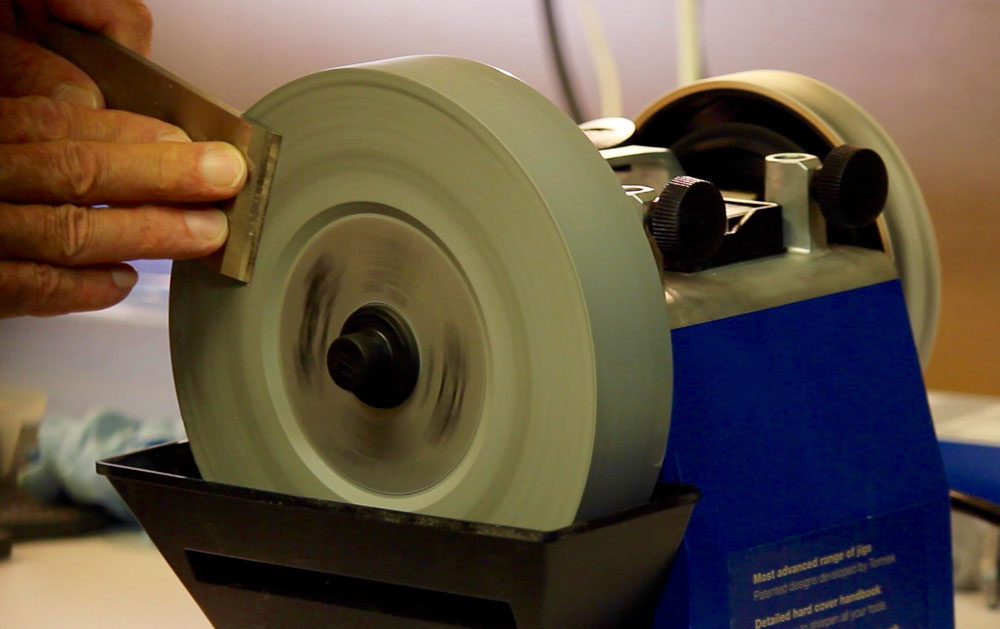
Figure 12 - Note the water dripping off the blade
as it moves off the stone
|
This, as you might have already envisioned, can be used to advantage. When hand honing, I often use a little additional pressure on the sides of plane blades in order to create a very slight rounding of the blade corners. This helps assure you don't leave "tracks" in the wood when planing a large surface. You can do the same thing, with a little practice, on the Tormek, faster and easier.
When sharpening a wide plane blade as you slide the blade to the left and right, a small amount of water will "spill" off the blade and miss the tray underneath… you will wind up with a small pool of water under the machine. This is more prevalent with the T-4 since the stone is narrower and the water tray is smaller than on the T-7. I put a plastic tray under the entire machine to catch the drips… problem solved. But it does mean you will have to add water to the reservoir a bit more often.
I tend to break sharpening down into three phases… shaping, sharpening, and honing. About 90% of the time, what I casually refer to as "sharpening" is actually just re-honing an edge after use. By hand it takes only minutes to return a blade to optimal sharpness. The time-consuming part of "sharpening" is actually the initial shaping of the bevel and the actual sharpening prior to honing.

|
Figure 13 - Flattening the back of a plane iron on the
side of the Tormek stone wheel
|
The Tormek (both models) does a very credible job of flattening the backs of tools in way less time than it can be done by hand. The instruction book covers the technique well, but in summary, you utilize the side of the stone to flatten tool backs. It is very easy, and in my final analysis of whether or not to buy a Tormek machine, this ability factored heavily.
Setting a chisel or plane blade in the Square Edge Jig is quick, easy, and it holds the tool tenaciously. Setting the bevel angle with the AngleMaster tool is simple, but I found setting a tool edge with an existing bevel by sight alone was even easier and just as accurate. A bright light to one side of the Tormek makes it easy to see exactly how the bevel is sitting on the wheel and the micro-adjust wheel on the Universal Support makes it easy to change the angle in fractions of degrees. People wonder about set-up time, and I can assure you that when you are finished with one blade and go to the next, it will take a minute and a half or less to make the changeover.
After initial shaping and sharpening, it takes a half-minute or so to "re-grade" the stone to its finer (1,000 grit) state, and final sharpening is done with the blade and jig set exactly as it was before. When you are happy with the blade, it is time to hone it.
First, charge the leather "strop" honing wheel with a bit of the included Honing Compound. A small amount goes a long ways, and each charging of the leather should last to hone several blades. With the T-7 the Universal Support and the Square Edge Jig can be used to guide the honing, but on the T-4 there is not enough room, so you will power hone freehand. It's not hard at all, but some users would likely prefer to be able to use the jig.
Honing is done on both sides of the blade. On the bevel side, the honing wheel will quickly remove the minimal scratch marks left by the stone and on the back side of the bevel the leather wheel will remove the wire edge.
An important note here: The leather wheel is used so that the direction of rotation is away from the blade. The square edge jig is best used with the stone turning toward, or into, the blade. This means that each time you finish sharpening and start to hone, you need to turn the machine 180 degrees. The T-4 weighs about 17-1/2 pounds (without the water in the tray) and the T-7 weighs 32 pounds. Either machine can be turned by hand, but in practice, you will be turning it very often. I also found (the hard way) that the T-4 is not balanced when lifting it by the handle. The "stone side" of the machine is heavier and if not careful, that side will dip when lifting and water will spill from the tray. Do yourself a favor and get the RB-180 Rotational Base. It fits either machine, rotates easily, and clicks into position. As a bonus, it will catch a few of those stray drips of water. For $57, it's worthwhile. Or make it yourself with an inexpensive
lazy susan hardware kit
.
The Bottom Line
It did not take long to determine that the Tormek T-4 surpassed every piece of power sharpening equipment I have ever used. However, I was still able to achieve a slightly sharper edge by spending an additional sixty seconds or so hand-honing a Tormek-sharpened blade on my 8,000 grit Japanese waterstone. For me, the purchase justification came down to a few things:
-
Anything I can do to save time and spend more of my precious hours working with wood is a good investment. The Tormek will save a lot of time. Any new blade that has to be flattened and shaped will be done in about one-fourth the time. A nicked or badly dulled blade can be re-sharpened in about half the time. I will continue to do a final honing by hand using my waterstones, but I would be doing that anyway.
-
It is kind of embarrassing to admit, but my three waterstones cost more than the Tormek T-4, and if the Tormek can save wear and tear on my precious stones, so much the better.
-
I have a bench grinder that I almost never use. I can't stand the heat it produces, the speed it runs, and the sparks it throws. I'm selling it to recoup a few dollars toward the Tormek.
-
With the accessory Hand Tool Kit I can now easily sharpen kitchen knives hatchets, axes, sporting knives and much more.
So with the decision made to purchase a Tormek, the next question was, "Which one?" The T-4 is a fine machine, and if someone had given me the machine, I would be happy with it for the rest of my life. But since I would be forking out money, it made sense to really think through how I would be using the machine and whether the additional features on the T-7 justified the additional cost.
Base price of the T-4 system is $399. Base price of the T-7 is $665, a difference of $266. The T-7 includes the Square Edge Jig, the T-4 does not, so add another $60 to its base price, and now the difference in price between machines is $206. The T-7 also includes in the base price the TT-50 Truing & Dressing Tool, an $89 item that I feel is indispensible. If you add that to the base price of the T-4, the price difference is now just $117.
For a $117 difference in price, the T-7 stone is 10" in diameter versus 8" on the T-4. For me that is a little less hollow grind and a lot longer stone life. The T-7 has a bigger, beefier motor (200 watts versus 120 watts) and a rated continuous duty cycle, whereas the T-4 motor is rated for 30 minutes use per hour. Couple all that with the wider stone (2" versus 1-5/8"), larger honing wheel, the ability to add the small profile leather honing wheels, the magnet in the water trough (I know, that seems like a little thing), and my personal bias toward machines with greater weight and mass, and the decision was pretty easy. I ordered the
T-7
, the
Hand Tool Kit
, the
Rotational Base
, and the
Profile Strop
accessory.
Update: Tormek has recently come out with the new
Tormek T-8 Sharpening System
now available at Highland Woodworking. The updated T-8 includes completely re-designed housing as well as a newly designed
SE77 Square Edge Jig
.
(Page 2 of 3)
Previous Page
1
2
3
Next Page
Return to
Wood News
front page