Project Idea: Barn Wood Star
by Andrew Morgan
Kennesaw, GA
Click on any picture to see a larger version.
My buddy Marvin and I had some old barn wood laying round and so we decided to cut out a rustic looking star. At first we were a little nervous about this because of all the angles, but once we did a couple we realized it wasn't that hard. We've decided to share the technique in case you want to make one yourself. In order to give the star a little more character, we decided to make the star with one point longer than the others. At first, we thought this would make the star more complicated but since he was up for a challenge that is exactly we did. Even though this seems complicated, after you make one, you realize it isn't hard at all so you end up making a few more as gifts or something to sell at the craft fair.
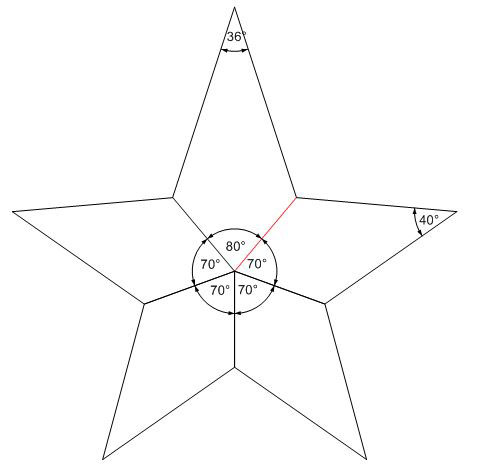
Stars come in all shapes and sizes but once you have one that you like, you only need a few measurements and a couple of simple techniques, and then you can make stars until you run out of wood. As shown in the picture above, the star we are making is made up of five pieces of wood. Four that are the same and one unique piece to add the character we are looking for. The first thing to notice is that the angles that make up the middle of the star have to total 360 degrees. Since a star has five points, if we wanted all the points to be the same, the center angles would be 72 degrees (360/5=72). Since we're making one point different, we chose to make four of the points 70 degrees and the last one 80 degrees. Now that that was decided, I just needed to decide how pointy to make the star. This is really a visual thing so after playing around on the computer a bit, we got a star that we liked and simply measured the angles at the points. These turned out to be 40 degrees for the point on the 70 degree sides and 36 degrees on the 80 degree side. The other nice thing about making one point different is that you can make four pieces the same and then fudge the last one if your angles are not just right. You can either use the angles we used or feel free to choose a different star that has a look you like.

|
Whether you are trying to make a star a particular size star or if you are trying to make a star from a particular piece of wood, the angles can be the same. Once you know the angles, the only other measurement you need is the length of the inner side as shown in red in the diagram above. If you are trying to make a specific size star, just measure this distance and note that this length is the same on each of the star points (even the one that is a different angle). Once you have the inside and outside angles and the length of the inner side, you are ready to cut.
In our case, since we were starting with a piece of barn wood, we wanted to make the star as big as possible and still fit the piece of wood. So, the next challenge was to figure out how to lay out the pieces on the wood so they would fit. This piece of wood was 5 ½ inches wide so to determine the size of each piece all we needed to do was figure out the square root of the hypotenuse of the diameter of the tree trunk… (just kidding). You can do trigonometry to figure out the lengths and angles (which we did on the first one) but then we realized that it wasn't really that complicated. Since we know the angles, it was faster and easier to just lay it out on the board as shown below. Since the top 80 degree piece was the longest, we just took an angle gauge and set it to 40 degrees (half of 80) and drew a line across the piece of wood and just measured the distance from the center of the point to the tip (blue dotted line in the image below). For our piece of 5 ½” wood, this was approximately 8.56 inches so I made the biggest point 8 ½ inches tall. Next I roughly laid out the star point on the wood as shown below. It isn't critical that you lay this out exactly but you want it close because this determines the length of the inside edge of the points (shown in red below). As noted above, this will be the same for all the points. For this star, the dimension was about 3.097 inches (so we went with 3 inches). On both the star length and the inside edge length, it is better to round down to make sure the points can be cut without going off the board. This may waste a little wood but that is better than having to start over or try to clean up a point that became too short. [One of Marvin's stars does have a short stubby point but he calls that art, not a mistake.]
Before you do the layout, you will want to make sure that both edges of the wood are straight and parallel. Even though this is barn wood, you want the angles to be right so it is important to have two parallel edges on the wood to start with. This is because in the cutting steps below, you will be flipping the board over for the cuts and if the edges are not straight and parallel your angles will be different for each star point and the inside edges will be different lengths. As usual, run one edge of the board on the joiner to get a straight edge and then cut a parallel edge on the table saw. Take it from me, I missed this step the first time and regretted it later. If you are going for a really rough look you may be able to get away with not doing this but it really makes everything easier. If you don't have a joiner and table saw, do what you can to make both edges of the board straight and parallel.
If this seems complicated, don't worry, it really isn't and after you make a couple you'll be surprised at how simple they end up being. The important things to remember are:
-
The center angles all have to add up to 360 degrees.
-
The length of the inner sides of the points all need to be the same.
-
The angle at the points determine how long the star points are.
As long as you get this right, the sky's the limit.
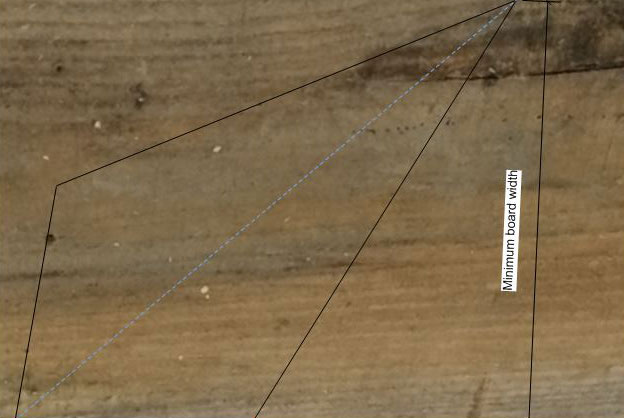
You can use this same technique if you are starting with a certain size star and want to know how wide a board you need to use. Just lay out the star on a board (or a piece of paper) with the inside edge along the bottom and measure the vertical distance from the bottom to the point (as shown above) and this will tell you the minimum board width you will need to make a star of the desired size. This will usually be the longest point, but lay out both point sizes to be sure you have enough wood before you start cutting.
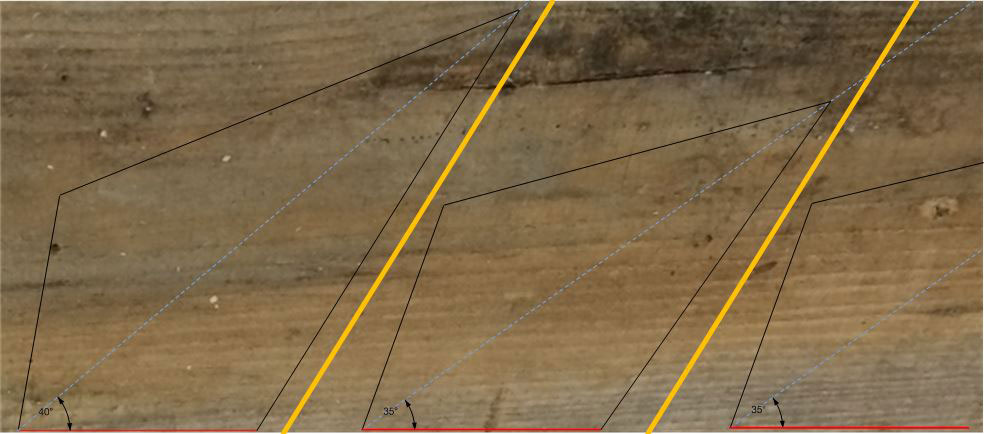
Now that we have the dimensions we need, we are ready to start cutting, but being the cautious type you will want to lay out the other pieces of the star to make sure they all fit on the piece of wood you plan to use. The first time we did this, we just started cutting and it turned out that we didn't have enough wood but we don't talk about that. The next image shows the first couple of pieces laid out. Notice that the 70 degree pieces will be shorter because the inside edges (in red) are the same in all the pieces which makes 40 degree pieces smaller on the board. If you are trying to conserve wood you can put the pieces pretty close together but don't overdo it. It is a good idea to draw the cut lines between the pieces (shown in orange) to make sure you don't cut at the wrong angle and end up with scrap wood. I'm not naming names but someone did this a few times too. This is because the angles you are cutting first are not the ones that separate the points and this helps visualize things. Once you do a couple of these it will seem easy but the first couple of times, if you don't have some guidelines to go by, all these angles can make you crazy. Pro tip: if you are using barn wood for character, don't draw on the side of the wood that you plan to have in the finished product. It wrecks the effect of having old wood if you have pencil lines all over it. Do the layout on the back side of the wood or use painters tape and write on this until you are ready to make the cut. Just saying… The other advantage of laying out the pieces beforehand is that you can cut the board to a workable size while knowing that you won't be making a cut right in the middle of where you planned to have a star point. A smaller size board is much easier to work with since you'll be turning the board over and around to make the cuts.

|
To do the cutting, we used the miter sled. If you don't have a miter sled, go out and get one now. Otherwise, you can use a table saw gauge such as the one from Kreg, Incra or a number of other manufacturers, but the sled really makes this much easier. You want something that makes repeatable angle cuts. For this project, being able to do repeatable cuts is more important than precise dimensions or angles .
There are three cuts required for each star point since one edge is on the side of the board that has already been through the joiner. I suggest cutting the four pieces that are the same size first. That way if you need to, you can make some minor adjustment in the angle of the last one to improve the fit.
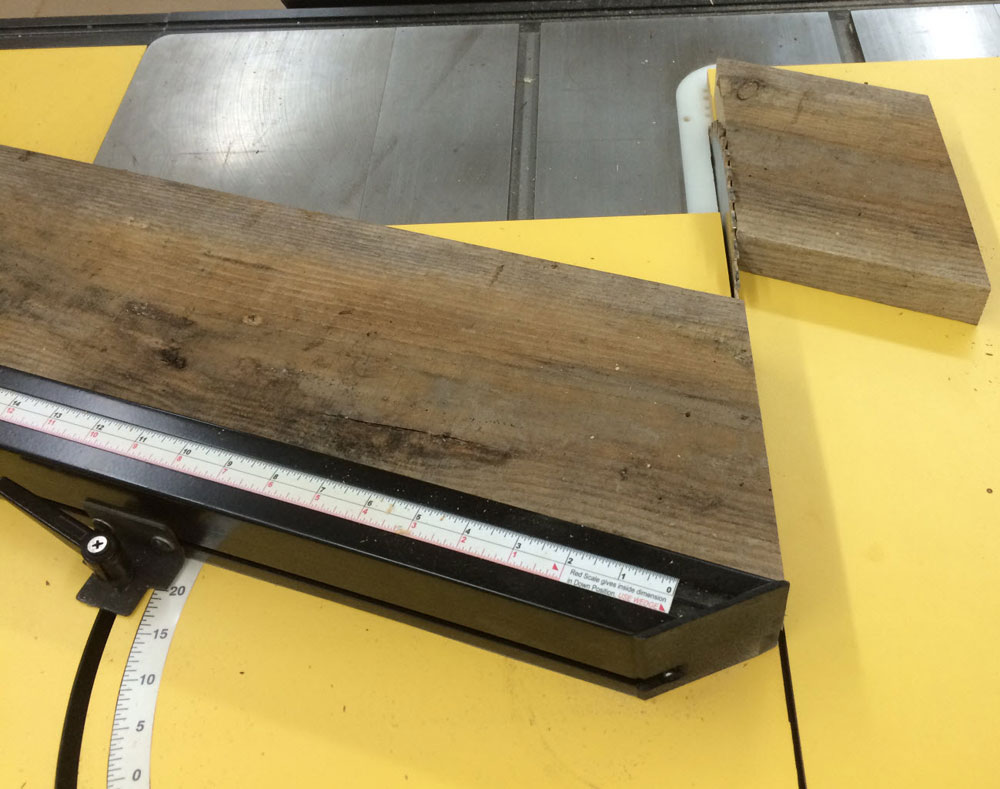
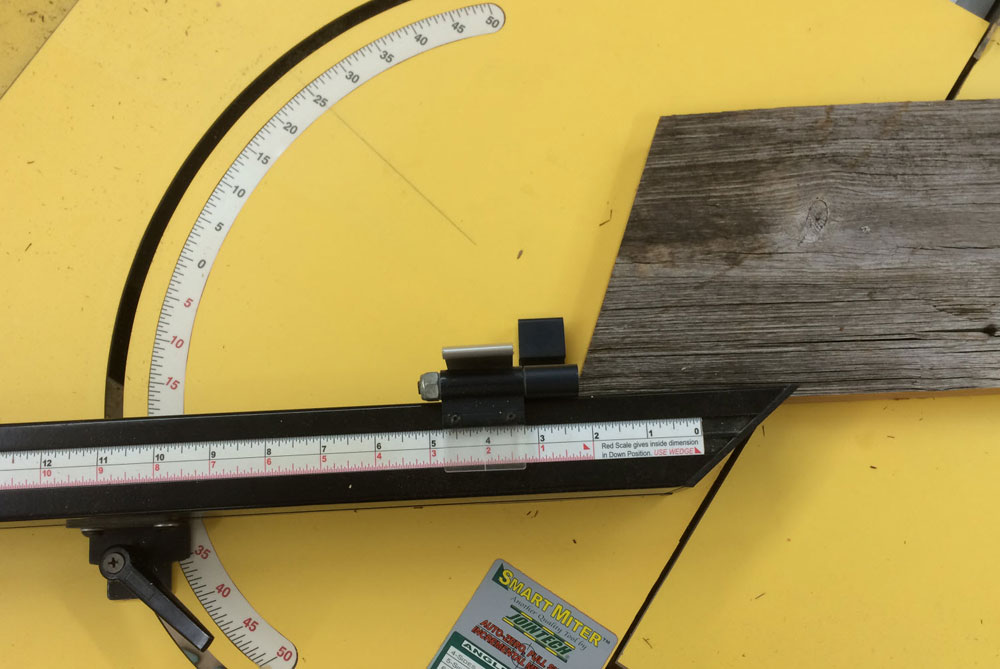
The first cut is at half of the outside (point) angle. For this example, set the miter gauge at 20 degrees (half of 40) and place the back side of the board up to make the cut as shown below.
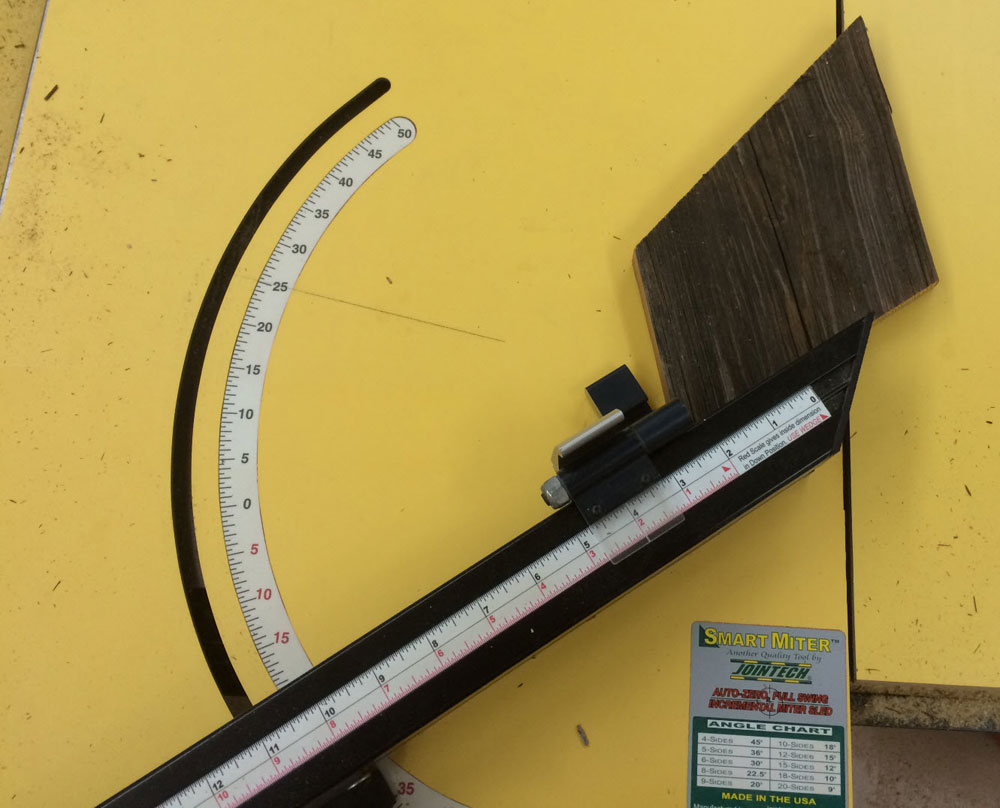
Next, set the cut angle to half the inside angle. For this example, set it to -35 degrees as shown below (notice that the miter gauge is moved to the opposite side of zero) and set a stop block at the inside length (remember the red lines above?). For this example, the stop would be set to 3 inches (the image below is for a different star which had a side just over 4 inches). You may notice that the board could be off the picture to the right quite a ways which could be awkward. So for safety's sake, as mentioned above, you may want to pre-cut the board along the (orange) separator lines described above.
The final cut is in the same miter slide angle (-35) with the piece flipped over so that the side that was on the left in the previous cut is now on the fence of the miter gauge.
You now have one point of the star completed. Repeat this same thing with the same settings for the remaining three points that are all the same size.
Once you have four pieces complete, dry fit them together and if you did it right, the remaining gap will be 80 degrees and you are ready to cut the last piece. If you are off a little, you can make an adjustment for the final piece (but you shouldn't have to do this with a good miter sled). When you are all done, glue the pieces together and you'll have a nice rustic star that looks good all year long.
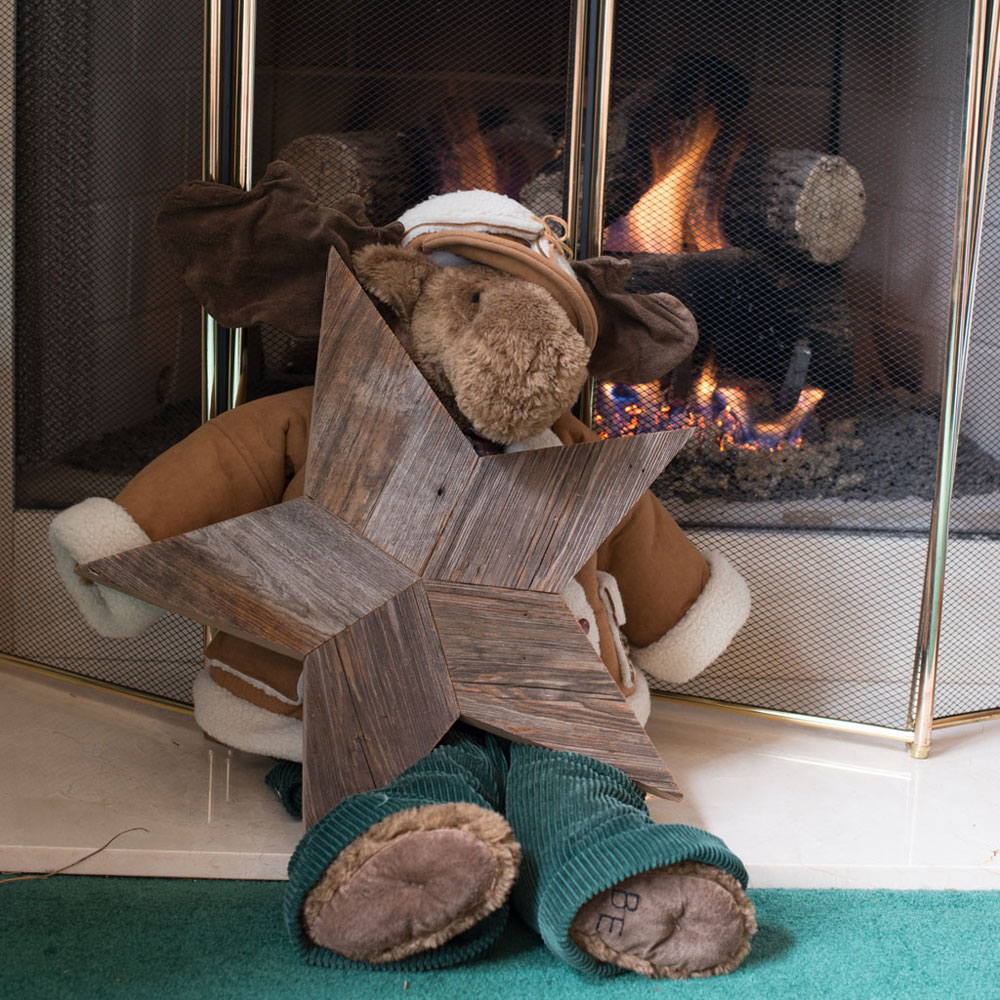
Here is my buddy Marvin sitting by the fireplace holding the star we made. We hope you enjoy building the star as much as we did.
You can visit Andrew's website at:
http://moosehollowwoodart.com/
.
Return to
Wood News
front page