Making a Veneer Compass Rose
By P. Michael Henderson
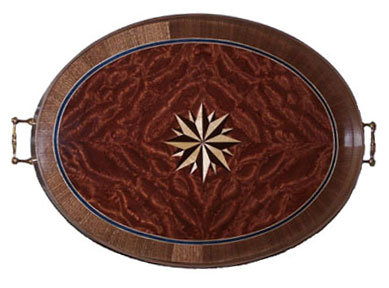
Veneer is a versatile medium that allows the woodworker to create decorative elements that perhaps could not be created in solid wood. While the possibilities are limited only by the veneer worker's imagination, this article describes in detail how to make a decorative compass rose, similar to the one shown in the tray below.
In describing this, I have to assume that you, the reader, have some level of expertise in working with veneer - it is simply not possible for me to describe all the basics of veneer work here.
There are two rules of veneer work that I want to remind you about:
1. Always work (cut) from the glue face, and
2. Veneer tape only goes on the show face.
Tools
Let me start by describing some of the tools required for this project - please see the picture below.

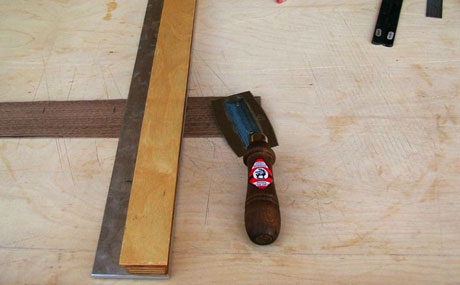
Starting from the left, we have a sponge sitting in a container of water. This is used to wet the veneer tape. Next, is the template for cutting the pieces of veneer for the compass rose. This template is for 16 pieces to make up a disk. You can make your own template but describing how to make one, and verify its accuracy, is beyond the scope of this article. Above the template is a brass brush which is used to brush the veneer tape after it's applied to get it to lay smooth. To the right of the template is a straightedge used when cutting veneer. You do not want to use a steel straightedge. Your straightedge should be of a soft metal, like brass or aluminum, so that you do not ruin the edge on your knives when cutting veneer. To the right of the straightedge and at the top of the picture is the veneer tape, and next to that is 3/4 inch blue painter's tape. We'll use the blue tape a lot.
Below the tape are a veneer saw and two Japanese marking knives. Two Cherries makes a very good veneer saw, and Highland Woodworking carries a
veneer saw
that is every bit as good as the Two Cherries. Highland's saw is less than $10. But no matter what saw you buy, it's not ready to use from the store. It requires preparation (sharpening) which is beyond the scope of this article. Search the web and you'll find descriptions of how to prepare a veneer saw for use.
I use the Japanese marking knives for cutting veneer. Other people use different things. Some people use a chisel as a knife, while others use things such as a scalpel. Whatever you use, it should fit your hand well and you should keep it extremely sharp.
Next to the knives is a sanding block. This cannot be your furniture sanding block - it must be very flat. The one I have here is a piece of MDF with some P150 grit sandpaper glued to it. We'll use this a lot.
The other tools are a 6 inch scale and a compass. Also included are pieces of walnut and maple veneer.
Design of the Compass Rose
The compass rose in the first picture has 16 points, with the major compass points large than the minor. Here, I treat the compass points of N, S, E, W, NE, SE, SW, and NW as major compass points. The minor points are NNE, ENE, ESE, SSE, SSW, WSW, WNW, and NNW. It is possible to have three levels of points, with the outermost points representing N, S, E and W, the next level representing NE, SE, SW and NW, and the innermost points representing the remaining minor points. So my design is not the only one possible.
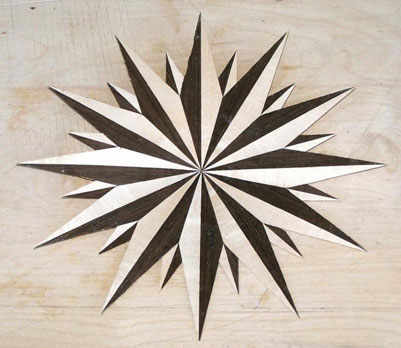
It is also possible to use more than 16 points for the rose. In this case, it is really no longer a compass rose but it can still be used as a decorative element in a table or other piece of furniture. See below for a rose of 24 points.
 For this compass rose, however, we're going to use 16 points. The size of the rose will be about 5 1/2 inches in diameter.
Preparation
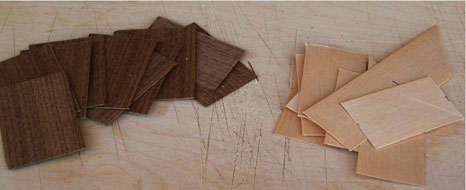
Since the rose will be about 5-1/2 inches in diameter, we'll need 16 pieces of veneer about 3 inches long, eight light and eight dark. I'm going to use maple and walnut for this demo. The compass rose in the serving tray is made from maple and wenge but wenge is very hard and difficult to work with. Rather than make things difficult, I'm going to use walnut which is easier to work.
We'll cut some walnut and maple veneer about 2 inches wide, then cut it in 3 inch pieces.
I used my veneer saw to cut the pieces to length. Ideally, you should mark the veneer so that you can maintain its orientation. That is, you want the same side up and the same direction pointing out from the rose. While this is good practice, if the wood is pretty consistent and especially on a small rose like this, it doesn't make a lot of difference if the orientation is not maintained.
When completed, we'll have eight or more pieces each of walnut and maple.
Go to page 2 of 3 of
Making a Veneer Compass Rose
