Building an Electric Bass Guitar: Part 1 - Design Considerations
by Lee Laird
Click on any picture to see a larger version.
For those who may not know, I've been playing musical instruments most of my life, with guitar as my primary instrument. For the non-guitar players, Bass guitar has the same note structure as the guitar. The low four strings on the guitar and the strings on a 4-string Bass are E-A-D-G, with the Bass an octave below the guitar. The same notes are played on the same frets, which makes it a fairly easy transition between the two, even though the length of the neck/strings is longer on the Bass. I enjoy recording music on my computer, and while many computer recording programs have "canned" Bass riffs you can insert into your song, they almost never seem to be exactly what I'm wanting. I suppose I could search for a local Bass player that could come over and lay down some notes, but there are times (like between Mid-night and 4am) that it would be both inconvenient and improbable to have someone stop by, especially since many of my musical ideas come at strange hours and are gone again if I don't act quickly.
Of course I could go down to any of our local music stores and buy a Bass, but after building a Les Paul (an electric guitar originally built by Gibson) that both plays and looks good (patting my own back, gotta make sure I don't hurt my shoulder!), I feel confident I can create a nice playing Bass, too. Plus, the Basses for sale at music stores are usually fairly expensive (if you look at the higher quality units) or made with less attention to detail and some can be difficult to keep the strings in tune. This is from experience, as I bought a low-end Bass in 1979 that was very reasonably priced, but was unfortunately of sub-standard quality and the tuning would shift during each song. As you might imagine, you want your tuning to stay rock solid so any music you play sounds the best, so that Bass had a very short life span with me.
So, I plan to build my own Bass so I can design whatever looks good to me, choose the wood(s), and basically use whatever level of components I desire, to end up with a really nice instrument. I have some nice Mahogany on hand that I purchased primarily for musical instrument building, and it has been acclimating to my shop for about 5 years, so I don't expect it will twist or warp much after cutting. Of course, I will still make initial cuts oversized, just in case. The remaining parts that make up the Bass will cost in the range of $300-$400 (tuners, truss rod, bridge, nut, frets, pickups, …), which could easily buy a lower end Bass at the music store, but my end product will be exactly what I want and the parts are all upgrades compared to the comparably-priced store unit. Besides having the satisfaction of knowing my Bass is made by me, some of the parts mentioned can make a huge difference in the playability and tone, so its a no-brainer to me.
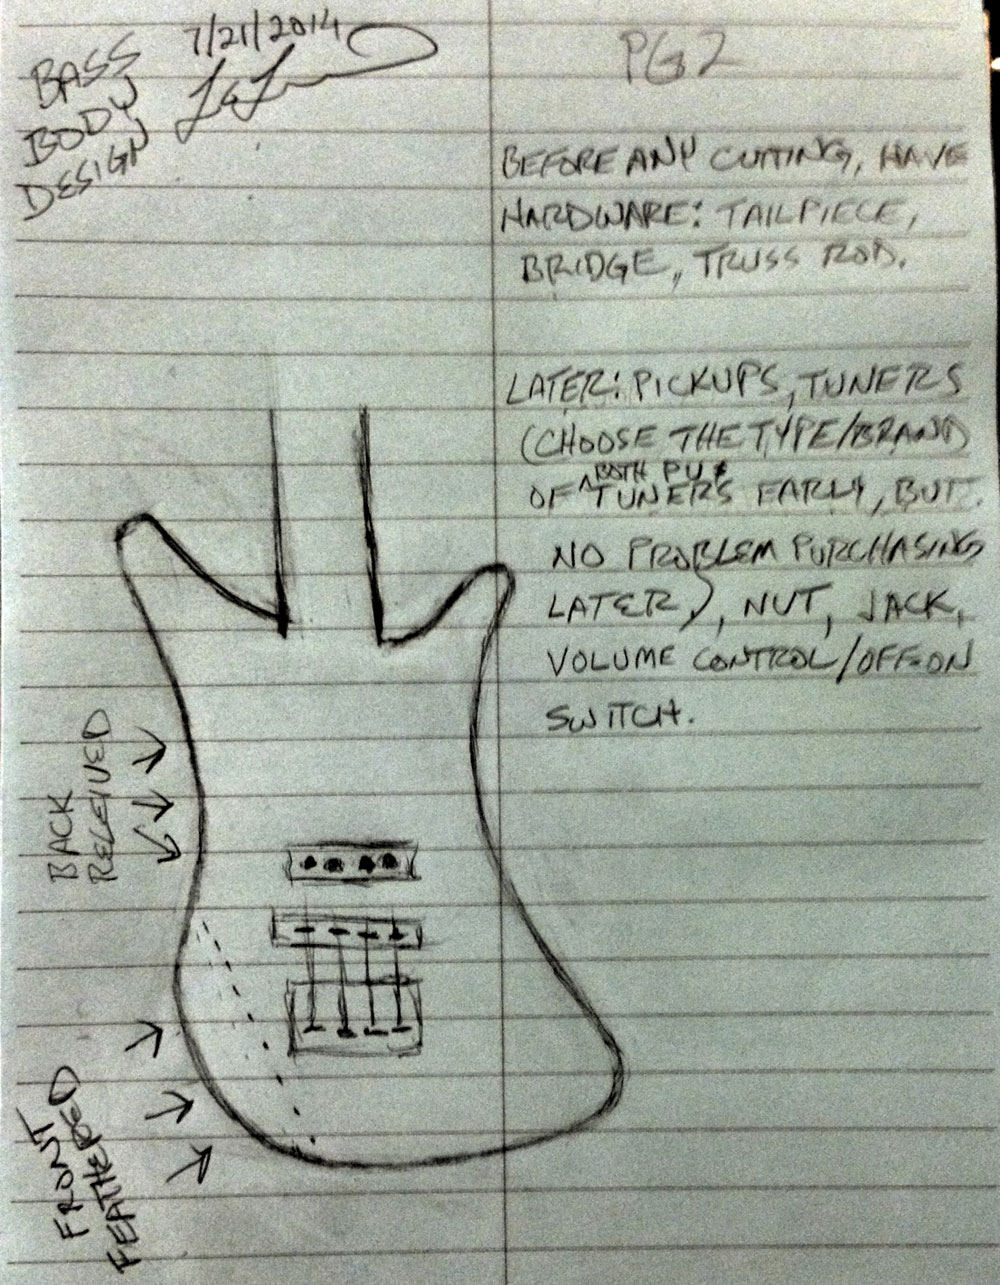
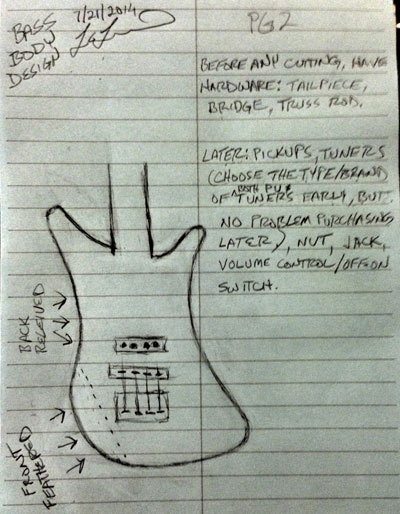
As I'd mentioned in passing, I'm designing this Bass from scratch, so the first thing I needed to do was come up with a design I liked. I started out with a small pad of lined paper and started sketching ideas, erasing sections that I didn't like and blending things until I was looking at something I liked. I drew the curves on the different sections of the body freehand, again just working to make it look right to my eyes, but I could have used either a compass (the type that has a pencil on one leg) or a circle/arc template to make it just right. After playing guitar for the last 40 years, and working with wood for around 25 years, I'm comfortable that I can easily adjust the design on the fly (even after I've transferred my design to wood) if something doesn't look or feel like I want. Even with this, I still prefer to make a pattern even if I'm only making a single Bass. I'll expand on this thought later.
|
|
Drawn design with shadows where adjustment occurred.
|
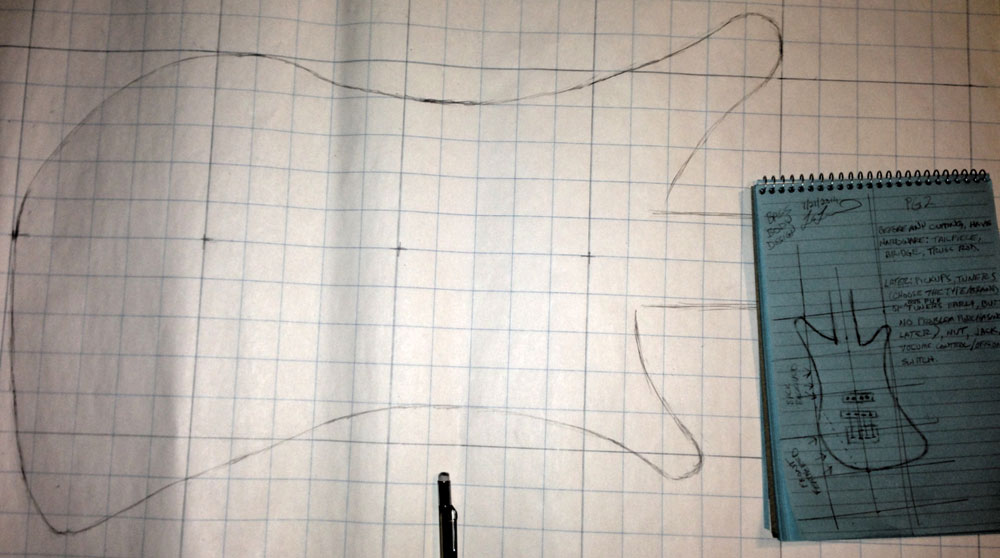
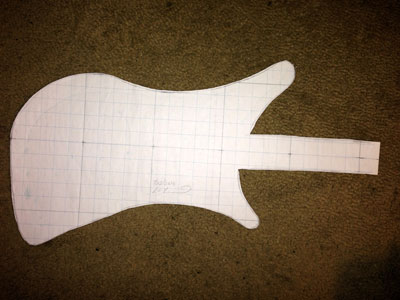
So after my initial sketch was complete, I needed to increase the scale to the full sized instrument. I used an old tried and true approach. I drew a consistent grid over my sketch, pulled out some large gridded paper (24" x 30") with 1" grids, and used the points where the lines crossed the grid on the small drawing to re-create a like image on the larger grids. It only required a little bit of fairing to integrate the curves and the straighter sections of lines. I also like to draw in a section of the neck, where it meets the body, so I have a good frame of reference.

|
|
Original design with grids beside full sized design.
|
One other thing that I find extremely valuable, is to make sure to mark the centerline from the tail of the body towards the neck/headstock. This can help make sure everything stays in perfect alignment, which is critical, especially when laying out the bridge/strings placement. If the bridge is off to the side of the centerline, even just a small amount (like 1/4"), the outside string(s) can be too close to the edge of the neck, if not hanging off the neck. This can cause the Bass to be unplayable, or the string(s) to slip off the edge of the neck, have strange sounds, as well as in some cases, cause the neck to bow slightly to one side over time. While you do have a little wiggle room, working off of a precise centerline can help prevent straying to the point of problems. When we get further into the building of the Bass, I'll also share a tip to make certain your strings align precisely with the neck.
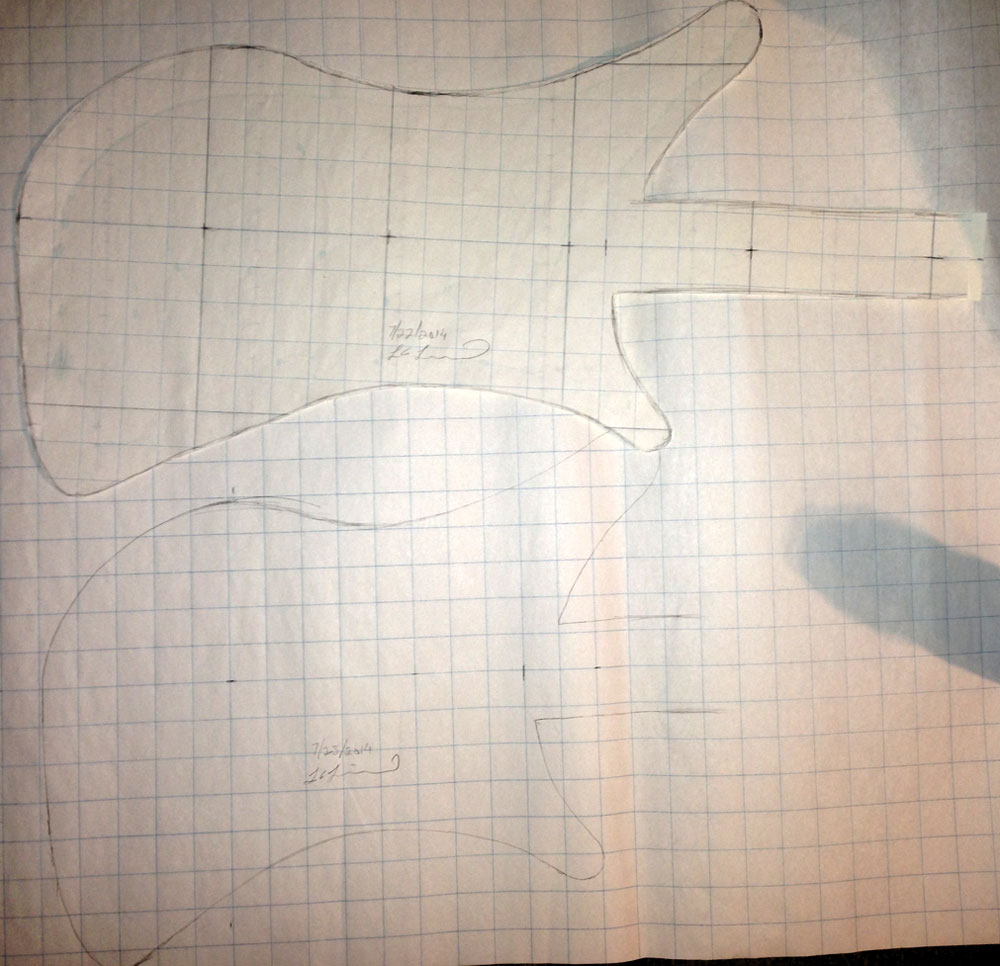
Now that my sketch is full sized, I cut it out with scissors, and cut about 1/16" outside my lines. The pattern is looking good, even though it is still just as flimsy as a regular sheet of paper at this point. I held the pattern up, as if I was holding a Bass to play, to see if it looked reasonable in the playing position. My design looked OK, but there was something about it that made me question it. I decided to make some measurements, using the scale length (standard is 34" on a Bass, but some prefer the shorter reach of a 30"-32" mid-scale Bass), to see where the other parts would lie. It turned out my design was great for a 34" Bass, but the body looked too long for the shorter scale lengths. I got another sheet of my large gridded paper and adjusted the overall design, so the overall look was similar, but the body length was a full grid shorter. When I checked the measurements, this smaller bodied design looked like I could not only use it for a short scaled Bass, but could also work as a regular guitar body. I completed the following steps on both body designs, leaving me with two patterns, and choices.

|
|
First design on top and reduced length design below.
|
The next step is one that you might choose to skip, and it would likely be just fine if you did. I chose to glue my flimsy patterns down on some card stock, using a glue stick. I again cut around the pattern with scissors. The main reason I decided to add the card stock is the thickness of the card stock makes it less likely the paper will accidentally fold slightly when I'm drawing around its edge, when transferring the design to wood.
|
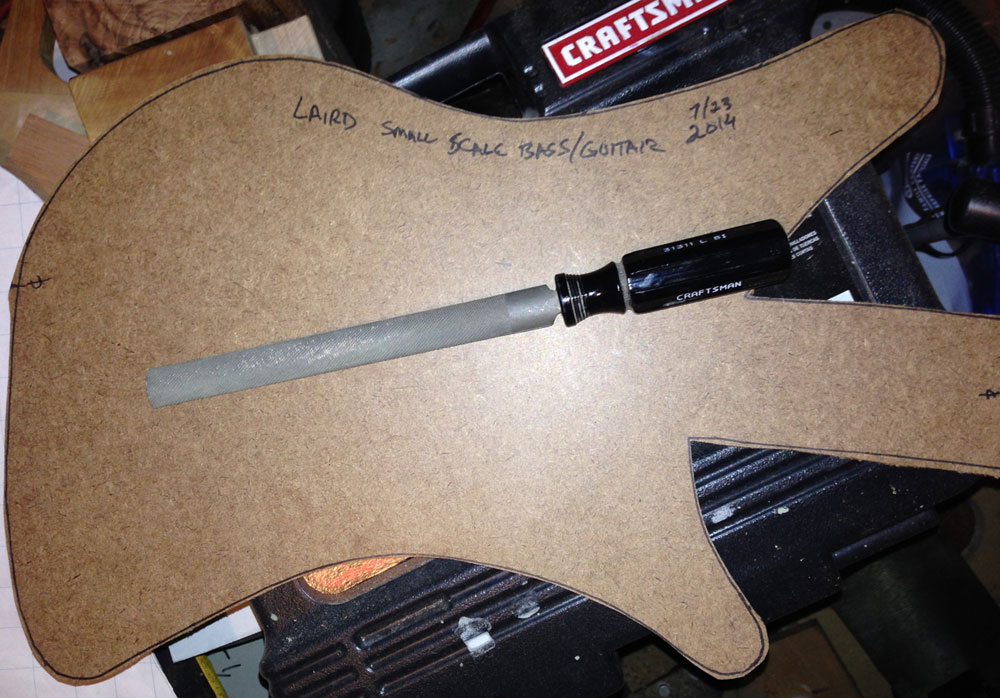
Pattern with card stock backing sitting on fiberboard,
ready to transfer.
|
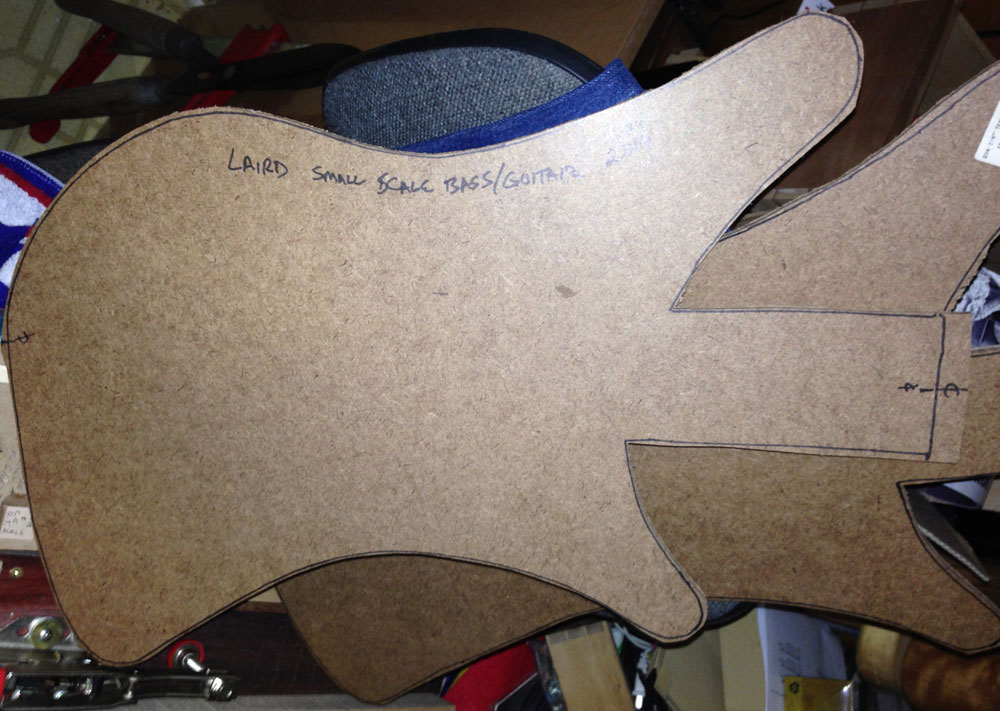
Since I was feeling good about the designs, I transferred the patterns to some fiberboard (1/8" thick) and cut them out on my bandsaw. Very similar to when I cut the pattern from paper, I stayed safely away from my lines with my bandsaw. The sections that were either straight or gently curving allowed me to sneak up a bit closer, but there was no reason to cut too aggressive and mess up the patterns.

|
Both sized patterns before working the edges with rasp,
files and sandpaper.
|
After I was finished on my bandsaw, it was time to pull out a couple of rasps and files, to bring the outside edges of the pattern down close to the line. Since I was working on fiberboard, I decided against using my Auriou rasps, as I was slightly concerned that it might tend to dull some of my best tools. I have some older, less expensive rasps and files that were perfect for this job. One is medium-coarse rasp and the other is a file that actually behaves like it is between a medium and a smooth rasp, both having a flat side and a curved side. I also used a mill file on the outside curves and straight areas, but since it is flat on both sides, it couldn't reach even the gentle inside curves. It did, however, leave a smooth enough surface for a bearing to follow without issue. The shape of these rasps allowed me to handle all of the outside edges on my patterns, since I made sure not to create any super-tight curves on my designs. While everyone will know the flat side of the rasp/file can handle flat surfaces and outside curves, the curved side can handle the inside curves, as long as the curve isn't more tight than the shape of the rasp.

|
|
Old coarse file on top of pattern.
|
As in most work, starting with the most coarse tool is most efficient, working down close to the line, but leaving some for the finer tools. This is so you can finish up the edge with either your file, which will leave a much finer surface, and you can follow the file with sandpaper in the 180-grit or 220-grit range stuck to the back of a flexible strip of wood. The backing wood will help level out the surface, rather than just following the existing bumps/humps along the edges.

|
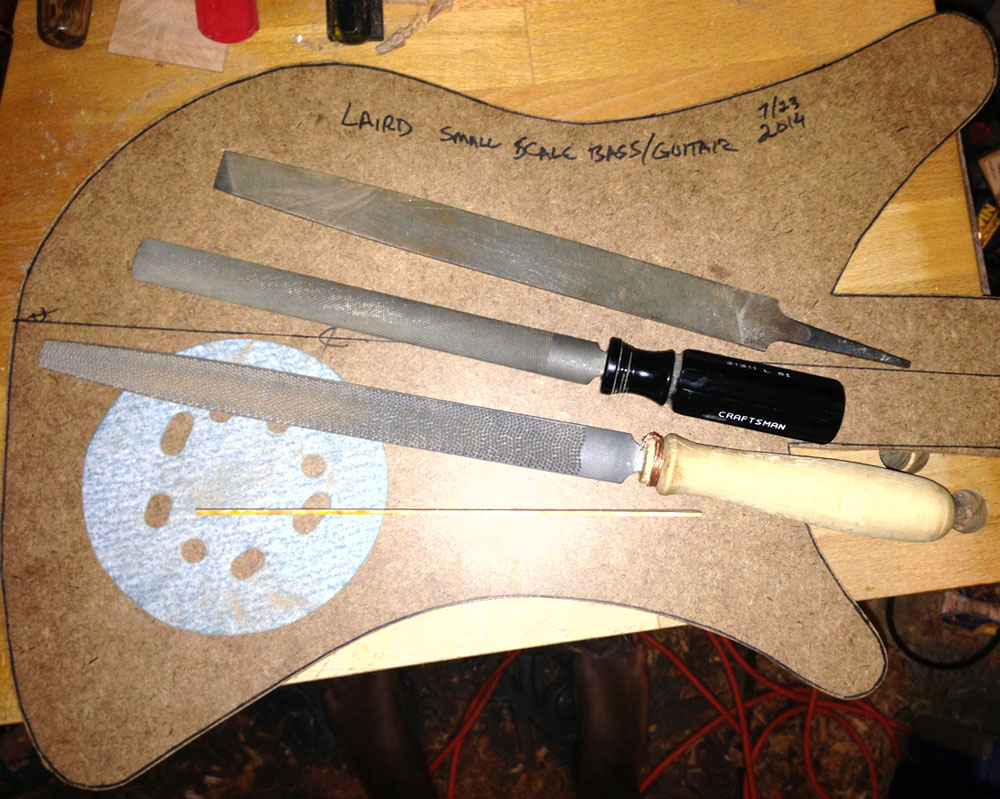
The tools used to work the outside edge,
on top of a pattern (with Centerline visible).
|
You might wonder why I'd take the time to make a fiberboard pattern, since I could already draw around the card stock version. I find the fiberboard version very useful, since I can also use it along with a router and a pattern bit, with the bearing riding directly on the fiberboard pattern. This allows you to quickly bring the actual body blank down to the same shape as the original design. It also makes it easy to retain the design, which you can drill a small hole and hang on the wall, in case I need/want to build another Bass with this same shape. If I find the design didn't work for some reason, then it is very little cost wasted, but I do my best to closely check all measurements on the full-sized pattern on the grid-paper before even moving to the card stock.
Next time I'll talk about choices you can make regarding the types of construction, relating to the neck/body connection, as well as some other design considerations.
I hope you enjoyed this article and please let me know if you have any questions or comments.
CLICK HERE
to read Part 2 of the Electric Bass Guitar Build- Creating the Neck
Lee Laird has enjoyed woodworking for over 20 years. He is retired from the U.S.P.S. and works for Lie-Nielsen Toolworks as a show staff member, demonstrating tools and training customers.
You can email him at
lee@lie-nielsen.com
.
or follow him on Twitter at
http://www.twitter.com/is9582
.
Return to
Wood News
front page