Building an Electric Bass Guitar: Part 2 - Creating the Neck
by Lee Laird
Click on any picture to see a larger version.
CLICK HERE
to read Part 1 of the Electric Bass Guitar Build- Design Considerations
At this point, the most critical decision, in my opinion, is whether to
build my Bass with a neck-through body, or have a separate neck that
connects to the Bass's body. The only Bass I've owned had a neck that was
attached to the body with screws, but it wasn't
made well and the neck-to-body connection caused tone and sustain loss.
I've owned guitars with almost any configuration of neck/body you might
think of, and the
neck-through
types seemed the most stable, which helped
me decide to make this Bass with a neck-through body design. I'll list a
brief description below of some of the other typical types of neck to body
connections. As with most things in life, almost all types of guitars will
have their positives and negatives, so keep an open mind when it comes
to building one.
The first type has a neck that fits into a pocket that excels when
relatively close in tolerances, but the majority of the joint strength is
accomplished with the use of either three or four substantial screws
attached from the back of the instrument's body, through the section of
the body that makes the pocket, into the back of the neck. (Most
guitars that use this design also have a metal plate on the back of the guitar,
which the screws fit through preventing the head of the screw from trying
to pull through the rear surface of the instrument.) There are many
instruments made in this manner, and if all of the components fit nicely
and are made well, they can help produce a very usable instrument at the highest
levels. This is how most Fender guitars and basses are made. (This style
can have a lack of sustain and certain tonal losses, depending on the
solidity of the neck-to-body connection and what woods are used. It is
reasonably quick and easy to replace a neck if damage happens to occur.)
The second type is much more similar to a mortise and tenon joint. The
neck has a tenon created on its end that fits into a mortise created at
the end of the instrument's body, where the neck attaches. The fit of this
mortise/tenon is critical for the instrument, as the primary factor
keeping the neck and body solidly connected is the exacting fit. For a
long-term connection, some type of glue is necessary, and this dictates
the fit of the joint. If you make the joint too tight, it will never go
together when glue is applied, and if it does it can be starved of glue.
If on the other hand the joint is too loose, glue alone will not suffice
to create the type of fit that a tone instrument needs. (Sustain and tone
can be imperceptible to that of a neck-through style, if made well. The
neck is not as easily removed for replacement, even if water soluble glue
is used, but it is possible.)
The last type is mainly used in the acoustic guitar world, but you can, of
course, choose to use whatever you desire when you build your own
instrument. This type has a dovetail on the end of the neck, that fits
into a corresponding socket in the body, with many having a taper so it
tightens as it reaches full depth. This type is the most difficult of the
group to get spot on, primarily due to the angles on the dovetail/socket.
Probably not too surprisingly, it has the strongest mechanical
connection. With the second type I listed above being as strong as it is, I really
don't see the need to use this last type of connection in an electric Bass
design. (A very solid connection with good tone and sustain, if made well.
Similar concerns on removing a damaged neck as the second type above.)
Okay, so I mentioned earlier that almost all of the types have positives and negatives,
but with the neck-through design, you may be wondering just what drawback
it might have. The first is perhaps not much of a concern for those that
keep their instruments in their case when not strapped to their body, but
can still be an issue. If the neck is broken, there is no easy way to
replace it, as the neck is integral to the center section of the body. The
other potential issue is that of warpage. With a long one-piece section of
wood, if it is not properly seasoned and dried, there is a chance the wood
may move, with either a twist or bow being the most common issue. One way to help
counteract the warpage/movement issue is to cut multiple slices of wood
(some like to alternate contrasting pieces for visual appeal) and glue
them together as a bundle. Each of the separate slices will help offset
the tendency for any movement as a whole, compared to one solid piece of
wood.
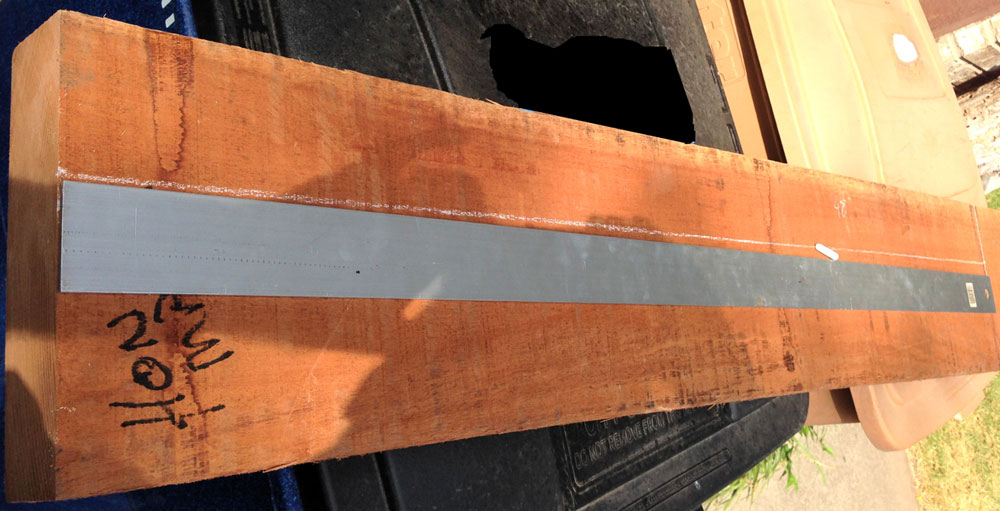
I looked over my stash of 8/4 Mahogany and chose a board from which to cut
my neck/center section of the Bass body. These boards are still fairly
rough from the mill, so I used one of my white pencils to mark out where I
would cut. Any time I work with either rough wood or really dark woods, I
like to use this type of pencil for any marking. It is so much easier to
see and it disappears completely with a few passes of a hand plane,
instead of potentially soaking down into the wood fibers, like markers.

|
Full 8/4 board of Mahogany, with white line drawn
around future neck blank.
|
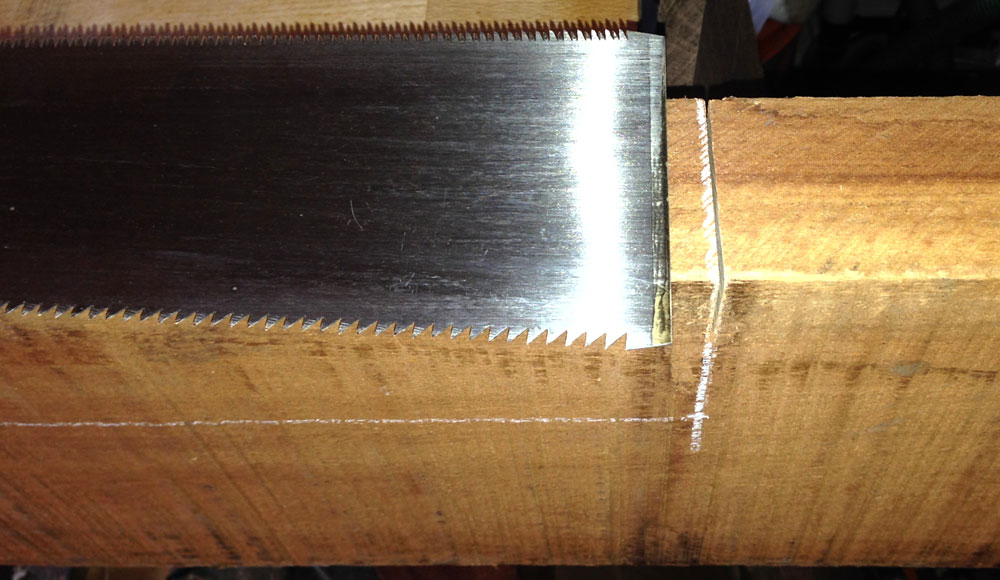
Since I decided on the 34" scale Bass, I measured out 48" long and
approximately 3-1/4" wide, so I would have some extra material in both
dimensions, after I cleaned up the blank. I made the short 3-1/4" cut across the
grain with a
Japanese Ryoba Hand Saw
, which has rip teeth on one
side of the blade and crosscut teeth on the opposite.
Since the board which I plan to cut the blank from is about 72" long and
10" wide, I couldn't reach the placement of this short cut with my band
saw, even though I have a MiniMax 16". Making this small cut first also
prevented the need to back out of a 4 foot cut on the bandsaw, if I'd
chosen to make the long cut first. For the long cut, I set up my fence on
the band saw and an adjustable support on the outfeed side for safety, so
I could focus my attention on keeping the board up against the fence
while the blank was completely supported immediately after the cut.

|
Full sized Mahogany board on bandsaw,
making length-wise cut.
|
Even though my bandsaw's cut produces a good surface, I still needed to
spend some time smoothing the rough face and touching up the two sides of
the blank over at my workbench. As I enjoy doing many of the woodworking
tasks by hand, I like using hand planes, hand saws and chisels. There is no
reason you can't use your machinery to do most of the upcoming tasks, so
it's up to you how to handle the work.

|
Partially planed top face, with signs of larger
sawmill teeth marks.
|
The first thing I wanted to do was to bring the top face down to a smooth
and flat surface. I use a
Jack Plane
setup with a somewhat radiused plane
iron, so I can quickly remove all of the rough surface, as well as
adjust its flatness if needed. With a radiused iron, you can tell which
portion of the iron will engage the wood, and if you have a high area, the
engagement point is centered over this area. It is really quite quick and
easy to adjust a board's flatness, with this type of shaped iron in a
plane. I moved to my
Jointer Plane
, which has a very small radius to the
iron, to bring the blank down to an extremely flat surface. This side of
the blank will be the front of the Bass where the fingerboard is located.
Before moving to the next step, I verified the top of the blank had no
twist or wind by using my winding sticks. After a few adjustments it was
good to go.
The next step is to do the same thing to one of the long adjoining sides,
with the final surface flat with no wind or twist, and precisely
90-degrees to the top face I worked first. With that accomplished, I set
one of my
Marking Gauges
to the narrowest dimension from this
just-worked side after testing it all along the length. With it set and
tightened, I ran it the full length of the blank with its fence against the worked side, letting the
cutter mark lightly down into the wood. I
flipped the blank over and making certain to use the same side for the
fence, marked along this second side. Lastly, I did the same on both ends
of the blank so I'd know where to stop planing.
I chose to again use my Jack plane with the iron set somewhat deep so I
could make the stock removal fairly rapid, but this depends on how much
material there is to remove. Check your progress often or else you can
overshoot your marks and waste both wood and time. If I have a couple of
areas that are further away from the mark, I'll pick up a shorter plane
so I can focus in on the problem areas. My hope is to work until I have a
similar thickness of excess wood all the way around, and then shift to my
Jointer plane. You can back off the iron in your final plane as you get
really close to your mark, so your final pass is in the range of .001".
You may notice I didn't talk about working on the back face of the blank,
and the reason is it would be wasted effort at this point. The back
portion of the blank (the part that is beyond the body) will behave as the
neck for the Bass and will have the rear section cut away at the bandsaw prior to shaping the neck so it feels good in the hands. The back
portion of the blank, which will be the back side of the body, will either be
planed so it is level with the sides, or have an electric tool like a
random orbit sander or grinder used on it.
Before moving on, check the center blank with a micrometer to make sure
it is the same width along its full length. If it is, then you are ready to go
forward. If not, see where the problem is located and spend a bit more
time with the planes.
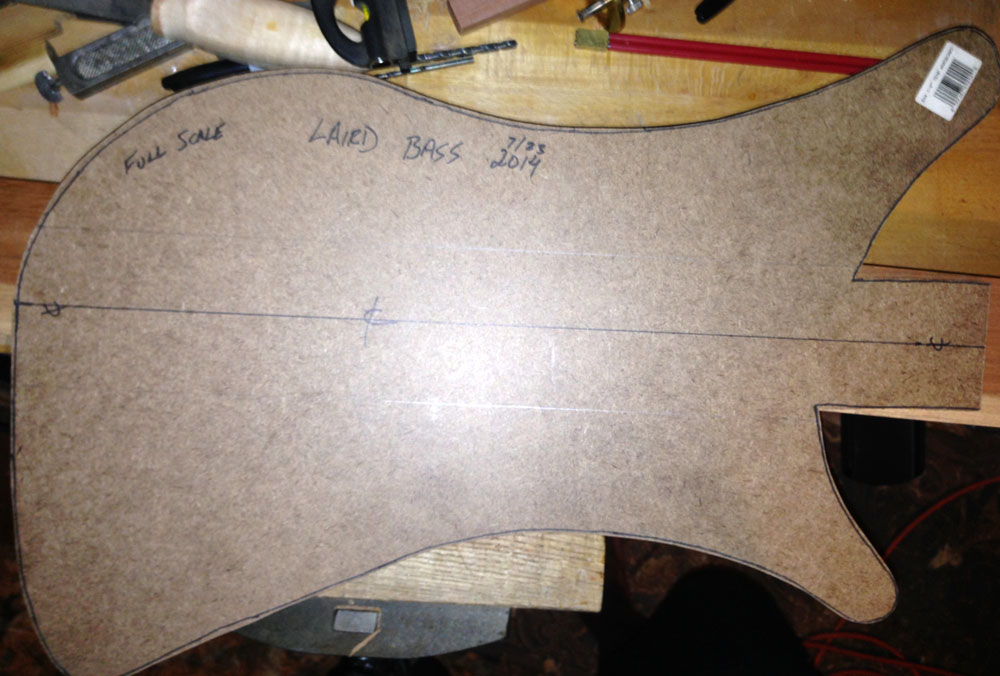
Find the center of the blank and mark it with a pencil down its full
length on both faces, as well as on the ends. Lay the pattern down on the
blank, making sure to line up the centerline on both. Take a fine pencil
and draw a mark where the edge of the pattern and the edge of the blank
meet. Connect the marks on the pattern, so they reference the two wings
that will make up the remainder of the Bass's body.

|
Pattern with pencil lines flanking the actual size
of the center neck blank.
|
With another piece of Mahogany laying flat, I position my pattern with one
of the recent pencil lines aligned with the flat edge of the board if it
is already a smooth finished board. (If the board is still rough, I offset it slightly,
so that the line on my pattern is around 1/8" deeper into the board. This
provides enough material to clean up and flatten the edge, without going
beyond the original intended shape.) With the pattern and board held still I draw around
it. Do the same for the other section of the pattern, so that you end
up with two "wings" for the body. With the shape of my design, I was
able to "nest" them together so I had much less waste after cutting the
shapes out on the bandsaw.
|
Both wings drawn close together, and a quick cut to
separate them from
each other.
|

|
|
Both wings now cut very close to the layout lines.
|
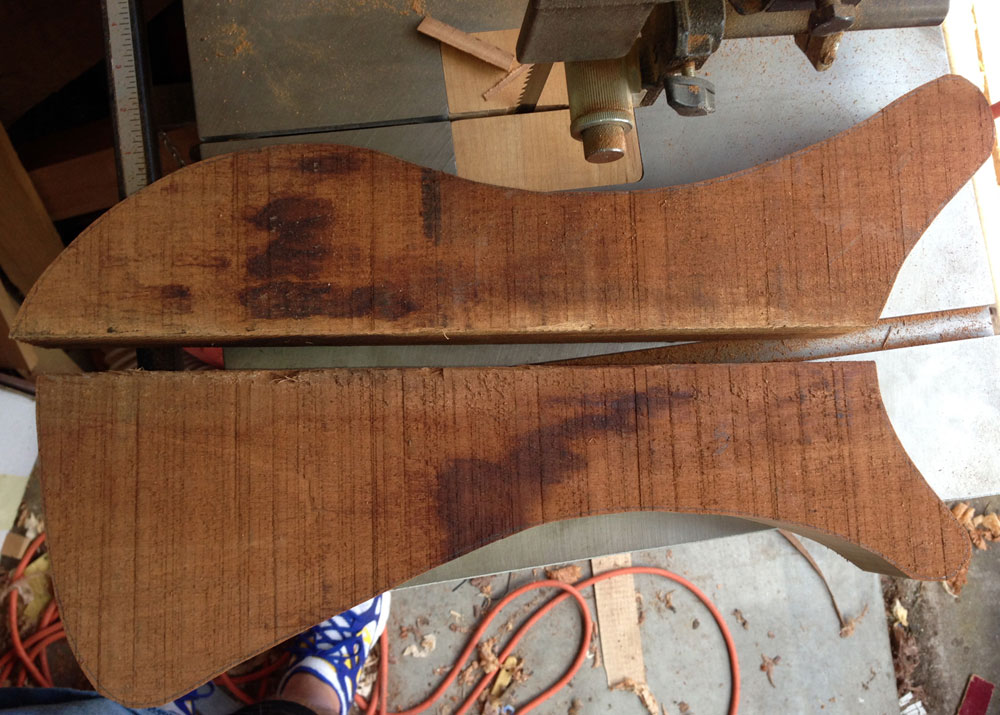
Just like we did earlier on the center blank, you need to plane the
straight edge of each "wing" until it is flat, smooth and with no wind or
twist. With their smaller length this should go fairly quickly,
especially after you've completed this on the center blank. The results
we are after is for both "wings" to fit with the center blank so there are
no gaps, which in the end will provide a very strong glue joint. Don't
glue the "wings" to the blank just yet though, as some of the upcoming
work would become more challenging, if not almost impossible with these
pieces assembled.

|
Wings laid up against the center neck blank,
to get an idea of the Bass in
wood.
|
As I mentioned earlier, I cut the center section slightly longer than
anticipated, so now it's time to start laying out some of the known
measurements to help decide where things will lie. Since this is a 34"
scale length Bass, the distance from the inward edge of the nut to the
saddles on the bridge will be 34". On a 24-fret instrument, the 24th fret
is located at 3/4 of the scale length. Using this information, I made a
very light pencil mark approximately where I anticipated the saddles of
the bridge to reside. To make my measurements more precise, I made this
mark on the centerline I drew earlier in the process. Next I measured up
the neck 34" and made another light mark. From the earlier
information, I determined the 24th fret was 25.5" down the neck from the
mark for the nut. When I made my mark for this location, I noticed the
24th fret was further into the body than I wanted, which would make it
almost impossible to truly access this position. This is where having the
side "wings" cut out and in place was very valuable, since I could tell
exactly how the layout would impact the bass. I shifted the location for
the 24th fret so it would be accessible without contortions, and
remeasured the 25.5" up the neck to mark the new nut location. A quick
measurement of 34" gave me my new mark for the saddle location, and then I
made sure to erase all of the old marks to limit any chance I'd work off
of an incorrect measurement.

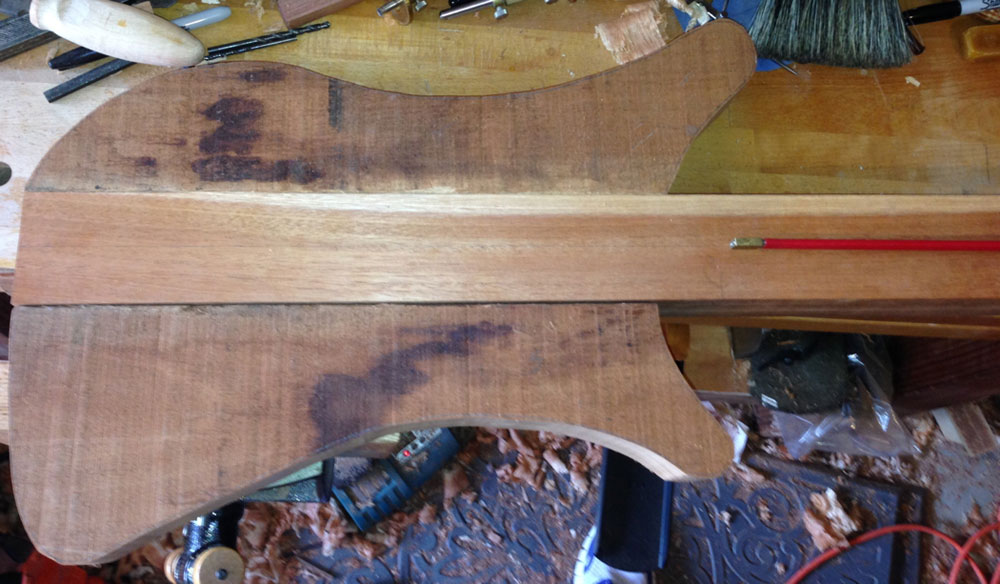
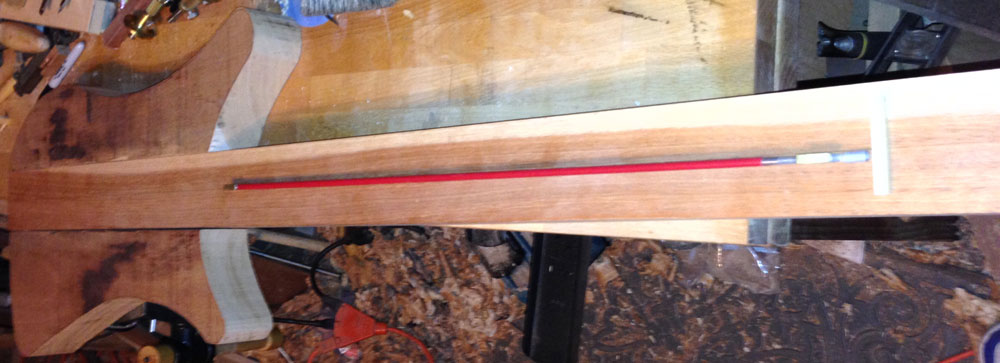
|
Truss rod laid on the neck, along with the un-processed nut
to aid in
determining where the angle of the
headstock will occur.
|
In future segments, I'll show how these marks on the center blank will
help us determine multiple things, like where to make the cut for the
angled-back headstock, likely positions for pickups, the ground wire
location, and more. I also plan to use a
Festool Domino Joiner
to index the two
"wings" with the center blank, which will allow us to do a fair amount of
shaping on the "wings" while they are still separate and easily handled,
and the future glue up of the body will go together without the
need to fight the pieces shifting around.
I hope you enjoyed this article and please let me know if you have any
questions or comments.
Lee Laird has enjoyed woodworking for over 20 years. He is retired from the U.S.P.S. and works for Lie-Nielsen Toolworks as a show staff member, demonstrating tools and training customers.
You can email him at
lee@lie-nielsen.com
.
or follow him on Twitter at
http://www.twitter.com/is9582
.
Return to
Wood News
front page