The Great Sawbo - Part 1
by Scott Stahl
Click on any picture to see a larger version.
Most people have heard of the
Roubo Workbench
, patterned after Andre Roubo's plate 11 from the masterwork
To Make As Perfectly As Possible
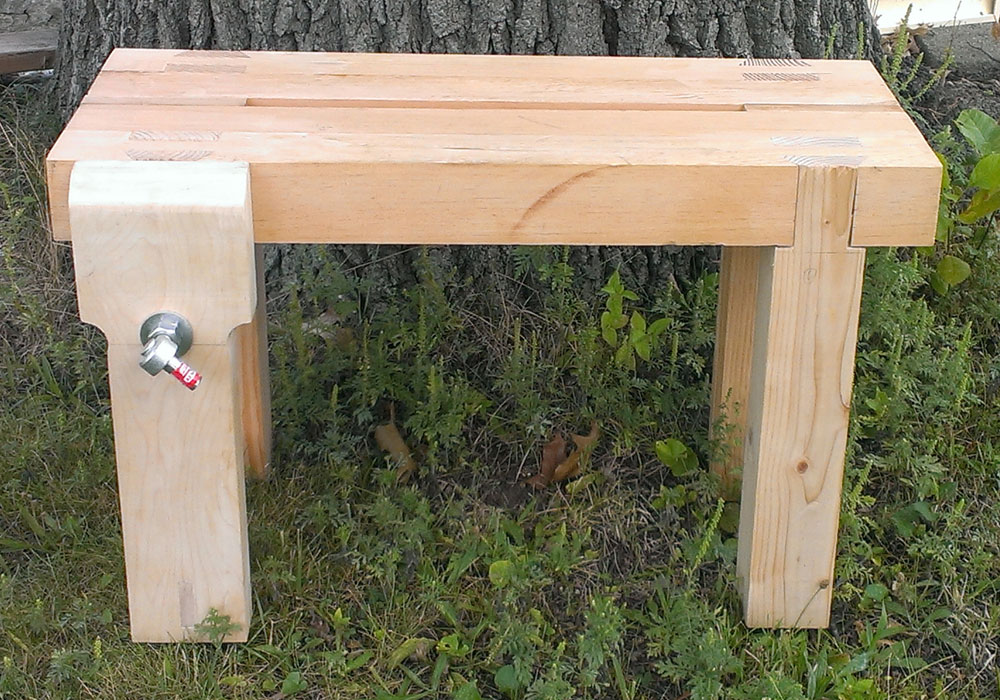
. The simplicity of form and dominating mass are ideal combinations for most hand tool woodworking. But did you know that Roubo had a lesser known scion (descendent, not car)? Ladies and Gentlemen, it is my distinct pleasure to introduce you to the Sawbo workbench:
The Sawbo is not just a miniature version of the Roubo workbench. It is a fully functional sawbench inspired by the
design Ron Herman uses
. The Sawbo design was alluded to in
my previous sawbench article
. The plan all along was to build two sawbenches because they work best in pairs. The primary difference between the two is the kind of work meant to be done on them.
The first bench is designed to manipulate relatively small pieces of wood. The nooks and crannies of the shape allow parts to be supported while various odd cuts are carried out by the user. Due to the organic appearance of this bench, I've been calling it the "saw horse" and the Sawbo "the sawbench" so my kids know which one is being referred to. I tried using the phrase "shop apprentices", but the children objected; I'll make woodworkers out of them yet.
Sawbo is designed primarily for ripping long pieces of wood. There is a secondary purpose to hold subassemblies for various operations. The space in the middle, commonly referred to as a split top Roubo in the full size model, is for rip cuts on narrow and/or thin boards. The crisp edges and flush front legs serve exactly the same purpose as on the Roubo bench: to support boards for working on the edges. The thick boards are designed to allow
holdfasts
to grip. There are no holes for holdfasts or clamps yet because I'm still unsure what will be needed. The split in the middle already allows F-style clamps access to most of the bench top. The plan is to let my work dictate placement of holdfast/clamp holes. The leg vise was thrown on more as an ornament, or joke than anything else. However, it proved to be so functional and strong that more effort was put into making the leg vise a real part of the bench. Finally, the Roubo plate 11 mortise and tenon joint for the legs was done as practice before building my next workbench (foreshadow alert).
The sawbenches are designed to work together. They are the same height, about 18 3/4 inches based on my bended knee with shoes on. My hips stay pretty much aligned with one knee placed on the bench top. This one act of fitting the bench tops to my body really does make them more natural to use. I won't say 'comfortable' because a lot of what we do as woodworkers is not so. Fatigue is less and unconscious avoidance is almost nil when using the benches. In fact, the first bench (horse) has become my go-to seat when I'm in the garage shop. I would urge anyone building one of these to do the same kind of fitting process.
I don't claim to be an expert in woodworking, but the preceding advice does come from personal experience. I have a number of plywood boxes made years ago that served as low work surfaces until the first sawbench was built. I hate using them simply because of back pain from being hunched over too far. Continuing in the vein of disclaiming expertise, the following method is the way I chose to work. Do not be convinced that this is the only way to build a Sawbo, even though I'm writing in an authoritative voice.
If you were skimming over the theory and practice section, here is where you should start to pay attention. Sawbo is made from one 12 foot and one eight foot 4X4 construction lumber plus any 12 inch long by 3" wide piece of hardwood scrap. I apologize if you were hoping for some hint of deep lore from woodworking antiquity. If it helps you can reread it with an English accent, and replace "lumber" with "timber"; things always seem more puissant that way. For completeness sake, a couple more pieces of scrap are used for layout purposes.
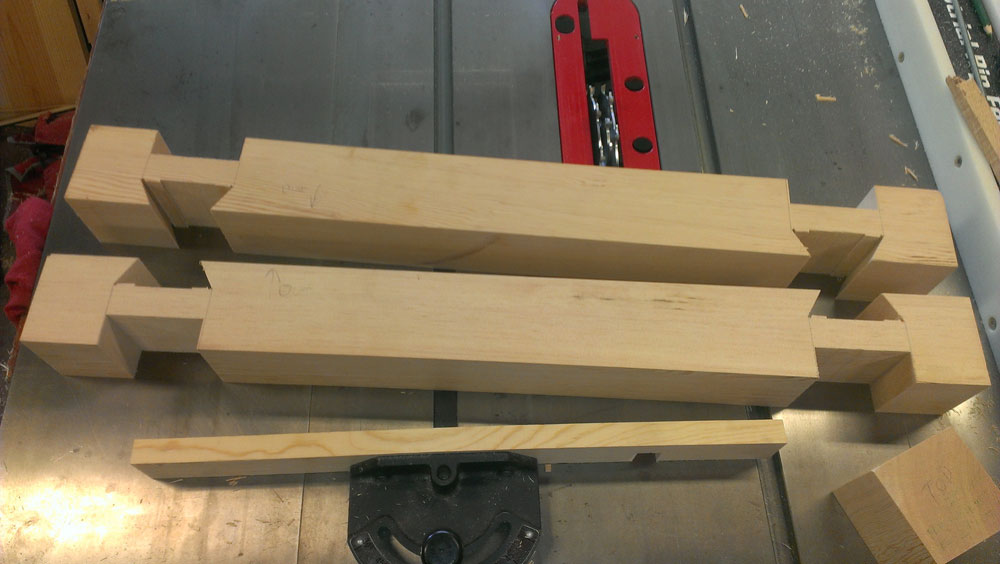
As always, the first step is milling the lumber. I prefer to work with smaller boards so everything was cut to rough length and then milled. The top comes from the 12' 4X4 leaving the legs to come from the 8' foot board. The goal is to get four 30" 3X3 boards for the top and four 19" leg boards 3-1/8" square. Note, you may need more than 19" if you have very long legs; I am 6'3". The slightly oversized legs help in shaping and fitting the double tenon. I didn't take any pictures of the milled boards because they looked kind of boring. In retrospect I could have spelled out LOL in driveway with the eight boards and took a picture of that; it would at least be good for a chuckle.
Now that everything is milled it is time to pick the two outside boards for the top. The mortises are going to be done mostly on the table saw before gluing up. The mortise and tenon operation is the most intricate part of the build. The layout methods described are meant to simplify the process, but better ideas are always welcome.
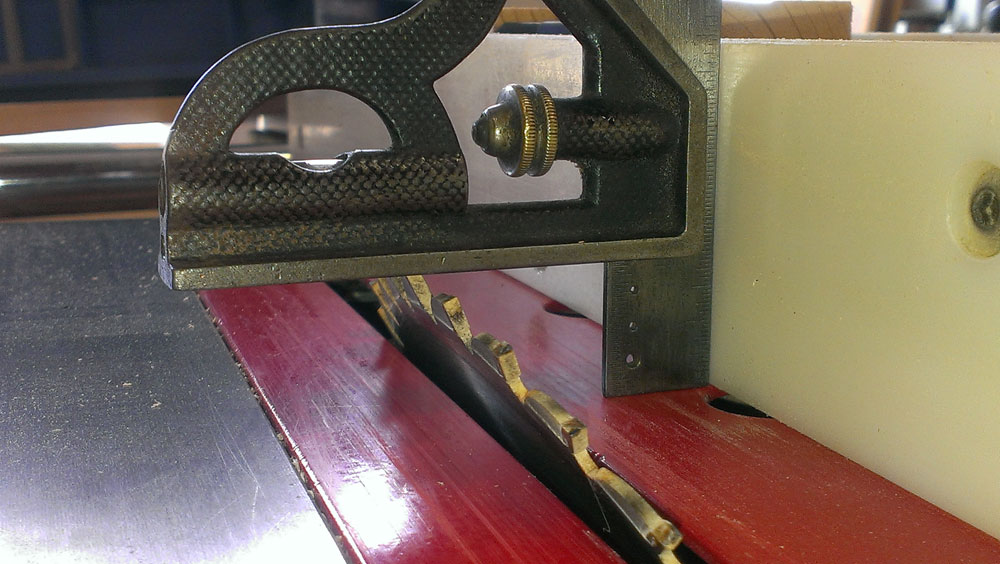
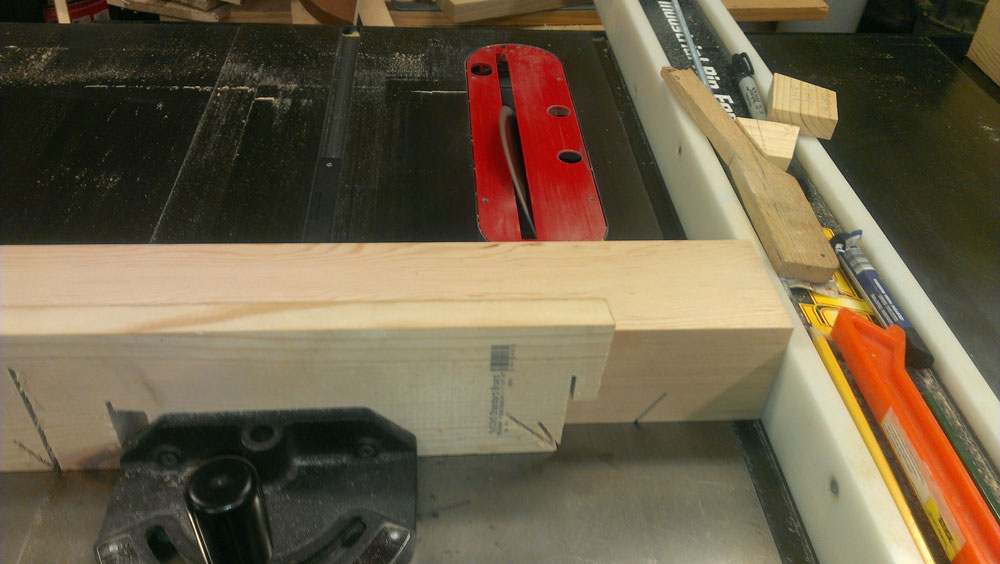
We are going to start with the angled mortise first. In my method the joint is registered from the angled mortise to achieve the objective of the leg and top flush with each other. Begin by tilting the table saw blade to 30 degrees and the vertical blade height to one inch. Note that is one inch from the table, NOT the blade length. Here is a photo for clarity:
By personal decree the legs are inset from the end by 3" AS MEASURED BY THE TABLE SAW ruler. The actual distance ends up being something like 2 3/8" from the end--enough room for a clamp to bite, yet retain stability of the bench. I have a left tilt table saw. The top pieces are 30" long; subtract 3" and SET THE FENCE AT 27". Run the board over the blade, flip end for end and repeat the cut for the other side. Replicate the process with the other board and all four outside faces of the angled mortises are cut. Do not change the table setup yet. Grab a piece of 30" scrap and repeat the cuts to use in the next step.
You are on your own if you have a right tilt saw. I hear Kentucky windage (or is it bourbon?) helps in figuring the euclidean geometry on a right tilt saw. Seriously, you will have to figure the distance yourself, but remember that close counts and these 'instructions' are merely guidelines.
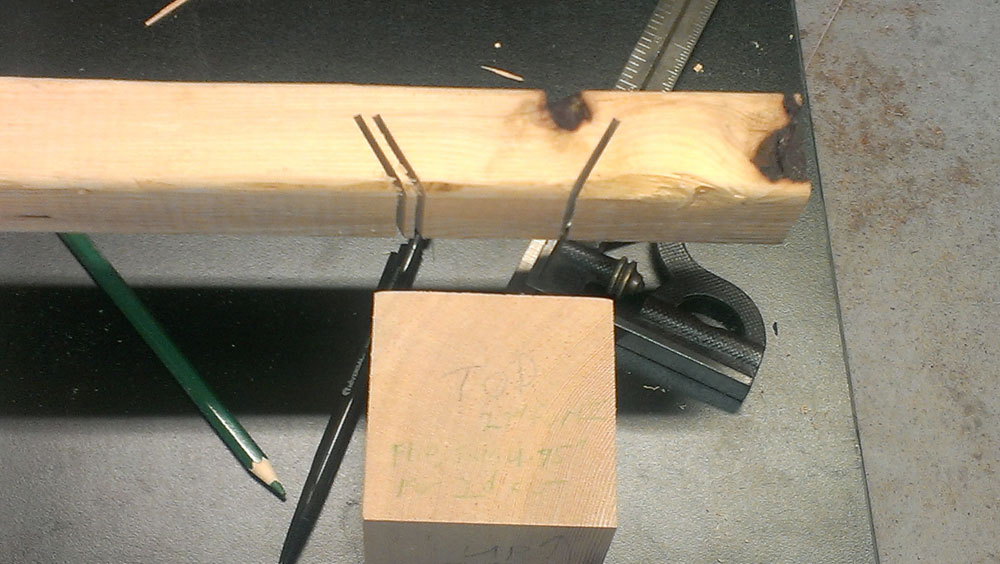
The first cuts were registered from the table saw gauges for simplicity. Cutting the other face of the angled mortise is registered off the work to account for reality, but here again the work gives us an easy out. I created a cheater block the same dimension as the top (3"X3"). It is more correct to say the cheater block is the same size as the completed mortise and tenon joint, but then that is starting to complicate things. In the photo you can see I wrote copious notes on the proper use of the block. That isn't for the benefit of the reader; I do this with all my jigs and even subassemblies.
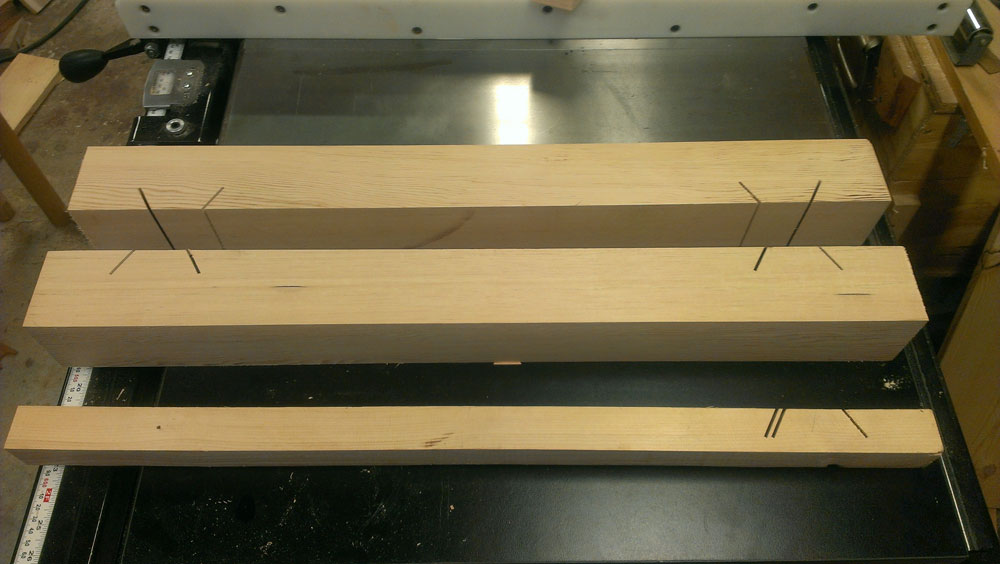
I use the cheater block as a spacer to guestimate the offset for the inside face of the angled mortise. Using the 30" piece of scrap and two test cuts arrives at the table saw gauge setting for the other cut; do not discard the scrap piece yet. In my case the setting for the other cut is 4 3/4"; it may be longer on your gauge, depending on how many times you tell the story.
Run the two boards over the blade with the new fence setting to make the other four walls of the angled mortise. Here is a picture of the completed walls and the test cuts.
I am getting ready to make the final angle cut in the below photo.
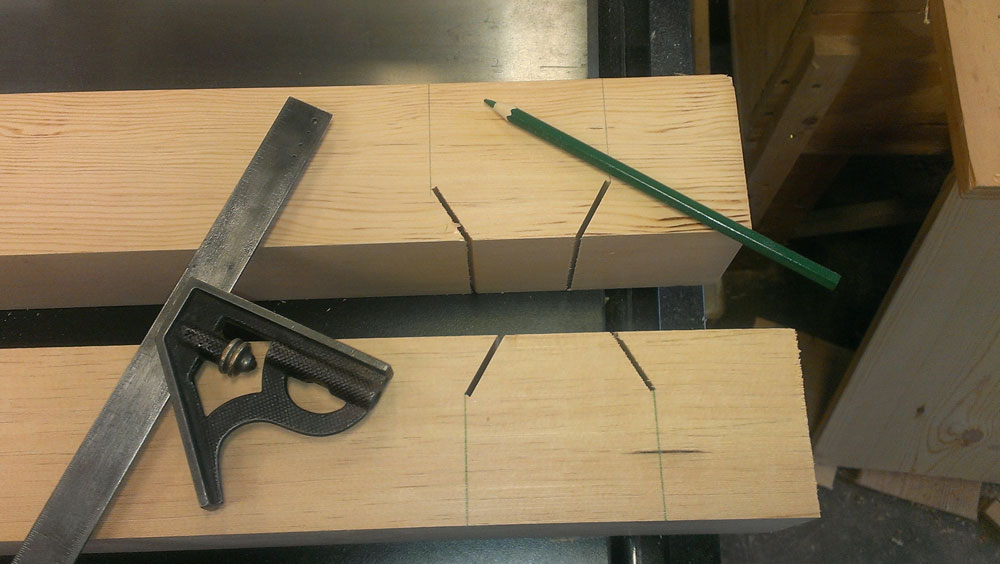
The next step is to define the walls of the rectangular mortise. Use a square to drop lines to the other side of the board as in this photo:
Now it is time to mount the dado blade in the saw to finish most of the remaining mortise work. I put all of the chippers from my Freud dado stack on the arbor resulting in a roughly 3/4" cut (Highland sells the comparable model, the
Freud SD208 Pro Dado Set 8 inch
). Again set the blade height to 1", using the 30" piece of scrap to get the height exact. The 30" piece of scrap can finally be returned to the scrap bin.
|
The next cuts are made with the miter gauge. A fresh sacrificial fence should be used for the remaining cuts to assure crisp edges. We are also looking for a fair amount of precision and a fresh fence will have a clean blade demarcation line. The double tenon on the leg will be custom shaped to fit the double mortise in the bench top so the only error hard to recover from is cutting the mortise too wide. As a reminder, the legs are 3 1/8" square in order to accommodate small errors along the way. The message is pay attention, but don't be super anal about these cuts. Squareness and consistency are more important than any measurement.
With the blade height dialed in with the scrap and a fresh fence prepared on the miter gauge, cut all four of the square mortises. Make sure to leave the line you traced. The phrase I was taught years ago at
Woodworking in America
is 'leave half the line'. I haven't quite mastered it, but saying it is easy to do. The square mortise is just that simple.
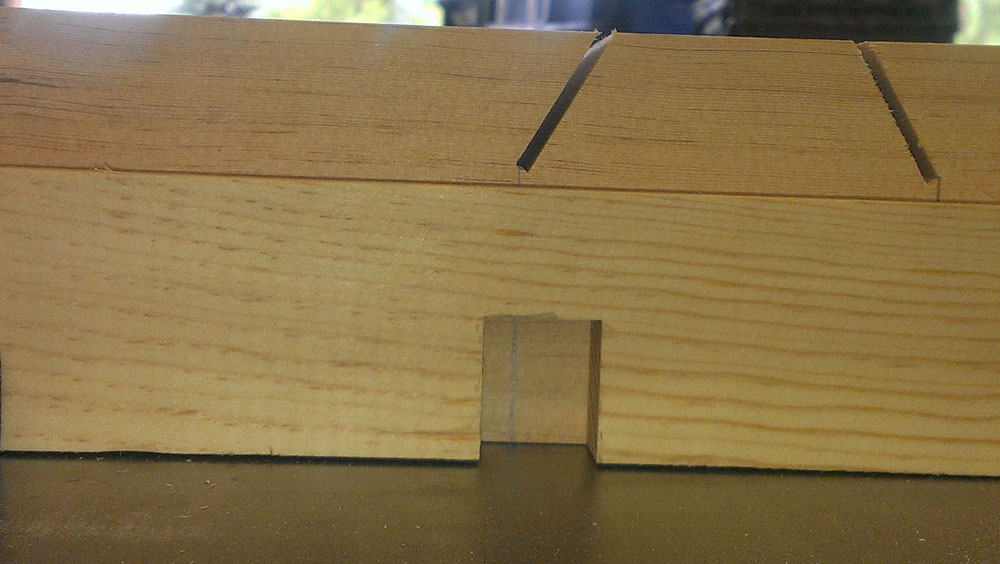
Here is a photo of me missing half the line; I did return to the end to get closer to the line:
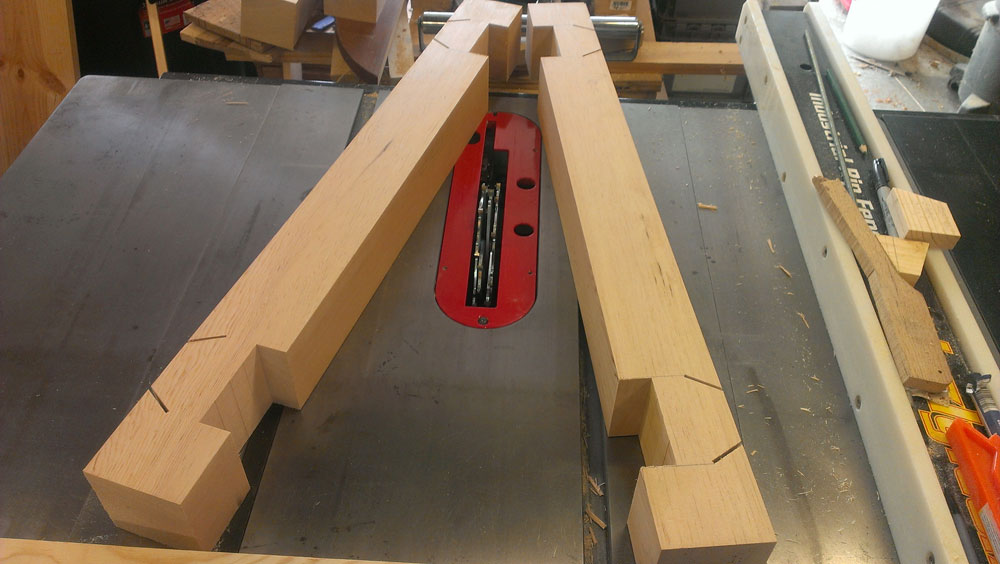
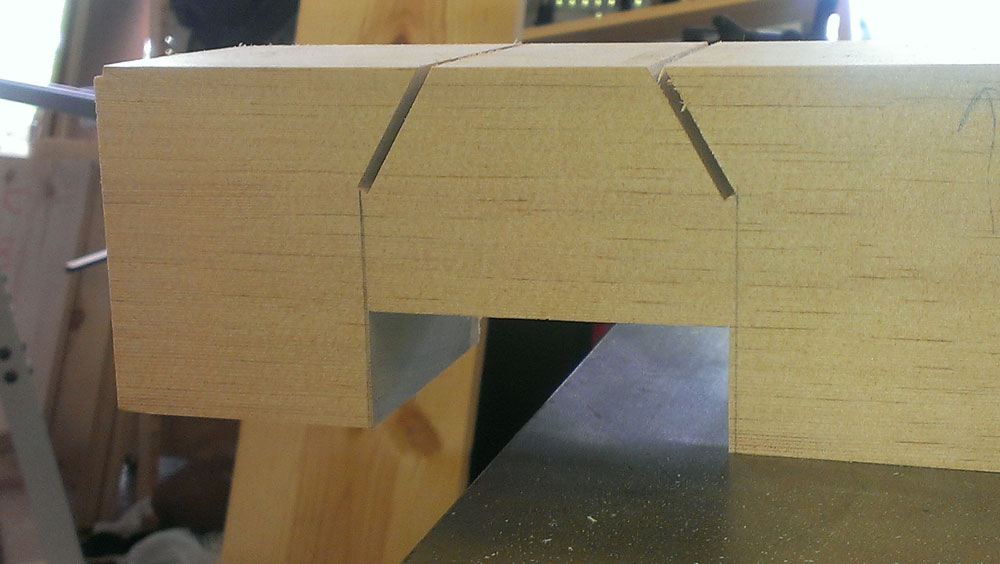
Hogging out the waste of the angled mortise is not much harder than the square mortise. Take extreme care to leave the angled wall unmolested and cut as much waste out as possible. Grab the nearest coping saw (or trained beaver; I don't judge) and knock out as much of the rest of the waste as you are comfortable doing. I have to admit that I used my bandsaw (named Ben). Here are my mostly completed edge boards:
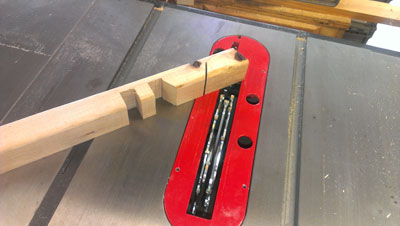
The last machine step is to cut the notch in the legs. I labeled each half of the joints with mating numbers 1 through 4. From here on out they are engaged to be married. Here is another step where some people might prefer more precision in the work. If this description fits you, now is the time to clean up the mortise walls. I chose (rightly, or wrongly) to work with more 'slop' in the measurements.
There is enough flat in the mortises to scribe a line on the top of the leg for each joint. Place the leg on the top of it's mated mortise and carefully align the front of the boards and then draw the lines for the notch lightly from the bottom. Use a square to complete both lines on the leg end. IMPORTANT NOTE: cut shy of the line to give yourself some leeway in fitting the joint later on, but not so much that you have to remove a ton of wood by hand. I used the dado blade to remove as much waste as possible with successfully higher cuts until the blade height maxed out. We are looking for a notch just over three inches deep. In this manner there should be some leg wood proud of the joint. This end grain is going to get the snot banged out of it during the fitting phase; we want some waste to knock off to complete the joint at the end.
The depth of the mortise is also where the eventual bench height comes into play. You want to make sure the length from floor to shoulder of the leg tenons (where it meets the bottom side of the top) plus the thickness of the bench equal the bench height you are aiming for. I scribed the shoulder line on all four sides of the leg to aid future layout. I have an old Disston backsaw that was just deep enough to complete the cut for the sidewall. The remaining waste was removed during the inside shop phase of this build.
The next step is the first glue up of the bench top. I chose to do a two stage glue up because gambling is not really my thing; any mistake at this point is easier to fix. We are now going to glue the edge board to it's companion, consort, brother, sister, whatever, depending on your world view. The important thing to note is that only each half of the top is glued up at this time. Standard rules and processes for edge gluing of boards applies. Done yet? Good. Now go feed the beaver, grab a cold beverage, and admire your mastery of the table saw while the glue dries. The next installment will detail the fine fitting of the signature Roubo double tenon joints.
CLICK HERE
to read Part 2 of
The Great Sawbo
, where Scott does the fitting of the signature Roubo bench joint and the final gluing of the bench top.
Check out my BLOG, if you would like to read more about what I've been up to,
CLICK HERE
If you have any questions or comments, feel free to email me at
tsstahl@gmail.com
Return to
Wood News
front page