Going Pro: A Suitable Work Space
Part 3 of a series
by Douglas Bittinger
This will be one of the lengthier, more complex discussions in this series. It would become impossibly complex if I were to attempt to discuss all the permutations that can occur for different types of woodworking, so to keep it just a bit more manageable I will restrain myself (mostly) to discussing a shop suitable for furniture making, because that's what I know best.
Your Mileage May Vary
As was explained in the
introduction
to this series, differences in tastes and habits may cause you to "need" different things than I do. I will explain what I have found to work well for me, feel free to modify (or ignore) my suggestions to suit your own preferences and budget.
How Much Space Is Enough?
Simply put, no matter how much space you have you will quickly get to a point where you wish you had more. Therefore the key to being happy is to make the most efficient use of the space you have available. I firmly believe there is no such thing as the perfect all around workshop. Everyone's needs are different, even people doing the same kind of work will want to arrange their space a bit differently depending on their work habits. And you will find that an arrangement that seemed to work well enough for the weekend warrior can quickly become frustrating to the full time user if some basic principles are not addressed. Here are some of those basics to look at as you noodle out a floor plan.
Before you start moving equipment around I heartily recommend making a scale drawing of your work space and each of the machines as paper cut-outs. Make another cut-out of a board the size you normally use and one of a sheet of plywood. Don't forget to include a lump or two representing human bodies in position to carry these loads. Arrange the tools on the floor plan then go through "A day in the life of a woodworker". Imagine a project from start to finish, be as detailed as you can and decide if the arrangement you are using will really work. If not, tweak it, or start over. It's much easier on your back to move little bits of paper around than to be dragging machine tools. And if your kids catch you "playing with your paper dolls" just ignore their cajolery.
Ideally your raw materials will come into the workshop from a storage area, flow through the shop in a linear fashion as the raw lumber is broken into blanks, blanks are made into parts, the parts are assembled into completed pieces, the competed pieces are finished, and the end product is made ready for delivery. This does not have to be an "assembly line" in a half-mile long building. A proper work flow can be achieved even in a garage sized workshop as long as your tools are grouped efficiently and sufficient table space is provided.
Avoid using your tools as space to stack wood or parts; you will be needing those tools and if you must keep shuffling 'stuff' from one tool to another you will waste tremendous amounts of time playing this shell game. Rolling tables or carts are especially handy because they not only provide a place to lay things as you work with them but the whole stack can then be rolled to its next station.
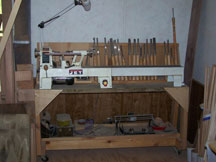
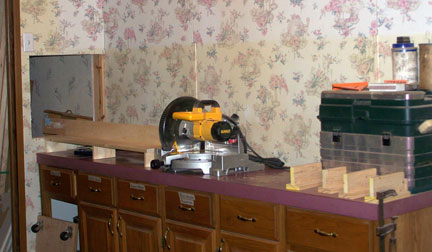 Long boards can present a challenge. Most woodworkers will be starting their work with lumber that can vary from 4 feet in length to 10 or 12 feet, depending on whether you will be buying dressed lumber or rough sawn. Cross cutting long boards into manageable lengths on a table saw can be difficult and dangerous. I put off buying a chop saw for many years because it seemed such a limited use tool for the money, but once I broke down and shelled out the cash it has become one of my most valued tools. Even the most basic miter saw will prove valuable in breaking long boards down into easier to handle lengths. A good one will prove useful in cutting miters on the ends of long boards - if you ever do such things. You will need a narrow but quite long bench on which to work your chop saw, but it does not need to be permanent; it can fold down out of the way to make space for other tools when not in use. I found the room I needed by cutting a hole in a wall so a board could poke into the next room, giving me almost unlimited length capability.
Plywood is another challenge. The best tool for efficiently slicing up full size sheets of plywood is a panel saw, but these puppies are huge and good ones (that will rip as well as cross-cut a panel) are expensive. I have seen plans for shop built versions that fold up against a wall or are mounted on wheels to roll out of the way when not in use. If you use plywood sheets a lot, this is a tool worth looking at. If combined with a rolling plywood cart it will save you a good deal of back strain.
If a panel saw just isn't practical for you, and you have enough space around your table saw, it can be kitted out to make cutting sheet stock easier by (temporarily) attaching in-feed and out-feed support tables and making an extra long rip fence. In a tight shop, cluster low tools near the table saw so sheet stock will pass over the tops of them.
If you don't work with plywood very much, a few wooden saw horses and a hand held circular saw will allow you to cut up a sheet of plywood into over-sized blanks that are then trimmed to exact size on your table saw. There are some long, self-clamping saw guides that help a lot with this. There are also a number of devices made to help the single-hander handle large, bulky and often heavy sheets of plywood and MDF. They are well worth the money.
While on the subject; casters have become my most valuable shop accessory. Most of your tools can be put on lockable casters so they can rolled out of the way when not in use or when a slight "re-configuration" is needed due to a special circumstance. Buy good ones though, the real light, cheap ones won't stand up to much weight or use and you want the locking ones to lock solidly so the tool doesn't move while you're using it.
If you will be working on more than one project at a time (and you probably will whether you want to or not) the issue of work flow becomes especially important. Trust me, you do not want to be jumping back and forth over part of one project with parts of another. Think about how you make parts, which tools you tend to use together and group those. I like to have my table saw, router table, drill press and band saw in close proximity for I use these for most of my parts making, then they go to a sanding area where I may refine shapes or do finish sanding. Chop saw and surface planer are also close by each other. The surface planer is on wheels so I can let it join the parts making playgroup or be used as a lumber prep tool. The turning lathe and grinder have a corner of their own near the parts making quartet but out of harms way so it doesn't impede the cutting of large stock.
A decent work bench is invaluable. It doesn't have to be super pretty or high tech, it just needs to be sturdy and the right height for you. We'll talk more about benches later.
Climate Control
Depending on where your workshop is, it may have heat and maybe even A/C available. But if it's in an out building, formerly a garage or shed, then you may not have proper climate control installed. If you do, skip this section, if not, read on.
Air conditioning is often considered a luxury. For a hobbyist shop it definitely is that, but for a professional workshop where you will need to be working on a daily basis this distinction becomes more fuzzy. If your shop has large doors and windows, a well insulated roof and you can run a few fans to move the air - and you don't live in the deep south where the ambient air temperature will get up around 100 degrees with 98% humidity every day for a month - then you can probably live without it. Moving the air around helps a lot. But if you live in the south or are heat sensitive then either you will need to go to work at 3:00 in the morning to take advantage of the cooler part of the day or you will need some sort of cooling capacity. You really only have two choices; central air and ducting or window units, though window units don't have to be mounted in windows -- a hole in the wall will do.
Heat is essential unless you live in an area that never gets below 40 degrees in the winter. How you heat a shop depends a lot on how much space you have, how well insulated it is, what fuels you have available and whether you are building a new workspace or refurbishing an existing shop for professional use. Some form of heat is needed in most workshops, at least occasionally. Not only do you need to consider your own comfort, but the belts of your larger power tools get stiff when cold and thump as they run, inducing unwanted vibration, the bearings too will not lubricate as well, and your glues and finishing supplies can be ruined if they freeze. Even temperatures below 50 degrees can prevent glues and finishes from curing properly.
Heat sources can be categorized in several different ways:
1. Fuel: electric, propane/natural gas, kerosene/heat oil, wood/coal, and solar.
2. Whether it employs forced air (fan driven) or is passive.
3. Location: built into the flooring (radiant), wall hung or baseboard, overhead, or even an external heat engine with water, oil or forced air bringing the heat inside the shop.
These three aspects can be combined in a myriad of ways to build heat systems suitable for any application. Some practical considerations include: Electric heat is clean, low maintenance, easy to install and has little or no chance of explosion, but it tends to be the least efficient in terms of cost per thermal unit. Propane burns clean and does not *have* to be vented so wall hung units can be placed without major remodeling of your shop. But unvented units introduce large amounts of water vapor into your work space and gas has an unfortunate tendency to explode if mistreated. Heating oils and coal are messy and ecologically disastrous. Propane, oil and coal have recently become quite expensive as well. Wood burning stoves or furnaces are the cheapest source of heat for a wood shop because you can use your scraps and cut-offs as fuel. If you live in the woods, free fuel is available just outside your door by picking up sticks and branches and cutting up fallen trees. But this takes time and effort. Wood stoves also get HOT therefore are the easiest way to reduce your workshop to a pile of smoking ash if not properly installed. Solar is the most environmentally friendly, but at this time a solar heating system that will actually HEAT a building every day that heat is needed is very expensive to buy and install.
A forced air system will heat a space more quickly and efficiently, but if you choose a passive system, you can compensate by installing ceiling fans to help move the heat around, especially if your building has high ceilings. Heat rises.
Radiant heat installed in either a concrete slab or under your floor boards is a wonderful thing; your feet never get cold, the "heater" takes up no space in your shop (the heat source can be mounted outside) and there is virtually no chance of your heater touching off an explosion of wood dust or finishing fumes. But unless you are building a brand new shop, installing this system just isn't practical. Electric or propane/natural gas wall hung units are compact, clean to use and require no flue stacks. 110 Electric units are a snap to install but use a lot of expensive electricity. 220 volt units are more energy efficient, but do require proper wiring. Likewise propane/natural gas units require gas lines to be properly installed - along with mandated regulators, sediment traps, filters, etc. Check with your local gas company to see what your local regulations are, it is never as simple as "run a hose in and hook it up." Overhead heaters can be propane/natural gas, oil or electric and will use space that is often unused for anything else, especially if your shop has high ceilings, but will need to be forced air units or combined with ceiling fans or the heat will just stay up there on your ceiling and grin at you.
Whatever system you choose to install, the best way to reduce your heating costs is to install adequate insulation - especially in the roof. Any way you go, heat is expensive, keep as much of it in as you can. You will pay for insulation whether you install it or not
What do I use? I have used nearly all of these; a kerosene "torpedo" heater, propane wall hung units, a wood stove, and an electric furnace. Of these I like the electric forced air furnace the most because of its convenience and lack of emissions. The furnace I have in my current workshop is quite old and pretty expensive to run, replacing it with a new high efficiency unit would save me money in the long run. Since the electricity up here on our mountain does go out occasionally, I did keep a couple of propane wall units from the old shop for emergency use to keep critical areas of our new shop from freezing up in case of an extended power outage. My furnace also has A/C incorporated, so I can work comfortably in the hot months, but I keep costs down by using our large windows and ceiling fans in moderately warm weather.
Lighting
When laying out the arrangement of the machines and tools in your shop, pay special attention to lighting. In a well-lit shop, every work space and machine has ample lighting positioned so that shadows do not hinder the woodworker's productivity or safety. You will find you are better able to do quality work when you can see well. Proper lighting goes a long way toward this end.
Again, there are several types of lighting available to you, incandescent, fluorescent, halogen, tungsten but you will probably be reducing your choices to deciding between a form of incandescent and a form of fluorescent. In my opinion, this choice is much simpler than the climate control issue.
All forms of incandescent lights, including halogen and tungsten, are incredibly inefficient producers of light. Incandescent light bulbs expend most of the energy they consume as heat, not light; they are more aptly classified as tiny space heaters that happen to give off light as a byproduct. Halogen lamps are very bright and can be used for spot lighting in special areas, but I would not try to light a whole shop with them; they consume too much electricity and produce a lot of heat. This may be a benefit in the winter, but in the summer it's a serious drawback.
A lot of the fluorescent lighting you will see, especially the most affordable models, are not appropriate for shop use, even though their name may suggest otherwise. The 20 to 25 watt tubes most of them are designed to use just don't put out enough light. To compensate you need to install more fixtures, so where is the cost advantage? If you try to use regular 40 watt tubes in these fixtures, they just burn out way too quickly.
My preferred form of workshop lighting are the T8 fluorescent fixtures. Buy only fixtures with electronic ballasts; this will all but eliminate the annoying hum that magnetic ballasts produce and the lights will fire right up even in a cold shop. Old style fluorescent tubes will flicker and stay dim for quite a while when they're cold.
The T8 tubes have the highest light output per watt that you can get. They also produce less heat, resulting in longer life. I would recommend lamps with a color temperature of 5000K or higher in finishing areas because these produce light very close in color to natural sunlight. Other areas can use the slightly cheaper color ranges below 3500 kelvin.
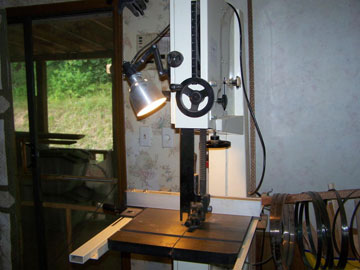 You will want focused lighting in special areas such as on your band saw, drill press, turning lathe and sharpening station. I like to use
magnetic based tool lights
designed for a 60 watt light bulb, but I use a 60 watt compact fluorescent bulb instead. The 60 watt compact fluorescents put out as much light as a 100 watt incandescent but practically no heat. They require no adaptor; they just screw in like a light bulb. They are expensive initially ($2.00 to $3.00 per bulb), but they can last for up to 9 years and use far less electricity than incandescent bulbs so they are cost effective over the long run.
You will want focused lighting in special areas such as on your band saw, drill press, turning lathe and sharpening station. I like to use
magnetic based tool lights
designed for a 60 watt light bulb, but I use a 60 watt compact fluorescent bulb instead. The 60 watt compact fluorescents put out as much light as a 100 watt incandescent but practically no heat. They require no adaptor; they just screw in like a light bulb. They are expensive initially ($2.00 to $3.00 per bulb), but they can last for up to 9 years and use far less electricity than incandescent bulbs so they are cost effective over the long run.
Arrange your overhead light fixtures so the light produced does not create dark shadows at your work stations. This usually means several rows or banks of lights spanning the room. Alternatively you can mount a single 4' fixture above either side of each tool, but if you end up moving your tools you will need to move the lights as well. I think it's better to install a more "universal" system of overhead lights.
If your ceilings are low, and your fixtures don't have a protective cage on them, invest in the optional plastic sleeves for the tubes so that if you should clip a bulb with a board, shards of glass will not rain down on you.
And the very best way to improve lighting that you already have is to paint your walls and ceilings bright white. If bright white is too institutional for you, go with the lightest color you can stand, this will go a long way toward reflecting the light you generate to the areas you need it.
Ventilation
Large windows will admit a good deal of natural sunlight, making your workshop a brighter, more pleasant place to work, but they will also allow a good amount of air flow for the majority of the year. Allowing clean fresh air into your work space does a lot to keep it "livable", especially if you don't have a fancy spray booth with fume extraction and activated charcoal filters. Spraying some finishes, like lacquer, will make your entire workshop uninhabitable unless the spraying is done in an area that is completely removed or hermetically sealed from the woodworking area. Using only water based finishes reduces the stink and health hazard in the rest of your shop but you still need some cross ventilation to stay comfortable, especially if you don't have or don't yet want to run an air conditioner.
If you do use a fan to pull fumes out of a finishing room, make sure it has an explosion proof motor. A regular motor can, in theory, spark and cause the explosive solvent fumes in the air being drawn out to ignite, turning your finishing room into a momentary but deadly fireball. I have not personally experienced this particular phenomenon - if I had I would not be writing this now - but I am told by people who are wiser than I that it is a matter to keep in mind while planning a finishing room.
Pulling fresh air in one window and contaminated air out another window in your finishing room works fine when the weather is nice, but if you are in Montana and its minus 30 degrees outside, this will not work very well. It is also not very much appreciated by nearby neighbors and any hard core Greenies who will be chastising you for releasing toxic emissions into the atmosphere. So if you regularly use solvent or spirit based finishes you will want to look at buying or building a spray booth with activated charcoal filters to trap the toxic fumes, allowing you to purify and recycle the air in the room.
Buying a commercial spray booth is very expensive, but you can buy activated charcoal filters and build your own cross-flow spray area quite easily.
Dust Collection
Dust collection should not be considered an "I'll buy it someday when I have more money" type of investment, it should instead be considered a vital addition to your shop as soon as you have bought your first power tool. Dust collection is not just a tool to help keep your shop clean, it is your first line of defense against contracting a deadly, incurable lung disease from breathing wood dust all day long. Remember that lungs are one of the few organs in the body that do NOT heal.
Of course, you could wear a respirator all day, but doing a Darth Vader impersonation for more than an hour at a time is such a pain! Dust masks are more comfortable and will help some, but a mask alone is not a long term solution. A proper dust collection system combined with a dust mask for particularly dusty operations is by far the best solution. You can get by with a roll-around dust collector to get started, but be sure you spring for the optional 1 micron filter bags. The standard cloth bags that these units come with will trap most of the dust 3-5 microns and larger, but the really fine dust is what hangs in the air forever and lodges in your lungs even hours after you've stopped working.
Dust & Noise Migration
While on the subject of dust, if your workshop is attached to your home in any way you will want to take a close look at how they are connected and make sure the wood dust from your work will not "migrate" into your home. Be thorough, wood dust is sneaky stuff! Whoever does the housekeeping in your home will not be thrilled with you if clouds of fine, powdery wood are drifting through your home depositing themselves on everything.
Noise too can be a nuisance to the non-woodworkers in your family. You don't want your daughter calling you to say, "Daddy, would you please take a break for a while I can't hear my show!" If you share a wall or ceiling/floor, adding sound proofing will be appreciated.
Acoustic panels make quick work of the unwanted sound, but even the much less expensive solution of Styrofoam panels used as insulation and available from you local building center help quite a lot.
Flooring
You will want to take some time to consider your flooring. You will be standing on these surfaces for many hours. Good work shoes can help, but eventually concrete floors will get to you. They are also murder on dropped tools, especially cutting tools like chisels. If you must live with concrete, buy padded rubber work mats to put in front of your most common work stations.
Wood floors are wonderful. Genuine hardwood flooring is durable and looks great, but even plywood is far more comfortable to stand on (especially in the winter) and easier on tools that go kamikaze on you. If you decide to lay wood over an existing concrete slab, be sure you use a proper vapor barrier to prevent your floor from rotting.
If you choose to lay linoleum or tile, choose one that will not get slippery when wood chips and dust are all over it.
Avoid carpeting at all costs, trust me.
Wall Coverings
Your walls will do a lot more than just hold up the roof, you will want them well insulated to keep out the cold and deaden the noise of power tools, they will need to contain enough windows to provide light and ventilation, and doors to move all your stuff in and out. They will support storage cabinets shelves and racks, perhaps a tool station or two and maybe even a lumber rack. Most of us end up hanging templates, patterns, jigs and fixtures on the walls. As mentioned, walls can help to reflect light as well. The wall coverings you choose can simplify or complicate your life.
One popular choice is pegboard, and this can make hanging tools and light weight cabinets easier. If you go this route get the thicker stuff designed for _" hangers. The thinner board will not support much weight and the hooks are made of much thinner, flimsier wire. You may want to save a few bucks and use the lighter peg board in areas you know will be used only for light weight stuff, but if in doubt about what will go where, use the heavier peg board and "pegs". Paint it white, the dark brown color will make your shop dismal.
Drywall makes for an easy to clean surface, but hanging things on it can get a bit trickier and moving things around that you had hung previously will leave scars, but they aren't difficult to patch. Proper drywall can add to your workshops fire resistance as well.
Wooden wall coverings look really great, and if something light in color like knotty pine is used it can work well. Hanging stuff is easy, no need to search for studs except for really heavy items, but patching holes when you move things it a bit tougher. If it's knotty pine you can disguise vacant screw holes with bits of dowel rod to look like knots, but if you use clear pine or poplar this is not as effective.
Shop Furniture
Shop furniture will include work tables and benches, cabinets, and tool bases, as well as a desk and file cabinets, shelves and a drafting table in the office. All need to be sturdy, easily cleaned and maintained, and it's nice to have them look good too. To accomplish all this you can spend about as much money on these things as you do on your tools, or spend a year building them yourself. My new workshop used to be a home, so I had more cabinetry and storage closets pre-installed than I need, in fact, I've been ripping some if them out. As time goes along I will replace or rebuild most of them because they are too frilly for my tastes; raised panel door with fancy routed edges that are horrible dust catchers.
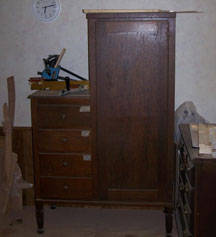
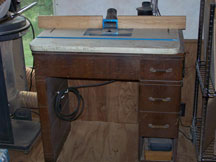 As you expand a workshop you can make use of off-cast household furniture available from thrift stores, yard sales and friends and relatives who clean out a basement. For instance, My current router table is made from an old (very old) sewing machine cabinet. It is a solid, stable piece of furniture that offers great access and several drawers for storage of accessories. I use a retired dining room table for an assembly bench, and several antique cabinetry pieces are pressed into service as storage. I try not to damage these as they are family heirlooms that may one day be called back into residential service. But for as long as they are "stored" in my workshop, they will earn their keep!
 But I have also built some custom pieces, like my roll-around clamp rack and the base for my turning lathe.
If you keep your eye peeled and get creative you can fill out your furniture needs with minimal cash investment. Then, once you are rich and famous, you can upgrade to the Norm Abram style of shop furniture.
A good, solid, heavy work bench is the heart of a woodworking shop. The exact style, size and configuration will depend on your needs. The basic elements are that it must be stable and heavy enough to stay put when you are using a hand plane on a board, needs to have vices and hold downs to help you hang onto your work, and a top that is rigid enough to stand up to chopping mortises or dovetails without bouncing every tool on the bench off on the floor. One critical element is the bench's height, and this will be different for each person, and even each use. For planing and sanding, a surface that is just below your waist level is best, for laying-out performing hand work a height about equal to the lower edge of your rib cage is good. If your bench is the same level as the top of your table saw it can be used as out feed support. A low bench can be 'amended' with a clamped on box or block for chopping dovetails, but a high bench is difficult to lower. I have seen a metal ratchet fixture that supposedly allows a bench to be raised and lowered between a half dozen or so preset heights, but have not tried it out.
Material/Supply Storage
The where and how of storing all the stuff you will need to have on hand will depend entirely on the size, location and lay-out of your shop. But do be aware as you plan a shop that you must include copious amounts of storage. Not just for tools, but for the supplies, materials, accessories, jigs, templates and fixtures you will acquire as well.
And some of this storage will need to be specialized: for instance, flammable finishing materials need to be stored in a fireproof cabinet or your insurance man will have a field day with you. Hand held power tools should be stored in cabinets or drawers that will help keep airborne dust from settling on them and getting into their motors.
Lumber needs some specialized storage as well. You can keep a small supply of stock on hand on traditional lumber racks, but sifting through it to find just the right piece is difficult. I find that a vertical rack which stands the boards on end allows me to flip through the boards much more easily, as well as providing better air flow to the boards as they acclimate to the shop environment prior to beginning a new project. Plywood needs to be properly stored or it can warp and curl. Short pieces of lumber need to be labeled and racked for easy access or you won't be tempted to use them and the collection will just continue to grow and serve no purpose.
Finishing Room
Your finishing room or area also needs some special consideration. Assuming that you will be using a spectrum of finishes, including some solvent and spirit based finishes, you will need to provide for air exchanging or cleansing. As mentioned above, activated charcoal filter panels can be purchased and used in constructing a cross-flow spray booth that will remove vapors, mist and fumes from the air, keeping your environment much more livable.
You will also want to provide for dust containment so that air borne dust does not contaminate your finishes. This is most easily done by putting the finishing area in a separate room that can be closed off by means of doors (that are kept closed except for moving things into and out of the area). If you are using a forced air heat/cooling system be sure you filter the air coming through the registers into the finishing area. Open cell foam rubber is good for this - just be sure to clean it occasionally.
If using some form of internal heat, watch out for explosion hazards. Here a vented propane wall unit with the propane flames in an enclosed heat exchanger, not open to the room is useful. An electric/oil heater can also be used as long as the heat elements are totally enclosed.
You will want plenty of room to work. I find that a finishing spinner helps a great deal. This is just a large lazy Susan built to accommodate whatever size work you plan to do. I have one that is about 3 feet in diameter that can be set up on a low base, about 12" high, for working on small furniture, or removed from its base and attached to a folding work bench when finishing small items. I plan to incorporate a 5 foot diameter version into the floor of the finishing room for finishing large furniture. I also employ some specialty drying racks for some things, like our bag handles, that we make in quantity. Hanging them on a rack to dry means we can finish 50 pair or so in a single batch. Leaving them laying out on a table would be far less efficient.
You will also want to have a small table or bench close at hand to use in preparing and cleaning your tools and supplies. Having this table on casters is especially handy for keeping your tools of the trade at hand as you move about the room, especially when working on a large piece of furniture.
Good shadow free lighting is essential. Place your lighting around the finishing area so that light falls on the piece being finished from several different directions and so that you don't cast a dark shadow across the work as you work. It is especially helpful to use lighting that emulates natural sunlight. Not only is this good for color matching, but it shows up things that you won't see under other lights. I can't tell you how how many times I have refinished a chair in an incandescent equipped workspace and it looks great, but as I'm taking the finished piece out to the truck for delivery I look it over again and say, "Oh, man, how did I miss that?" and back in it goes to re-do something that the sunlight showed up.
You will also want an air-tight bucket in your finishing room for disposal of rags used in staining and finishing. If you are careful, you can spread rags out on a floor or bench until the solvents cure out, then dispose of them. But, as you know, piling up several wet finishing rags is an invitation to fire.
While on that subject, if you have a sprinkler system no where else in your shop, you should consider installing one here, for this is one of the most likely sources of fire in your shop.
Hopefully this has given you some pointers that will help you prevent having to gain experience the hard way; as it is said:
Experience is what we get from making mistakes, and mistakes come from a lack of experience.
Douglas Bittinger has been building custom fine furniture for over 25 years, and has been lead repair tech for a major furnishings retail store chain.
Along with his wife, Marie, he currently operates
Smoky Mountain Woodworks
in Edwina, TN.
For your convenience, here are links to all the articles in the "Going Pro as a Woodworker" series:
Taking the Plunge into Professional Woodworking
Is Self-Employment
Right For You?
A Suitable Workspace
Tooling Up
Finding Good Suppliers
Financial Tools
Setting Prices
Marketing Your Work
Hiring Employees
Retiring to Management
Return to
Wood News
front page
