by Steven D. Johnson
Racine, Wisconsin
(Page 2 of 5)
Previous Page
1
2
3
4
5
Next Page
Torsion Box Bench Hook
High on the list of must-have, super-simple, easy-to-use workbench accessories, along with a
shooting board, is the venerable bench hook. Essentially just a work-holding device, the bench hook
can be used as a sawing guide for straight and angled cuts and can be used as a planing stop for
small parts. The simplest, built in five minutes or so, will consist of a base, a fence, and a
"hook" on the underside.
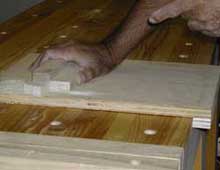
In use, the bench hook is placed on the bench with the fence in front of you, and the hook on the
underside against the workbench. The work piece is held against the fence, and as you can see in
the photo, the weight and pressure of holding the work piece holds the bench hook stable against the
bench.
This bench hook, perhaps my twentieth, might last a few weeks or months, and I will slap together
another in five or ten minutes when this one is worn beyond functionality. But, based on the
success of my recent shooting board design (see "Building a Shooting Board" article and video), I reasoned it might be possible to improve on the basic bench hook.
In addition to its basic functionality, there were some corollary benefits to the shooting board
design that have proven to be quite useful. The quasi-torsion box construction is rigid, heavy, its
surface is dead flat, and the design gives the shooting board extra height above the workbench. The
French cleat underneath allows the board to be hung on the wall, out of the way, when not in use.
And by leaving the French cleat-equipped end of the torsion box open, there is some storage inside
the box. Multiple fence options such as the 45-degree miter fixture and so-called donkey ear
fixture allow me to save the space of several purpose-built shooting boards. The bench hook should
be even easier to build than the shooting board, and using some of the same ideas, should be just as
versatile.
As with a shooting board, size is not critical. The fixture should be built to accommodate your
bench, your comfort, and your style of working. I wanted my new bench hook to span across my entire
bench width so that I could work it from both sides. In order to hang the bench hook out of the
way, it also needed to accommodate a hook on one end and a French cleat on the other. If you prefer
a shorter bench hook, the French cleat could serve double-duty as the hook.
Building is easy. Start by cutting equal size top and bottom pieces from plywood, MDF, or any
straight stable material you have on hand. I used ¾" ply. Then rip spacers to equal width. You
will need at least two the length of the top and bottom pieces and several short lengths to span the
width.
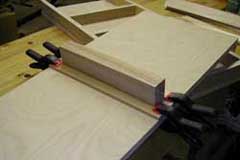
With the bottom piece on a flat surface, glue the two long pieces into place, and after they are
set, cut crosspieces to fit between and glue them down. While this is drying, rummage through your
scrap bin and find some suitable pieces of hardwood for a fence.
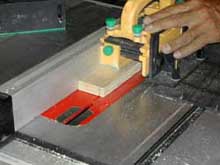
When sawing on a bench hook, the saw will inevitably cut into the base, knick and mar the fence,
and over time, render the bench hook inaccurate at best, or at worst, unusable. To make the torsion
box bench hook last longer, sacrificial replaceable fences with broad bases are the answer. As you
complete a saw cut, the saw will cut into the extra wide fence base, not the torsion box bench hook
itself. Make the wide fence bases from ¼" plywood or hardwood. I used hardwood drawer bottom stock
leftover from a previous project. Cut the length of the fence base to match the width of the torsion
box.
|
|
|
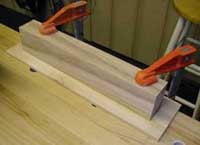
My fences are Ash, but could be made of anything that is milled straight and true. Make the
fences shorter than the overall width of the bench hook and the fence base by an inch or so. If you
plan on using the bench hook from both sides of the bench as I do, make the fences a couple of
inches shorter and center the fence on the fence base. Glue the fence to the fence base, making
sure to keep the pieces square. I made a square fence, a fence with 45-degree ends, and cut a
couple of additional pieces of the ¼" stock the same size as the fence bases to be used as planing
stops.
|
|
|
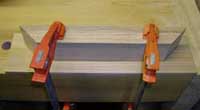
By this time, the bench hook base and spacer strips should be dry. Before gluing the top on the
torsion box, mark out three hole locations where the fences will be mounted. Clamp one of the
fences into its intended location and drill quarter-inch holes from the under side through the
plywood and into the fence. My plywood torsion box top was too big to wrestle to the drill press,
but I wanted really straight and true holes, so I used a drill guide and a hand held drill. If you
are really good with a drill, go for it "free hand." After the box top and first fence is drilled,
use the hole locations in the torsion box top to mark the hole locations for the other fence(s) and
the quarter inch planing stop stock. Use a quarter-inch brad point bit through the plywood top to
mark the locations of the additional fence holes. Drill holes in these pieces as well. Make as many
fences as you want at this time – you will use them all sooner or later.

|
|
|
Glue ¼" dowels into each of the holes in the fences. These dowels will provide a friction (dry)
fit into the torsion box top and will allow you to easily remove and replace the fences. At this
point glue the torsion box top onto the assembly and add the French cleat and/or the bench hook on
the bottom side of the torsion box, and your new bench hook is complete.
In the video (Building a Bench Hook) more construction details are shown and the use of the bench hook is demonstrated.
You will also see how I built a couple of additional torsion boxes and how I plan to use them.
(Page 2 of 5)
Previous Page
1
2
3
4
5
Next Page
Return to
Wood News
front page