
|
|
|
Show Your Stuff!

This month we are featuring several impressive pieces made by Tom LeRoy.
CLICK HERE to take a closer look at this plate rack along with a number of other beautiful pieces:
Show Us Your Wood
Carving!

In this month's column, we have many intricate carvings by Denis Hermecz, who specializes in beautiful door designs but seems to have tried a bit of everything and does it all beautifully!
CLICK HERE to take a closer look at many of Denis' pieces:
Tips From
Sticks-In-The-Mud Woodshop
 By Jim Randolph
Long Beach, MS In this month's "Tips From Sticks-In-The-Mud Woodshop", Jim Randolph shares a few finishing tips he has learned over the years. CLICK HERE to read this month's tips from Sticks-In-The-Mud Woodshop!

Doug Lewis keeps an eye on his own comfort level before making a cut...read his tips to find out more.
CLICK HERE to read Doug's Tips:
This Month on
The Highland Blog The Chair-Man: Building a Windsor Chair by Hand

Terry Chapman is off on another woodworking adventure, this time to New Hampshire to make another windsor chair with Mike Dunbar.
Read his thoughts on getting ready for the trip on The Highland Blog:

Charles Brock has singled out the specific tools he uses when building his sculptured
chairs and listed them in one place for easy selection by woodworkers
undertaking this challenging project.
Check Out the Tools of the Trade:
Finishing Wood
with Alan Noel 
Using Wood Putty Wood putty is a very useful tool for filling nail holes and small cracks during the building process. The two most common types are lacquer based and water based. Once cured, both types can be a problem to touch up in the finishing process because the binder that is used in each type will refuse to accept color. Here are NINE tips to help you with finishing after using Wood Putty:
|
Inside This Issue
Show Your Shop!
For this popular monthly column, we invite you to SEND US PHOTOS of your woodworking shop along with captions and a brief history and description of your woodworking. (Email photos at 800x600 resolution.) Receive a $50 store credit if we show your shop in a future issue. 
This month we are featuring the Templeton, PA workshop of WinterHawk, who makes beautiful Native American style flutes.
CLICK HERE to take a closer look at WinterHawk's shop:
Our May Lie-Nielsen
Tool of the Month: The #101 Bronze Violin Maker's Plane 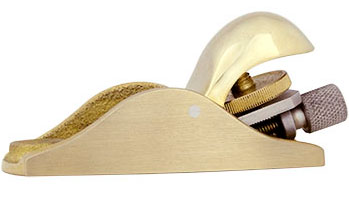
Read Lee Laird's blog post about the Lie-Nielsen #101 Violin Maker's Plane to find out more: Take a closer look at the #101 Violin Maker's Plane:

By Steven D. Johnson,
Racine, Wisconsin
Open Letter To Manufacturers
Mobile Sanding Center – Design and Materials Shop Overhaul (Really? ...Already?) It Got Hot In Her Kitchen... Coffee Table Project – Finished!
 In his column this month, Steve addresses tool manufacturers with an open letter asking for better specification sheets and instruction manuals. Do you agree with Steve that what is available from manufacturers is lacking? We then get a peek at the final design of Steve's Mobile Sanding Center, as well as his next project - an overhaul of the 2nd floor of his shop. And finally, Steve recounts another perspective on how much shop space you really 'need', and then provides some long awaited pictures of his finished natural edge coffee tables. And boy do they look nice!
But first, do you agree that you want more information about the tools you buy?
|
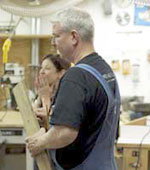
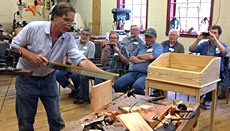 Roy Underhill's April Visit to Highland Woodworking
Roy Underhill was his usual entertaining self during his class at our store in Atlanta on April 28, 2013. Above he demonstrates his custom "one stroke" Lie-Nielsen dovetail saw. See more photos from the class, and a video of the saw in action: 
CLICK HERE to see our April episode:
Seven Steps to Peak Handplane Performance
By J. Norman Reid Delaplane, VA
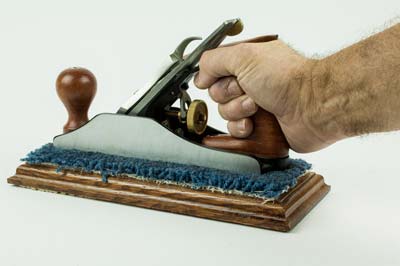 You've just purchased that new smoothing plane you've had your eye on for so long. Or you've lovingly brought an older Stanley to bright and shiny condition. And now you're ready to put a fine finish on a treasured piece of wood. But is your plane ready to make the wispy shavings you're hoping for? What can you do to set up your plane for the best results?
CLICK HERE for seven steps to get peak performance from your hand planes:
Ask the Staff
Question: In the woodworking plan I am using for a project, the directions call for a 1/2 inch rabbet bit to cut a 1/4 inch rabbet in the middle of each drawer divider. It is a curved edge. How can you tell that your bit is going in 1/4 inch?
E-mail us with your woodworking questions. If yours is selected for publication, we'll send you a free Highland Woodworking hat.
WOOD SLICER
Testimonial

So it’s been 20 plus years since I bought my 9" Delta band saw. I was really looking forward to having a saw to do shapes and just take a nick off a block of wood. So for 20 years it sat on my bench and I NEVER EVER was able to make the slightest bit of a straight cut with it. I tightened, loosened, searched the web. You name it, I tried it. Mostly it just sat there taking up space. I saw your demo for the wood slicer blade and thought that might be the trick but you only go down to 70.5". THEN I saw the Rikon 10" bandsaw on sale, watched the video demo and I bought it as well as the wood slicer blade. It arrived today. I set her up and made the prettiest STRAIGHT cut with it. Yippee! I showed it to the old Delta, and told it THIS IS THE WAY TO CUT WOOD, but it wasn’t impressed. Finally I’m going to be able to use a band saw! Thank You! — Bob M. Get Yourself a Wood Slicer:CLICK HERE to watch a video tour of the Wood Slicer:
|
|
||||

Copyright ©2013 Highland Woodworking, Inc.
www.highlandwoodworking.com www.woodnewsonline.com |