Building an Electric Bass Guitar: Part 6 - Final Details
by Lee Laird
Click on any picture to see a larger version.
CLICK HERE
to read Part 1 of the Electric Bass Guitar Build - Design Considerations
CLICK HERE
to read Part 2 of the Electric Bass Guitar Build - Creating the Neck
CLICK HERE
to read Part 3 of the Electric Bass Guitar Build - Making the Fretboard and Neck from Scratch
CLICK HERE
to read Part 4 of the Electric Bass Guitar Build - Gluing the Fretboard, Cutting the Headstock and Installing the Tuners
CLICK HERE
to read Part 5 of the Electric Bass Guitar Build - Installing the Frets, Bridge, and Saddles
This is the last part of a multi-part article, relating to building a Bass from my own design.
The previous sections are available in the links above, for anyone
wishing to either start from the beginning or go back to see what took place earlier. Let's get this
bass finished...
As I mentioned last month, the Bass's balance was a bit on the body-heavy side, so I decided it
was time to change it. I drew a proposed cut line, allowing me to stand back and assess the visual
impact. After tweaking the line a couple of times, everything looked good, so it was time to remove
a portion of the body, a little bit behind the back of the bridge. I removed the marked area on my
band saw, even though I could have accomplished the same almost as quickly using the bow saw I made a
couple of years ago. After the cut, I blended the freshly band-sawn surface into the existing smooth
perimeter, using my low-angled spoke shave. This shave is amazing in how it can handle a relatively
thick shaving, and still leave a really nice surface. A very efficient tool to have in the kit.
After updating the body of the bass, I sat back with the bass in playing position, and it was
obvious the balance adjustment was successful. It can be a bit scary at times, when building an
important piece, and you realize some aspect of the design isn't matching up with reality. We can
sometimes get too close to our projects, as I likely was with my bass, but there comes a time
when either something works or changes must be made. I just tried to look at my situation as
logically as I could, minimizing any emotions that might stall my progress.
Now that the body was coming together, I wanted to install some strings so I could see how much
material I'd need to remove at both the nut and the saddles, since I expected the playing action to
be much too high. After feeding all four of the strings up through the end of the bridge, I was
shocked by what I saw. When the strings began to wrap around their respective tuners, and the
tension began to push the nut around, I quickly became aware of a major difference between bass
strings and guitar strings. Guitar strings are quite a bit smaller in diameter (the thickest is the
low E for guitar, and it is around .050" compared to the low E on the bass of .105") and with that
diameter differential, comes a whole lot of extra force. Specifically, on the guitar, some designs
utilize the ability to have the strings come off the tuner and enter the nut at a small side-angle
(e.g. not directly in line with the nut-to-saddle path towards the other end of the guitar). While
the smaller diameter strings have an amount of "give", the heavier bass strings have very little,
and that was the crux of the problem. The position of the tuners on my bass's headstock fed the
strings into the nut with enough of a side-angle to cause disaster, and it was immediately obvious
the tuners would not work in their current locations.
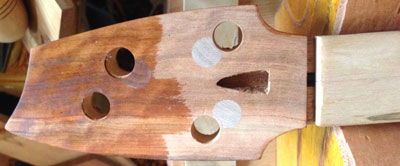
After looking at the possibilities, I decided the best choice was for me to turn some plugs out
of some cherry scrap I had on hand to fill the tuner holes. This allowed me to quickly
create plugs on my lathe that fit the exact size of the holes, and with a known species of wood that
can handle the stress. I glued each plug into the holes and left a little proud on both sides of the
headstock, which I pared flush with both surfaces after the glue completely dried. I thought about
applying a thin veneer to both sides of the headstock, which would easily conceal the change, but I
decided I'd leave it as a recurrent reminder for myself. I think I may call this my Frankenstein
Bass, as it will have a scar or two.
With the headstock back to solid, I laid out the string paths and offset the tuners to match, while
also including half the diameter of each string. This, in theory, should provide the exact center of
each string, relative to the anticipated string path. This also required me to revisit the location
(up or down, along the string path) for each tuner, to make sure none would interfere with the
others. After choosing the best placements, I drilled the new tuner locations on the drill press and
then reinstalled the tuners.
|
|
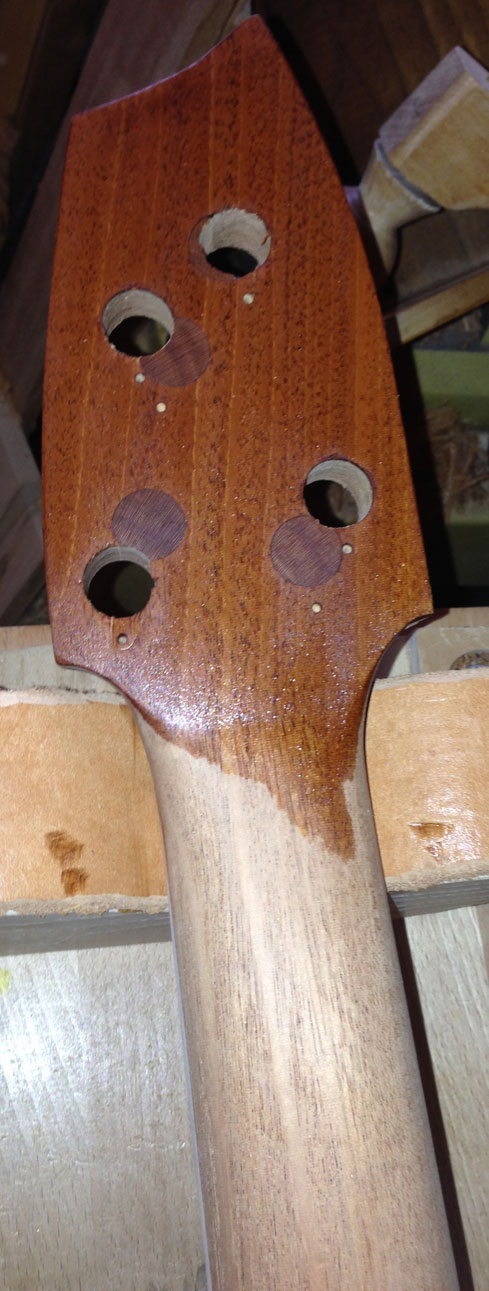
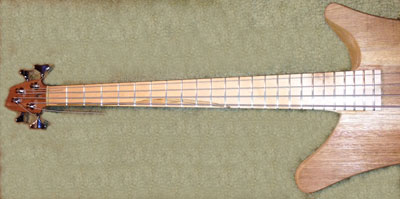
The headstock above is already re-drilled and the plugs are very obvious. Top of the
headstock has the first touches of Danish Oil applied, to see just
how much change in color it would make.
|
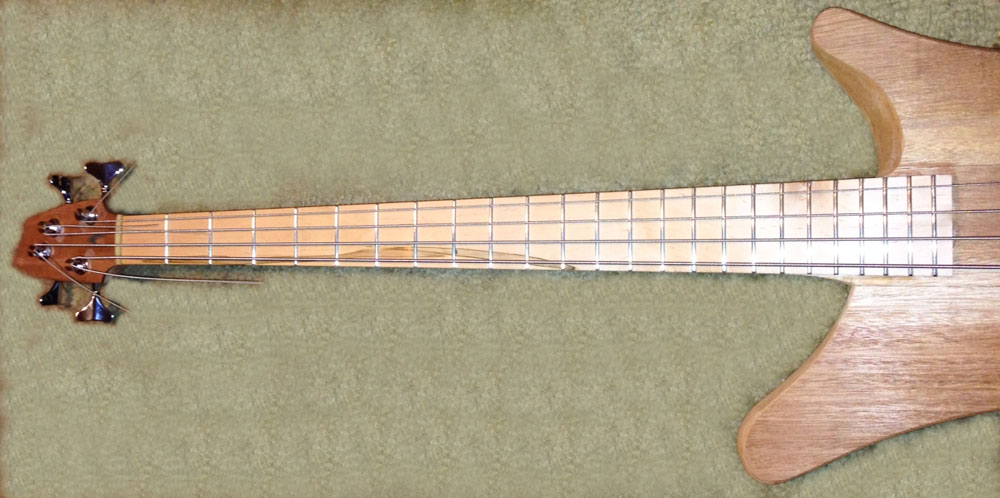
It was finally time to again install the strings. This time the strings lined up beautifully with
the nut and the bridge saddles, so I put a little tension on the strings to determine how the
height of the saddles and nut looked. The strings were extremely high, as I'd anticipated, so I
started the lowering process by focusing my efforts on the saddles. I marked the location where each
string crossed over its respective saddle, and estimated approximately how much too high each
saddle was.
|
|
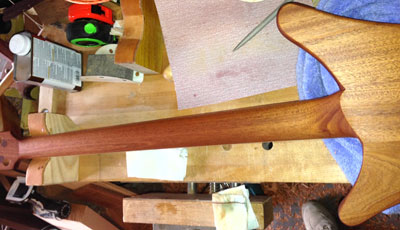
Bass with strings on and lining up nicely
|
I removed all of the saddles from the bridge, and again took them to my clamping jig. Using a
small round file, I made each of the notches at slightly different depths, based on what I saw while
the strings were installed. I reinstalled the saddles into the bridge and replaced the strings to
see what type of impact the notches made to the string height. There was improvement, but the area
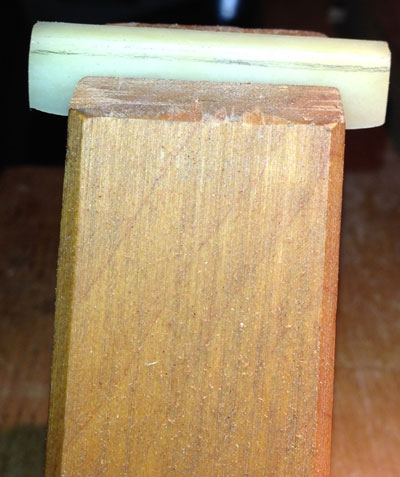
closest to the nut was still too high. I removed the nut and marked its base an equal
distance up from the bottom. Since the nut was presently sitting properly in its slot, removing the
same amount across the bottom should leave the nut sitting squarely in its slot. And it did!
|
|
Nut upside down in my vise jig, with line I drew to keep
the bottom in the same orientation
|
I started removing material from the bottom of the nut, using a somewhat coarse file, making sure
to check progress often so it wouldn't get too far out of square. I also kept my hand pressure as
even as possible, and waited until I felt the file match the bottom of the nut, before starting any
stroke. When I started approaching the line that I drew around the base of the nut, I shifted to
some fine sandpaper on a known flat surface. Again, the location where pressure is applied is
extremely important, so I focused on centralized pressure and carefully moving straight back and
forth. I put the nut back onto the bass and re-tensioned the strings, which showed a very nice
improvement in string height. I can always go back and tweak the nut and/or the saddles if it feels
like the playing action is still a bit high. At this point though, I'm calling the nut done.
I reattached the strings and noticed the distance between the neck and the strings, close to the
nut, was starting to grow as I increased the tension on the strings. This wasn't a surprise since
I'd not yet tightened the truss rod, which applies pressure in the opposite direction of the force
of the strings, keeping the neck somewhat straight. Changing the truss rod's adjustment in the
clockwise direction causes the neck to have a slight rearwards force. If you go too far with this
direction of adjustment, the strings will usually buzz against some of the frets closer to the nut.
If you experience this, turn the adjustment nut counterclockwise slowly until the buzzing stops. *If
you do not feel comfortable with this type of adjustment, take your instrument to your local music
store, and a qualified repair person can quickly handle this. After I set some tension on the truss
rod, I tuned the strings up to final pitch, which I prefer to use a half-step down from standard
tuning, to match what I use on all my guitars. The strings played great, with no sign of any
buzzing, so no further truss rod adjustment was needed at this time. The bass sounded reasonably
good acoustically, even though it sounded slightly out of tune in the upper registers, which isn't
much of a surprise before a complete setup is performed. During a complete setup, along with some of
the procedures I've already mentioned, the position of each saddle on the bridge is validated (also
know as setting intonation), verifying that each string at the 12th fret plays the same note as when
the string is played open (or in other words, unfretted), just an octave higher. If the two notes
played are not the same, the saddle must be moved either towards the nut, or away from the nut. Most
bass bridges have a screw that feeds through each saddle, and by turning the screw (clockwise moves
the screw away from the nut, and causes the 12th fret note to be less sharp, compared to the open
note; counterclockwise is the opposite results) you move the saddle until the notes match. One of
the best measuring tools to use when adjusting the saddles is a strobe tuner, which has a high
degree of pitch accuracy that allows for perfect saddle alignment and intonation. Most strobe type tuners
have a jack where either an electric instrument or an external microphone can plug in, while some of
these tuners also have a built-in microphone, which is necessary when tuning instruments that are
acoustic in nature (e.g. a non-electric piano, a cello, an acoustic guitar). Since the bass
doesn't presently have a pickup installed, I used the internal microphone on my tuner. Before I move
on, I want to make sure to let you know that you CAN make this saddle adjustment with nothing more
than your ears. Your overall results will directly relate to your ability to hear and recognize
extremely small differences between the pitch of two notes.
This is the point where I would normally install the electronics, including the pickup, volume
control and the output jack. Unfortunately, I am still waiting for these pieces, and I always work
directly from the parts in my possession to make sure everything matches for a custom fit.
Some pickups are active (which means that they require a 9V battery to operate, and the usual benefit
is very little background noise) and others are passive, indicating the magnets in the pickup
work without any batteries. I will install a passive pickup on my bass, as I've always been more
fond of the tone they provide, but I could swap it out sometime in the future to "test the waters".
Besides deciding on the pickup's electronics, the pickups also come in a few different shapes, as
well as heights. Some instruments have extra room under the strings, just in front of the bridge, so
a pickup might be mounted so that it just sits on top of the body. On my bass, I anticipate I will
need to route at least a shallow opening for the pickup, to make it sit low enough so the strings do
not contact the pickup when pressing the string down to fret a note or during the vibration of the
string. It might seem that the tension on the strings is so significant that the oscillation of the
strings, back and forth, shouldn't really need to be considered. If you set the height of a pickup
so the strings just barely clear the pickup, while the strings are at rest, you might be surprised
when there is a buzzing sound when you start to play (at least on fretted notes). Some pickups are
designed to sort of "float" when installed, as the pickup itself isn't directly attached to the
body. These have what is called a pickup ring, which is attached to the body with 3 or 4 screws, and
then a long screw is fed through a hole in the ring and into the threaded pickup holes. Other
designs are screwed directly to the body, even if they are recessed into a matching hole. You can
try both and see what sounds best to you, as there are many players in each camp.
In the cavity I
drilled in an earlier process on the back of the bass, I will need to drill a hole through the top.
This is for the volume control, and depending on your setup, can have: just the volume control,
volume and a tone control, or if you have two pickups there can be two of each control (along with a
switch to choose which pickup is transmitting sound). There is one more hole I'll need to drill, and
that is for the output jack, which I usually place on the rear of the instrument. The connections
I'll make with the soldering iron, are as follows: taking the hot wire from the pickup and soldering
it to the left lead on the volume control. The other pickup wire will get soldered to the back of
the volume control (or to the third lead on the volume control, and then the control is also
soldered so it is against the back of the volume control), which will be the electrical ground
connection. A wire is soldered to the center lead on the volume control, and the other end will get
soldered to the tip connection on the output jack. Another wire is soldered to the back of the
volume control (ground) and the other end to the sleeve connection on the output jack, along with
the ground wire that is in contact with the bottom of the bridge. This may sound somewhat confusing,
and if you don't care to install the electric portion on the bass, again a trip to your local guitar
repairperson is a valid way to handle this work.
I always test my instruments with the cavity cover
left off, so I can validate everything is functional before closing it up. I usually make the
cavity cover out of a rigid plastic, and have used a clear plastic once, which allowed me to see
through it to determine how large I should make it. This was somewhat helpful when I changed the
design of the cavity on my Les Paul, so I could make room for other electronics. I pre-drill the
holes in the cavity cover, so they will sit flush or slightly below the surface. I then use the
cavity cover as my template to create a matching recess in the instrument back, and also to mark the
exact location for the screw holes. The last step is to paint the clear plastic, unless you like the
visual aspect clear provides. ***(I plan to write additional information regarding the actual pickup
install, after I have the electronics in possession. This will be on my personal blog:
Leelairdwoodworking.com
. Feel free to
check into my blog in the not-too-distant future, if you are interested in that type of further
information.)
Now that the intonation is set, the bass sounds like it is supposed to sound, while playing all
over the fingerboard. During this playing, to make certain all was right, I became more aware of an
issue I'd noticed earlier, but was now pushed into the spot light. The lower cut-out area I made, on
the thinnest-string side of the bass, wasn't pronounced enough and the interaction between it and
the heel of the neck needed some help. As there was a fair amount of wood I decided to remove, I
started by using some of my full-sized Swiss carving gouges to rough out both the cut-out and the
heel of the neck, and then followed with my Auriou rasps (#9 and then #15) and then sandpaper in a
range of grits.

|
|
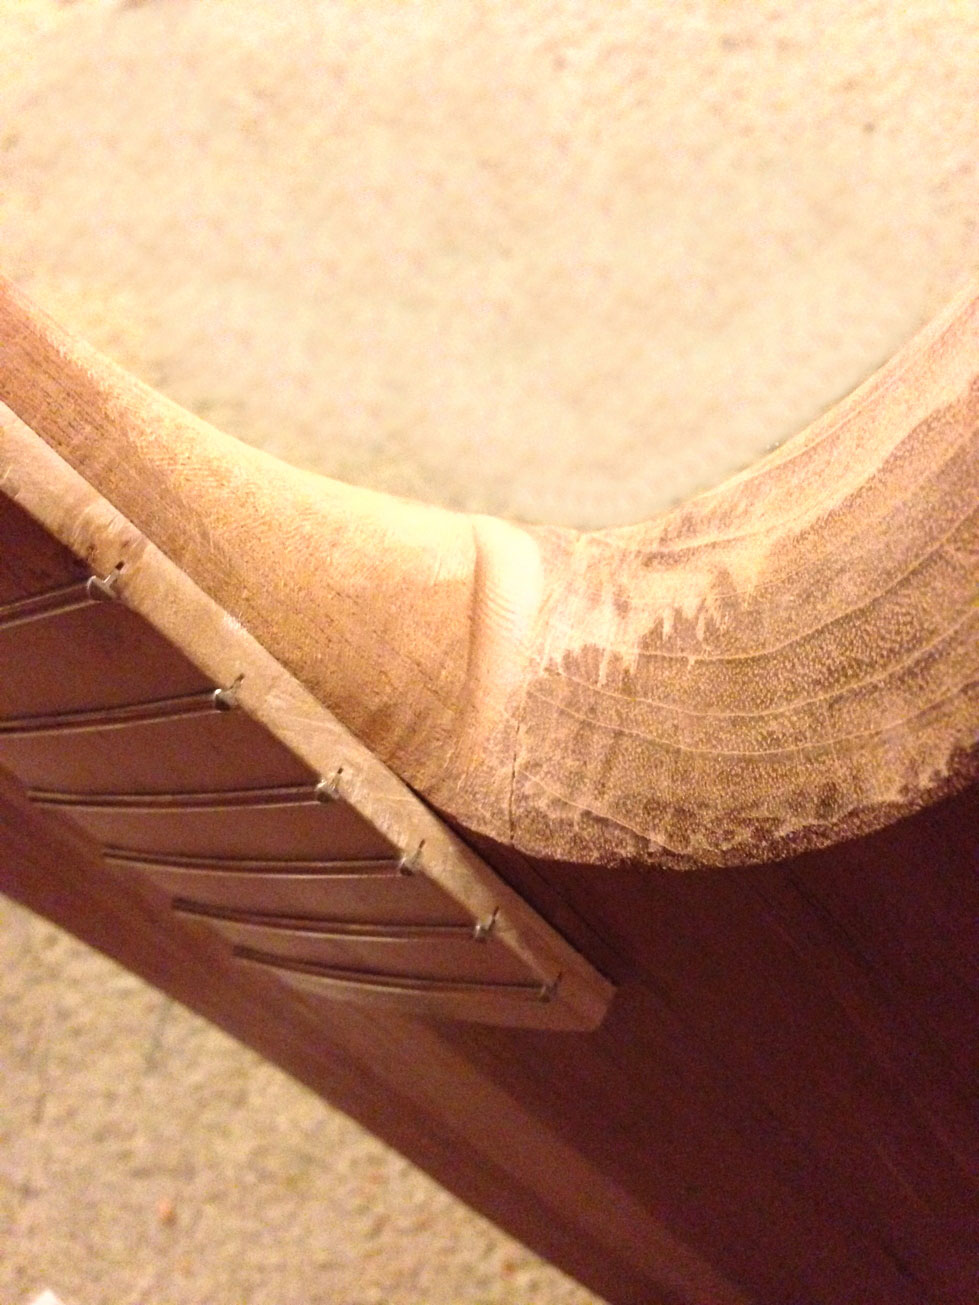
Still working to remove material from the side of the neck
and in the cutout, so playing will be easier
|
This allowed playing on the highest frets with much less contortion than I originally
experienced. Just remember to take this type of removal slowly, making sure not to work against the
grain's direction, especially with the gouges. Also, I ratcheted my movements down even further,
when I was getting close to the fingerboard intersection. This area can be very hard to repair, if
you take a big gouge out of the edge of the fingerboard, or you hit this area with a coarse rasp.
I thought I might try leaving the surface on the bass's body, directly from the spoke shave
and/or plane, as the clarity and glow is top notch. Unfortunately, there were some small areas that
I just couldn't quite get to behave, so in the end I sanded the body, neck and headstock. I sanded
from 120-grit up through 220-grit, stopping at that level to apply some Danish Oil.

|
|
The headstock and the horn on the lower section of the
body are showing how the rest will look after the Danish Oil
is applied. The headstock veneer is curly Cherry
and the body Mahogany
|
I drilled and attached the two strap buttons, one on the upper horn and one at the center portion
on the rear edge of the body. I like to use the buttons that lock the male section, that is
pre-attached to the guitar strap, once it is inserted. There is much less chance that the strap can
accidentally slip off, and have your important instrument possibly crash to the floor.
When I originally started this bass, I wasn't quite sure if I wanted to spray a Nitro finish on
my bass, like I did on my Les Paul, or go with an oil/varnish blend. I chose to use Danish Oil, as
it soaks into the wood, and depending on how many coats are applied, can range from warm to somewhat
glossy finish. I applied the Danish Oil somewhat liberally, wiping off any excess with a dry rag,
and making sure to let it sit until it was dry.
|
|
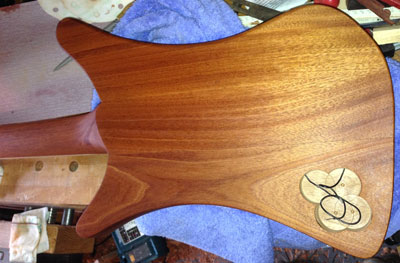
Body of bass while the second coat was drying.
|
After the second coat was dry, I went back and lightly sanded with 320-grit sandpaper, which
knocks down any little dust nibs. I decided to sand up through 800-grit and then applied two more
coats of Danish Oil (the oil-application portion is something I do, even if I had stopped at
320-grit). I find the Danish Oil I applied earlier seems to act like it locks the wood fibers
together, so the subsequent sanding with finer grits works faster and more efficiently (you really
don't need to do much more than a light sanding with the finer-grit paper held around a felt block,
touching all of the surfaces). The "locking wood fibers" aspect may be a figment of my imagination,
but it has worked well every time I've tried, and on every species of wood on which I've applied it.
You will noticed the Danish Oil doesn't penetrate as much, after the finer-grit sanding. With this,
don't apply the Danish Oil too liberally (almost sparingly is best, while ensuring you cover all the
surfaces), but make sure to check the wood after it sits for a few minutes. Some areas of the bass
absorbed the Danish Oil much more readily, so I reapplied to those areas, until all areas are no
longer accepting oil. Using a dry rag, I wiped off all of the excess finish, and again checked it
after a couple of minutes. There were a few spots that released some more finish, after the short
wait, and I repeated this a couple of times until there was no further signs of excess oil. After
the last coat of Danish Oil is completely dry, I'll likely apply a nice high-grade wax, which is
something I've used often on this type of surface. While I love the wax on furniture and
boxes I've made, I'll have to see if this also works on my bass.
|
|
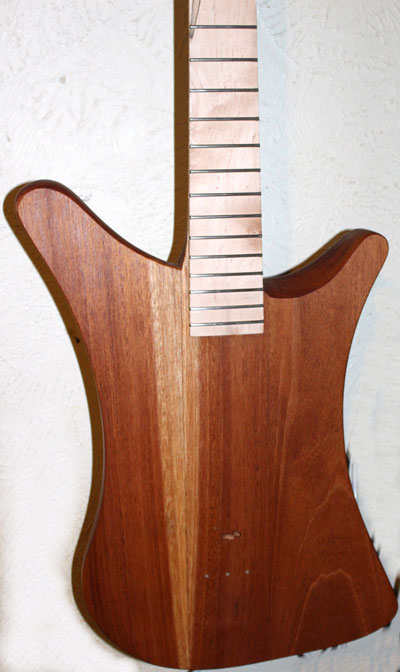
The back of the bass after sanding up through 800-grit,
just waiting to finish drying, so it can get some wax
|
|
|
This photo shows the heel/back connection and up the neck. So close to dry
|
The finish on the bass is taking a little longer to dry than planned, as we have higher humidity
right now. I bought fresh Danish Oil just before applying it, to make sure I didn't use an old mix
that might not ever cure completely. Now is the time to be patient. After the wax is on and buffed,
it'll be time to again install the hardware and play it acoustically until the electronics are
here.
Thanks to everyone that followed the build over the last few months. It was a great deal of fun and
pressed my skills in an enjoyable way. If you've ever thought about building a guitar or bass, now
may just be the time. Please let me know if you have any questions or comments.
Lee Laird has enjoyed woodworking for over 20 years. He is retired from the U.S.P.S. and
works for
Lie-Nielsen Toolworks as a show staff member, demonstrating tools and training customers.
You
can email him at
lee@lie-nielsen.com
or follow him on Twitter at
http://www.twitter.com/is9582
.
Return to
Wood News
front page